While playing D&D, I wondered: Is there any difference between rolling 1d8×2 (that is, rolling exactly one d8 and multiplying the result by 2) and rolling 2d8 (that is, rolling exactly two d8s and not modifying the result)?

(For those who don’t know, a d8 is an eight-sided die. A six-sided die is a d6; the 20-sided die is the d20; and so on. In D&D, the d20 is used to check whether something succeeds, and other dice such as d4s, d6s, d8s, and d10s are used to measure damage dealt or occasionally to pick a random one of a small pool of (possibly unknown) choices.)

The intuitive answer is no, they’re equivalent. As is typical in statistics and probability, the intuitive answer is wrong.

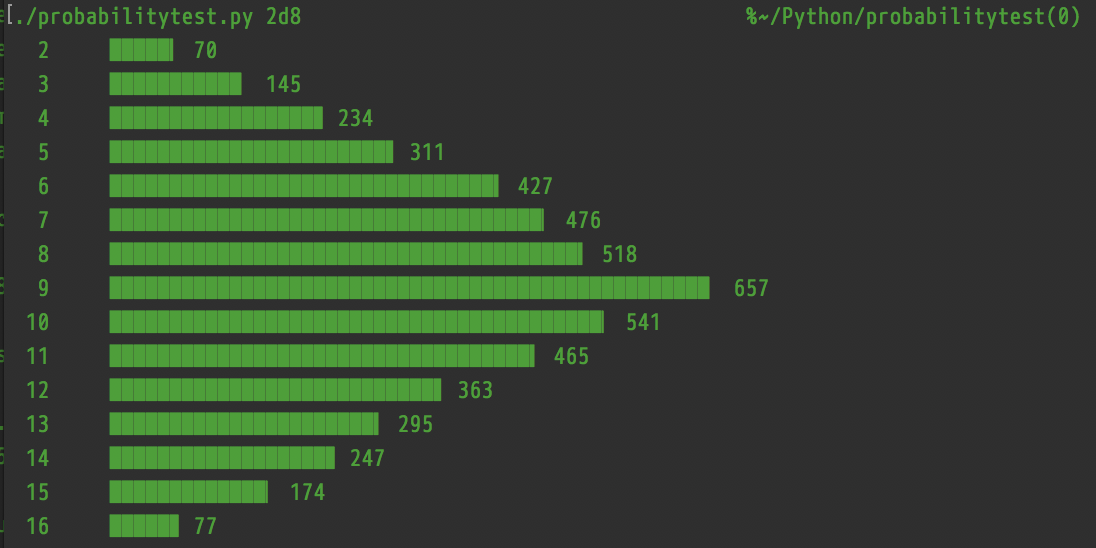
I wrote a Python script to simulate 10,000 dice rolls, store the natural results of those rolls for later measurement, and then use them to graph out the results of as many of the requested roll as possible. You tell it something like “1d8x2”, “2d8”, or “1d8x2+4”, and it prints out a histogram of how many times each total result came up.

With 1d8, the distribution tends toward uniform (I used Python’s `random.choice`, which is based on `random.uniform`):

Results of 1d8: Pretty much every face comes up 1250 times, plus or minus 20, out of 10,000.

1d8×2 uses exactly the same rolls and simply multiplies the total of the natural rolls, so it produces exactly the same histogram, except distributed over 2–16 (stepping by 2) instead of 1–8:

Results of 1d8x2: Pretty much every face comes up 1250 times, plus or minus 20, out of 10,000. Each face is then multiplied by 2, which changes the final result of each roll but not the histogram.

2d8, however, changes the distribution dramatically:

2d8 produces a bell curve centered on the median result, which is 9 (one higher than the highest result of 1d8). The lowest and highest results, 2 and 16, are the least likely by far.

If this is a damage roll (the moment that inspired this experiment was when I landed a critical hit), 1d8x2 means you’re equally likely to do any amount of damage, including both the minimum and the maximum, whereas 2d8 not only doubles the range (from 1–8 to 2–16), it also makes the lower end of that range much less likely, and makes the high end of the original range (the middle of the new range) the most likely.

There is another aspect to the question of whether to double the result or roll the dice twice, and that’s what does the Player’s Handbook (or equivalent if you’re playing something other than D&D) say?

The D&D 5.0 Player’s Handbook says:

When you score a critical hit, you get to roll extra dice for the attack’s damage against the target. Roll all of the attack’s damage dice twice and add them together. Then add any relevant modifiers as normal. To speed up play, you can roll all the damage dice at once.

For example, if you score a critical hit with a dagger, roll 2d4 for the damage, rather than 1d4, and then add your relevant ability modifier. If the attack involves other damage dice, such as from the rogue’s Sneak Attack feature, you roll those dice twice as well.

So the 5e Player’s Handbook makes crystal-clear that, in the circumstance that inspired this experiment, 2d8 is the correct roll. Fortunately, that’s what I did—but now I can be more certain of that going forward, partly because now I understand why.

Review: Raspberry Pi 3 Model A+


2020-01-02 20:47:09 -08:00

TL;DR: It’s $25 (not including case); it’s good; you should get one and set up Pi-Hole on it.


Quick history recap:

When the first Raspberry Pi was introduced, it came in models A and B. Initially, the only differences were Ethernet (the B had it; the A didn’t), USB (the B had two USB ports; the A had only one), and RAM (the A had half as much).

Later, they introduced the B+, with more GPIO (general-purpose input/output) pins.

Then they introduced the A+, with all the guts of the Model A, and the larger GPIO pinout—but on a smaller board, over 20 mm shorter on the board’s longer dimension. (The A+ is still not quite square, but it’s a lot closer.)

Both of the original A models, however, suffered a big drawback over the B and B+: No networking.

On a B or B+ board, you could plug in hard Ethernet, or use your other USB port to plug in a Wi-Fi dongle. No contention with your USB keyboard and mouse (or Bluetooth dongle). On an A or A+ board, with no Ethernet and only one USB port, you had to choose between your input devices and a network connection—or else add an external USB hub, at which point you might as well just get a B+ in the first place.

The second generation skipped having any sort of Model A entirely. There was only the Model B.

The third generation was the first to have built-in Wi-Fi and Bluetooth. Like the second generation, it debuted as only a Model B, which supported only 2 GHz Wi-Fi (no 5 GHz). Two years later, that was succeeded by the third-generation B+, now supporting 5 GHz Wi-Fi.

The B+ was followed a few months later by the return of the Model A+.

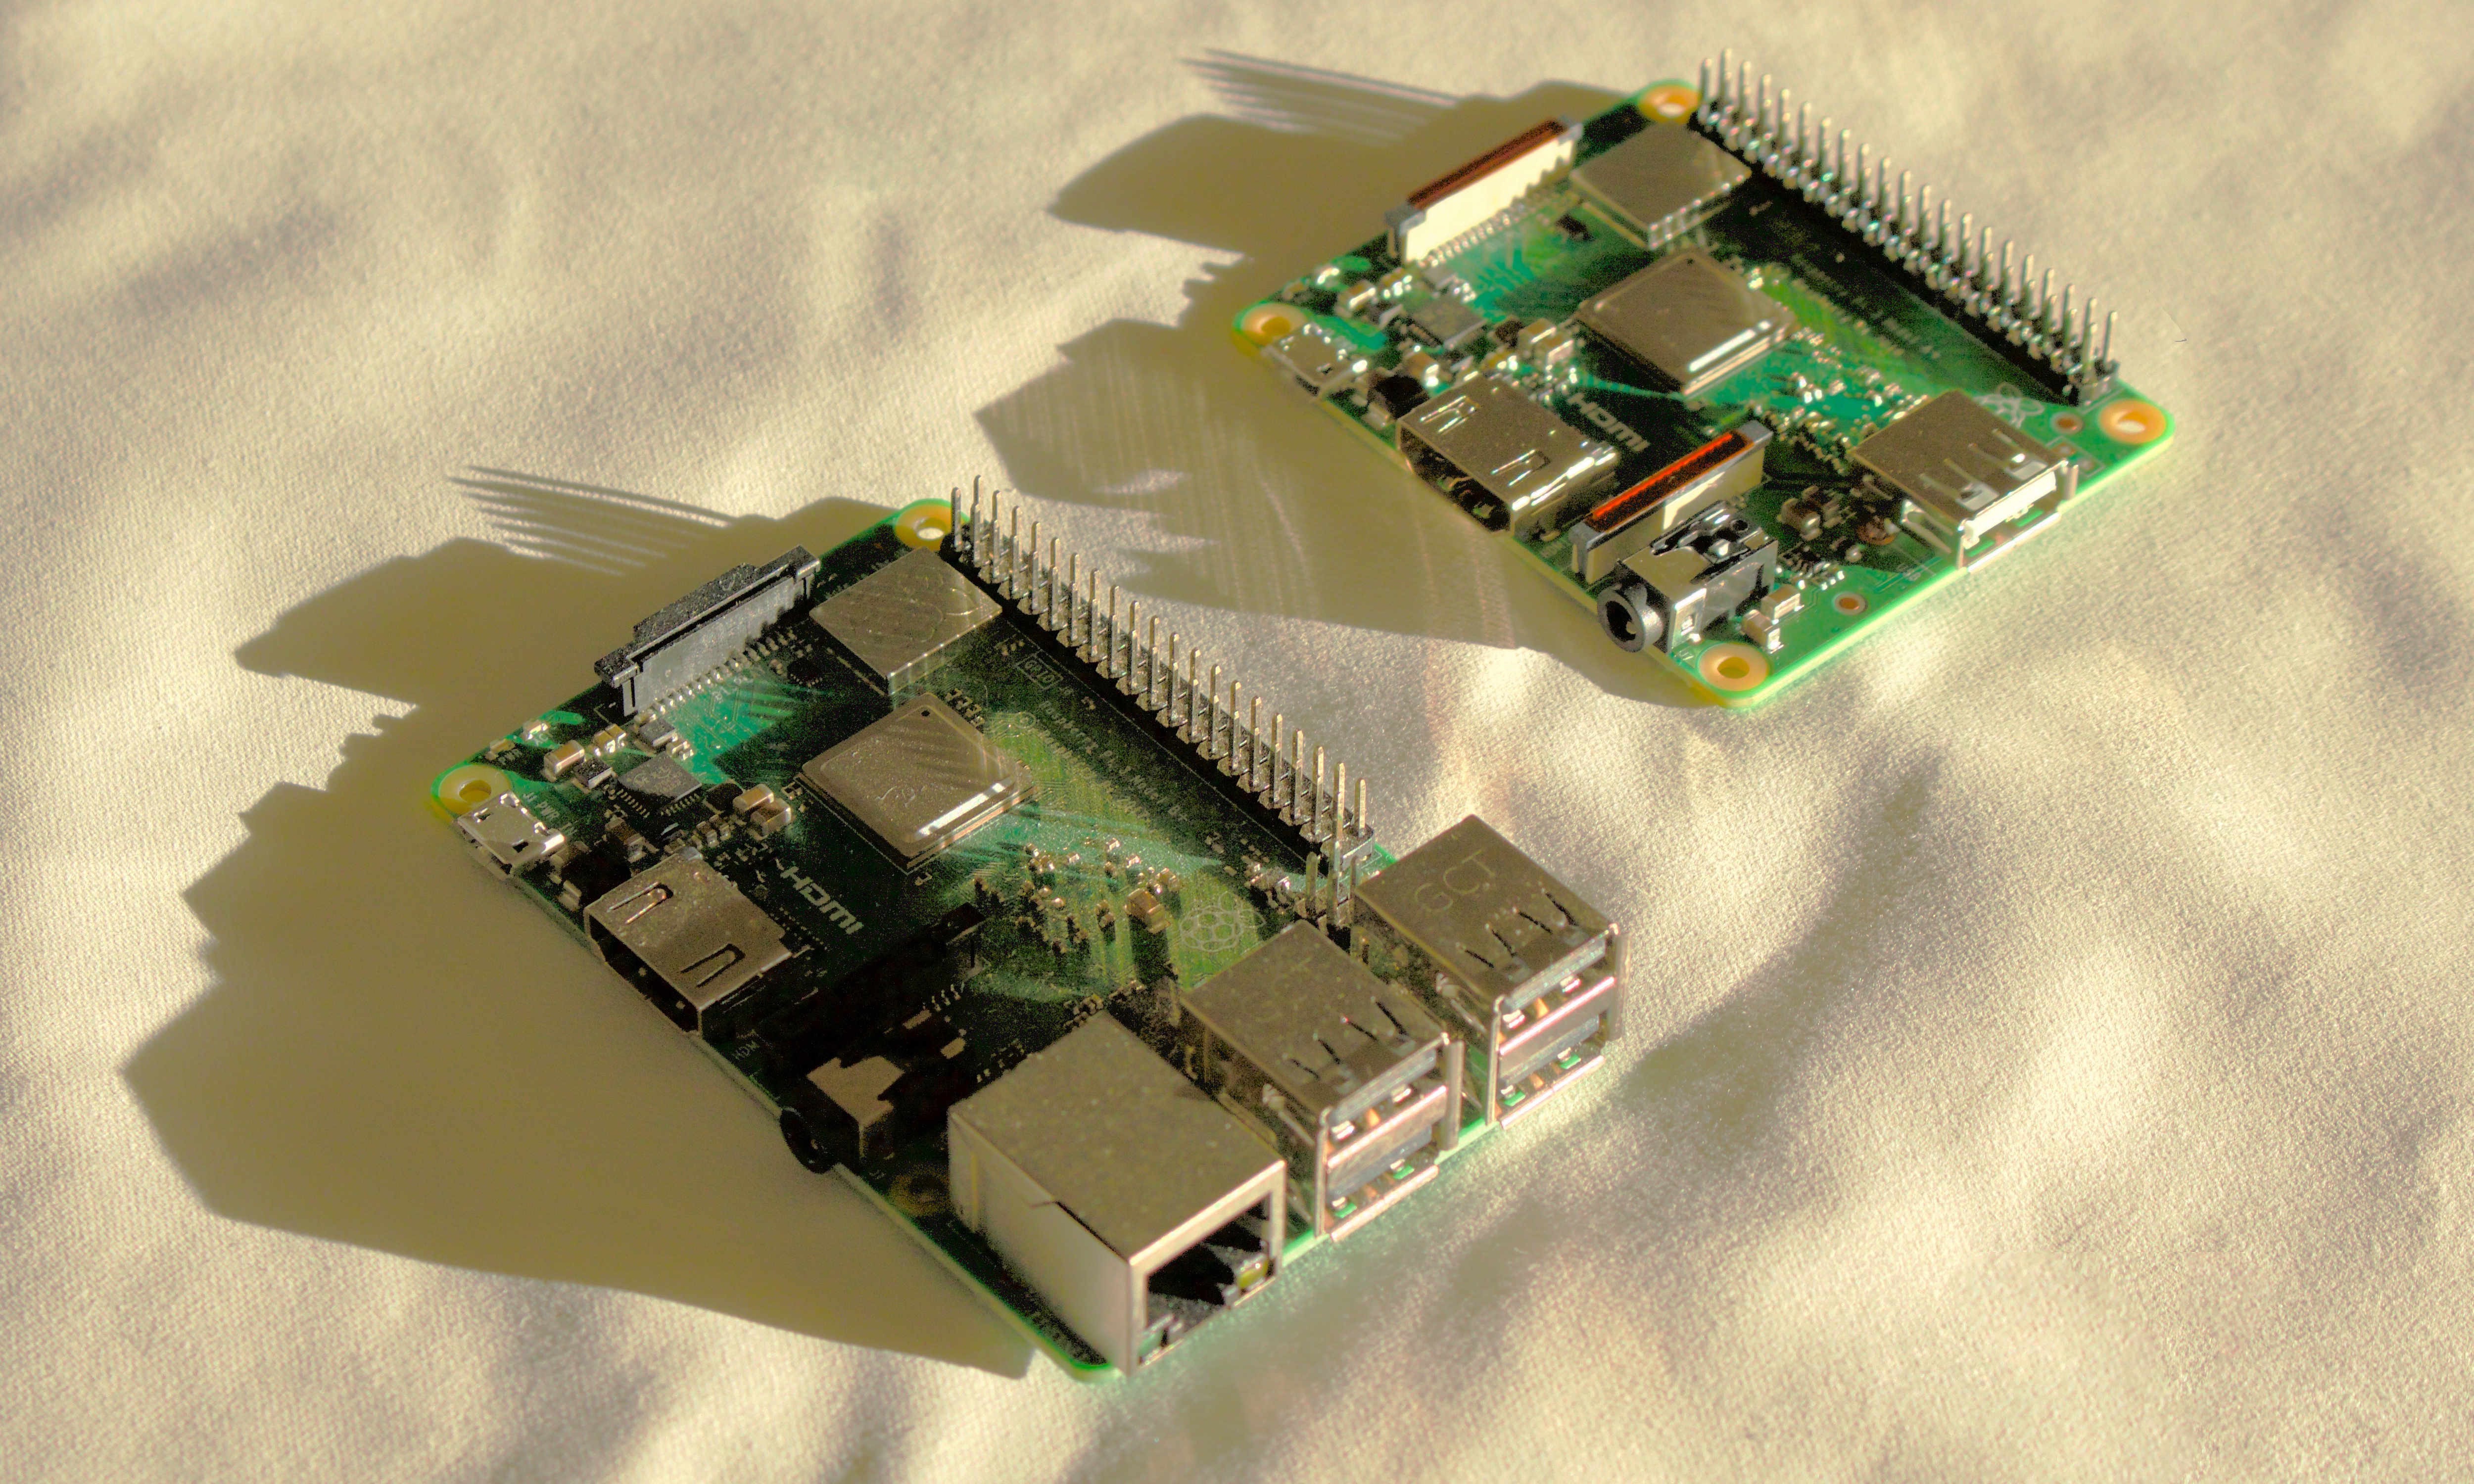
Side-by-side comparison of Models A+ and B+ (of the third generation).

The Pi 3 Model A+, like the original A+, has half the RAM of its bigger sibling, only one USB port, and no hard Ethernet. But, it has the Bluetooth and dual-band Wi-Fi support of the third-gen B+.

Previously, you basically needed a B+ to do anything networked, including software updates, without having to add an external USB hub. Now, an A+ alone is perfectly sufficient for most Raspberry Pi applications, especially those that treat the Pi as a server.

My Model A+ is my Pi-Hole.

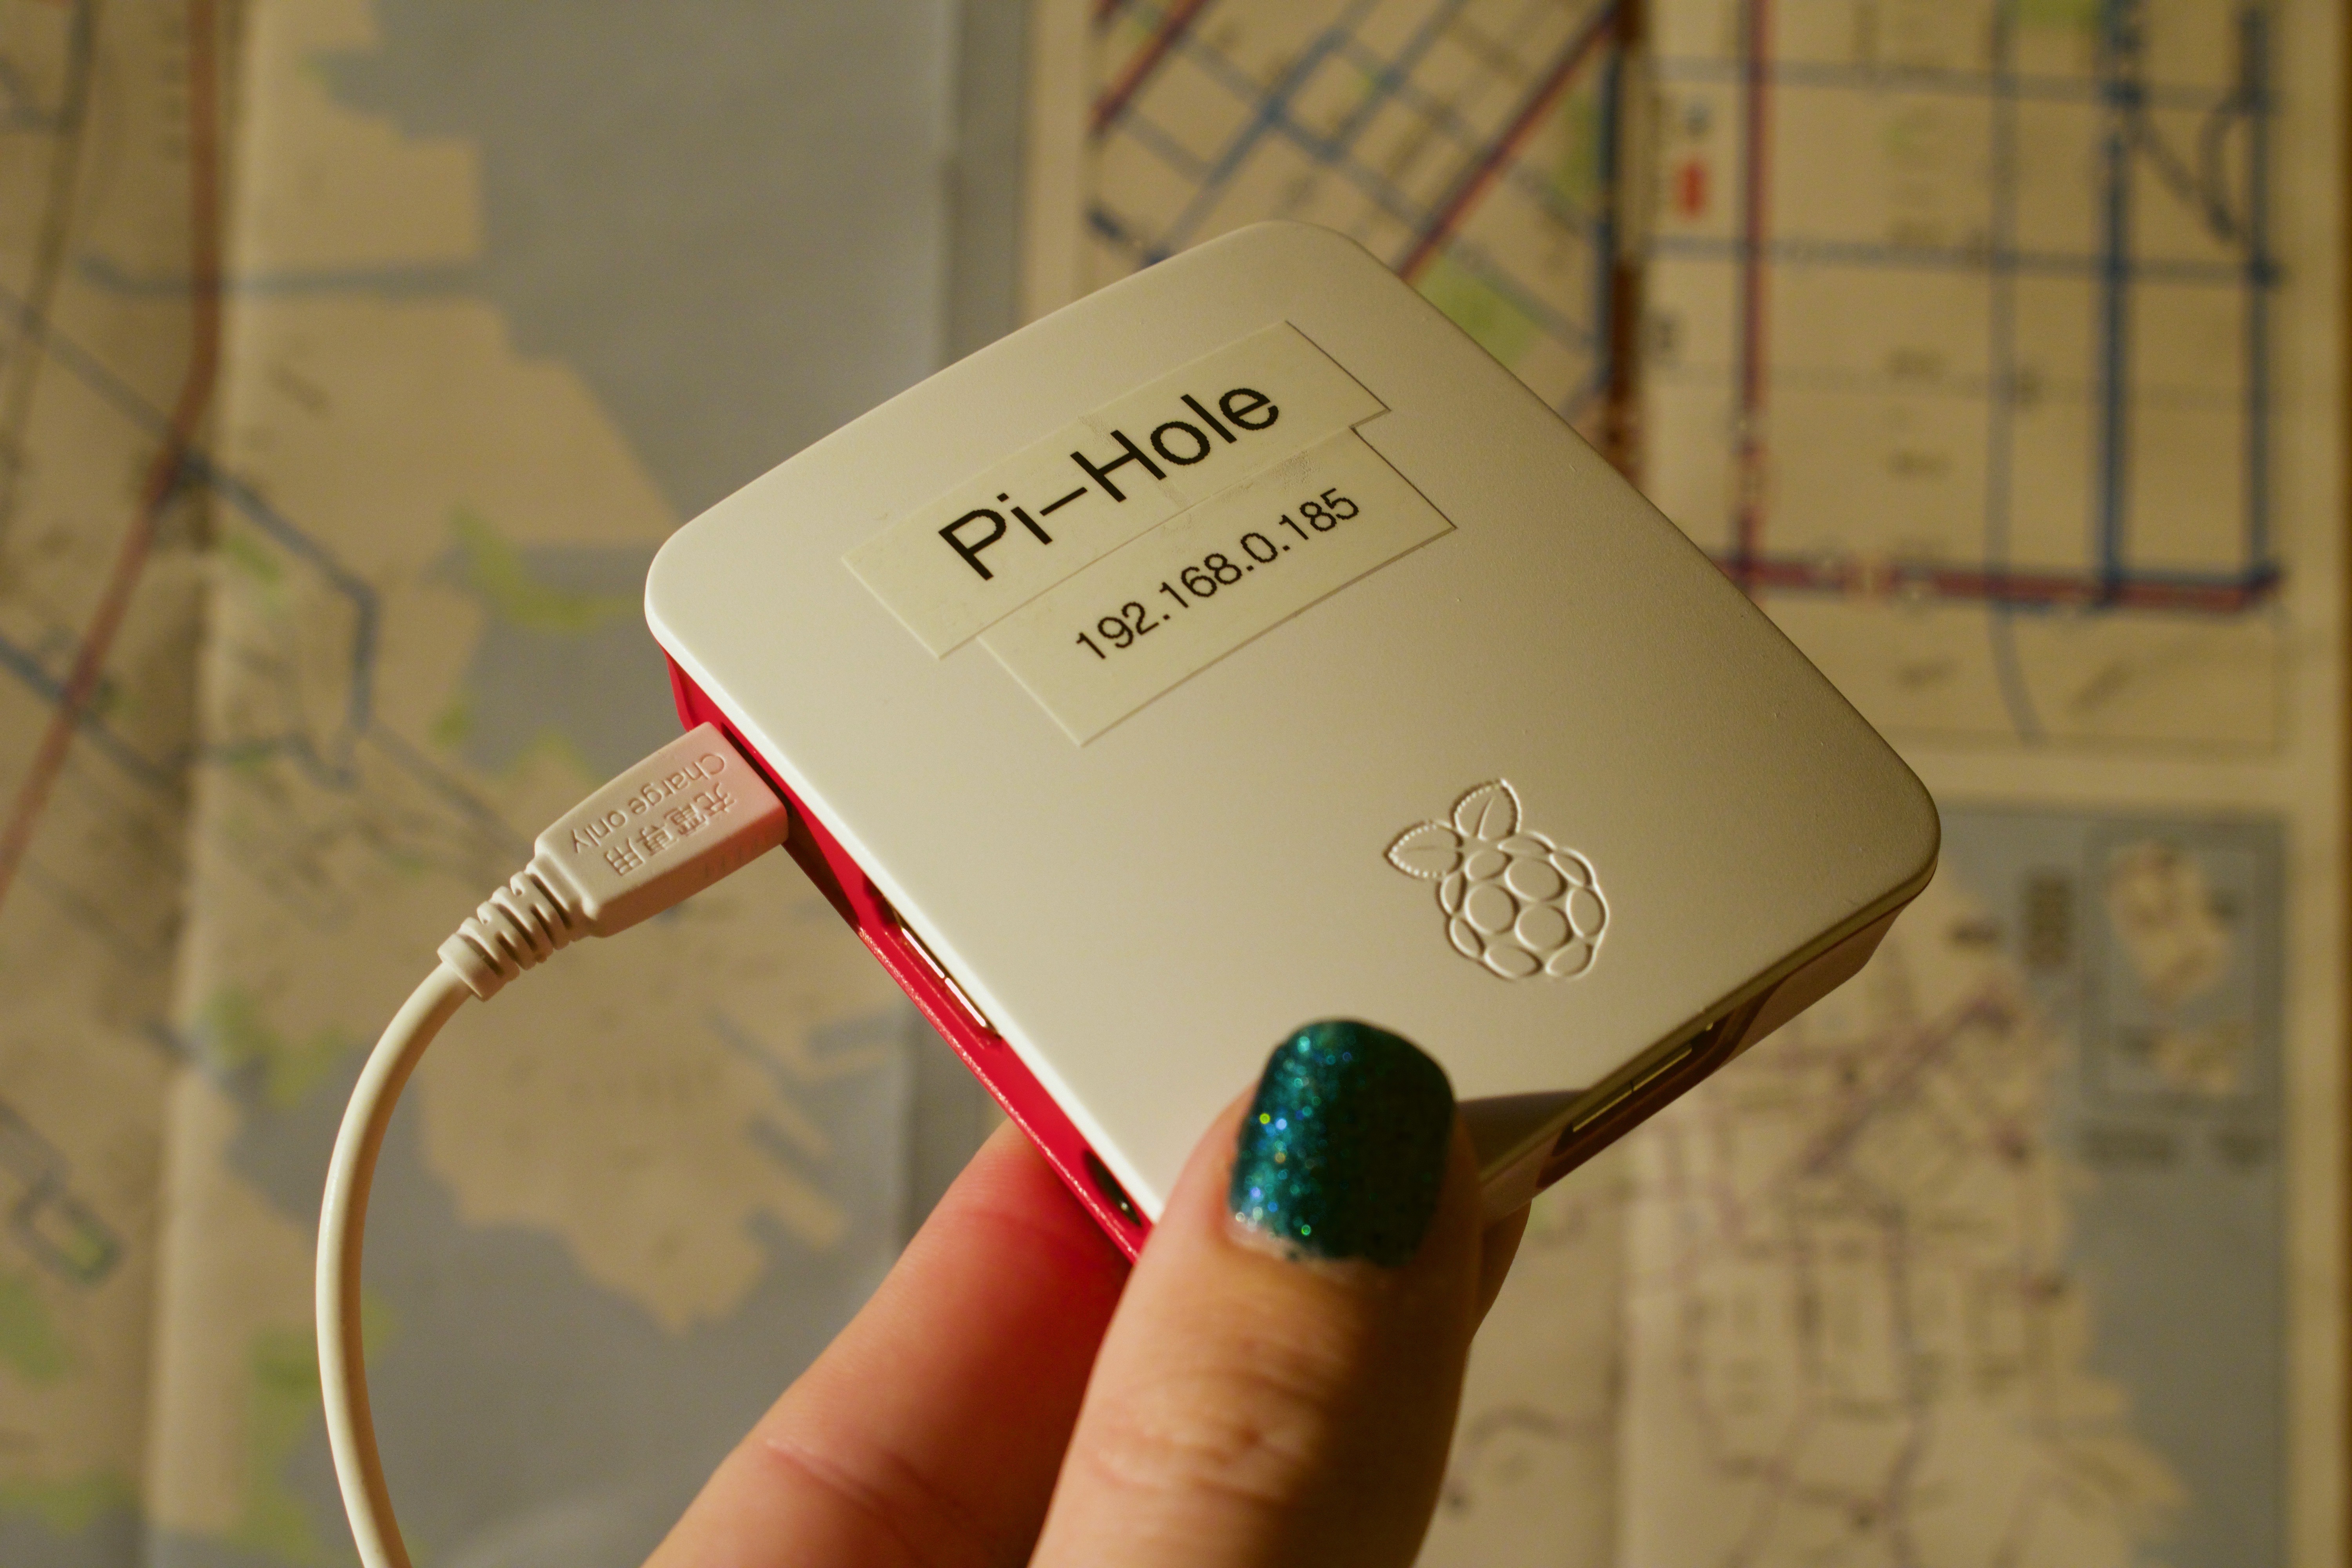
A Raspberry Pi 3 Model A+, in the official case and plugged in on power, but with nothing else plugged into it, being held up for display. A couple of labels affixed to the top panel of the case read “Pi-Hole” and an IP address (192.168.0.185).
Bonus question: Why did I choose 185?

Pi-Hole is a DNS-based content blocker. You set it as your router’s DNS server, and point the Pi-Hole at your real (ISP) DNS server, and the Pi-Hole will filter all DNS requests from clients on your network, screening out requests to advertising and tracking servers.

It’s similar to a variety of hosts files (I’ve used the WinHelp2002 hosts file for years) that route the known names of such servers to the null address, but unlike setting up a hosts file (which has to be done per machine), the Pi-Hole benefits every device on your network, including mobile phones and tablets.

Pi-Hole is open-source software. You install it on your Raspbian card by running a shell script on the Pi. The setup process is relatively painless and can be done in textmode (I used the Lite version of Raspbian, which omits the GUI; it’s textmode-only).

You do need a sufficiently advanced router to be able to set the router’s DNS IP addresses (if your router came from your ISP, it may be locked down to not provide this option), as well as to assign a fixed IP address to a particular MAC address (that of your Pi).

The default configuration of Pi-Hole maintains a local log and database of requests, both for your own perusal and for the software’s own cache. You can turn this off, and I did, but (as Bill Bumgarner suggested) you should also get a high-endurance microSD card, so that it’ll take longer for any logging—including the system’s—to wear out the card. You can get the smallest capacity available; Pi-Hole doesn’t take up much space.

The Raspberry Pi 3 Model A+ is the perfect Pi-Hole machine, and also likely to be a good option for many other Raspberry Pi applications. It’s $25, which is $10 cheaper than the B+. You should probably also get a case, such as the official one, to keep the dust off your board.

Shopping list

Here’s what you’ll need to run a Raspberry Pi 3 Model A+:

  • Raspberry Pi 3 Model A+ (also available at Micro Center, though not online)
  • Raspberry Pi 3 Model A+ case (also available at Micro Center)
  • A USB micro-B cable (like this one, though I use one from Daiso) and a USB charger dishing up 5W or more (like this one)
  • A microSD card, preferably a high-endurance variety (like this one)
  • Raspbian; the Lite (no GUI) version will do
  • A USB keyboard (like this one)
    • You’ll also need a mouse, trackball, or trackpad if you use a GUI version of Raspbian. The keyboard I linked to is a combination keyboard and trackpad, so it covers both needs.
  • A monitor, TV, or projector that can receive HDMI input, and an HDMI cable (full-size HDMI, not mini or micro)

Pi-Hole specific notes

If you’re setting up your Pi as a Pi-Hole, you’ll only need the keyboard and monitor for setup. You shouldn’t need to interact with the Pi again once it’s set up and working.

You should also dig up (or download if possible) your Wi-Fi router’s manual, and the IP address and admin credentials you’ll need to use to administer it. If your router doesn’t let you change DNS servers, you may need a newer/fancier one, like this one.

I assign my Pi its static IP address on the router (by setting the router to always assign that IP address to my Pi’s MAC address). My router has this under its DHCP settings as “Address Reservation”. Your router may call this something different, or it may not have this feature; the Pi can also be configured to request a static IP address, though I have not tried these steps.


UPDATE 2020-01-03: Added the shopping list and Pi-Hole set-up notes.

Putting the “author” in “authoritative”


2019-12-25 20:32:49 -08:00

(This isn’t a particularly cheerful or hopeful or actionable post. It is a rumination on society, and one of its present negative trajectories.)


We’ve had a reasonable debate over the right to be forgotten. The next one will be about the right to lie. Not the right to lie in court or as part of some fraud, but the right to everyday lies and white lies. Digital surveillance deprives [us] of this important part of life.

For whatever reason, I might be ashamed or shy about my age/looks/past/job/health/sexual preferences/race/ethnicity/beliefs/political views/abilities/education/family history etc. It’s valid to lie about such in everyday life. Tracking and ML should not interfere with that right.

John Wilander, 2019-12-24

We often treat records, such as government records, as authoritative or definitive—reflecting, even to the point of creating, reality or truth. Want to know something? No need to ask the person(s) involved; just look up the record.

This practice and the mindset underneath it is commonplace for a wide range of records, including anodyne ones such as birth certificates and loan records.

Now, as anyone who’s had to correct a birth certificate or clean up a fraud-riddled credit report can attest, treating a record as definitively equal to truth can present some pretty tall barriers to fixing a discrepancy between the two. It involves asserting that there is a truth not created/confirmed by the record, demonstrating that the record is wrong, and convincing the authority who maintains that record to revise it to match reality.

Surveillance isn’t just the act of watching someone, or everyone. Indeed, in the modern era, mass surveillance doesn’t involve any individual person or persons watching anyone at all—it’s the bulk collection of phone call records, voter registrations, addresses from credit card purchases, all this data that is created whenever we interact with any kind of system. Hoover it up, save it somewhere—and you have a surveillance system. A system that creates records of what it observes.

As with classical surveillance, there is a problem here of “but what if they get it wrong?”: Records erroneously merged, data entry errors, people named “Null” who break poorly-implemented checks and comparisons. In modern mass surveillance, rather than there being a human surveillant misinterpreting your intent or mischaracterizing your actions, it is the bare facts of your life and your actions that get misrecorded. Less “surveillant thinks you’re having an affair” and more “surveillant thinks you have more children than you have” or “surveillant got your birthdate wrong”.

But the problem is not merely the accuracy of the record. It is the authoritativeness of the record. It is treating the record as an infallible determinant of truth, rather than a fallible artifact of an observation.


When we try to automatically verify someone’s identity using whatever scraps of information they’ve given us, or to let them board a plane with their face, we treat the data we have on someone as being necessarily, implicitly the same as their actual truth. We assume/trust/bet that the data we have matches the truth; that they are the same as each other, and therefore the record can tell us the truth.

When we make this bold leap into the concrete wall of bad assumptions, we create the sort of dystopia in which you can’t sign up for Hold Mail because “identity verification” just mysteriously fails. We create systems that reject objective reality and substitute their own.

We create systems that seize authorship over reality, and over our own personal truths.

That is an even greater crime of surveillance, even more than knowing too much about you/everyone, or than the risk of there being inaccuracies in the record (both of which are also severe problems).

When Wilander talks, in the tweets I quoted, about the freedom to lie about yourself, Wilander is talking about authorship of your reality. Authority over your reality.

That is: self-determination.

The freedom to lie about yourself is the freedom to tell the truth about yourself. It is the same freedom, the freedom to tell your story as you see fit, and as much as you see fit, and as accurately as you see fit. It is your exercise of your power to determine yourself, and present yourself, and determine how (and whether) to present yourself.

It is your ownership of your truth.

A system that creates records, definitive records, that other subsystems and other systems treat as the truth, and that those other systems query directly without asking us, seizes ownership over our truths away from us.


That’s dangerous enough without introducing malice into such a system. We see that now, when the system gets it wrong, when the record is inaccurate, when we have to spend our precious time and energy trying to find a real, live human being like us who (a) will believe the system got it wrong, (b) has the power to fix the record, and (c) will do so.

But when we think of surveillance, when we warn of surveillance, we are already thinking about malice—the state (or corporations, or both) acting against us.

No wonder that some of us are scared of a mass-surveillance society that has the power to write our reality without us, and confirm that (maybe-parallel) reality behind our backs, and maybe turn that reality into consequences for us ranging from inconvenient (can’t sign up for Hold Mail) to hostile (false arrest). It’s bad enough when it’s trying to help us but not always succeeding; it would be a true dystopia if (or when) it is turned truly against us.

The only record that cannot leak—or in any other way be used against you—is one that is not kept, is not recorded. But this fact becomes irrelevant in the face of malice; a system that chooses to write its records regardless of your reality, or to override your reality with the contents of its records, does not care about recording truth; it has assumed the role of defining truth, and your own truth outside of that system ceases to matter.

To guard against that is to resist surveillance in all forms, malicious and not.


Back in the present, our system of mass-surveillance/data-brokerage/(whatever facet you want to look at) is one that promises convenience. It promises to enable its users, its querents, to learn (or verify) information about a subject without their involvement (which implies without their consent). It promises to enable the construction of other systems, automated themselves, to fulfill the function of querent, to ask the questions about us that the record-keeping system promises to be able to answer.

It promises to obsolete us.

You are no more than a record to be verified and/or updated and expanded. You are not a customer, who has wants and needs and a real life that the record may or may not match; you are not an employee interacting with that customer; you are not a manager responsible for any of this. You are a card in a Rolodex and you do not hold the Sharpie.

The automation of so much of this—of identity verification, credit checks, checking out at the grocery, checking in at the airport—is, I think, part and parcel with the rise of mass surveillance. The more data we assemble on everyone, the more we can automate. And the automated systems feed data back, and contribute more.

I think the opposite of mass surveillance is also the opposite of automation. It is a focus on people, real people in the really-real world, as human beings with lives who are not the same as, nor defined by, a record. It is the awareness that the map is not the territory and the record is not the person. It is the recognition that we cannot automate our society away, because our society is us; it is made of us, by us, for us, and giving all of it over to automated systems means leaving none of it for ourselves.

That said… I have no idea how we’re gonna get there.

But I think lying to surveillance systems might have to be part of the short-term effort.


P.S.: I should say, I’m not 100% anti-automation. I think there are things that could be automated in ways that make us all better off. But we’re gonna have to be suspicious, and ask hard questions about whether any automation technology liberates us, or pushes us out of our own society—and, whenever possible, how we can ensure the former and not the latter.

P.P.S.: The day after I posted this, former Googler (fired for organizing) Laurence Berland wrote a thread, commenting on excerpts from a WaPo article, about a student-surveillance system for universities named “SpotterEDU”. One of the (many) problems with the system has been erroneous reports of lateness or absence—and the school taking the surveillance system’s side.

Of note, the mindset behind the development and deployment of the SpotterEDU system appears to be adversarial: assuming that students will flake out, lie about their attendance, make bogus excuses, etc. unless their movements are tracked at all times. That is to say, the system makes its (fallible, not-always-accurate) records of students’ locations without regard for the truth of the students’ accounts, because the system positions itself as the sole determiner of truth.

I’ve enjoyed “Factorio”, but find it hard to progress in the campaign because it quickly bogs down in militarized colonization: the game turns, from one level to the next, from the fun part of Building Stuff to the much-less-fun task of having to defend that stuff against the “aliens” (lol) who are native to the planet you’re colonizing.

I spent some time thinking about how one might make a game essentially like “Factorio”, but more ecologically-aware, anti-colonization/anti-colonialist, and anti-militarization.

  • You land with enough resources to build a small, self-sufficient colony with recycling, composting, and subsistence farming. As in “Factorio”, it’s an emergency landing; this is basically your survival tent. You didn’t come here to colonize, but now you’re here and you have to survive.
  • Buuuut, your long-range radio broke, so now you need to pursue one of two goals: Build enough of a tech tree to build a replacement long-range radio so you can summon help, or build a much taller tech tree so you can repair your vessel and escape on your own.
  • You can mine/harvest to expand, but doing so risks disturbing the wildlife (and, since you aren’t bringing in colonists, you don’t have much motivation to expand beyond your needs).
  • You can protect your resource extraction sites (and the colony itself) with fences or moats, which cost acquired resources (moats require water outside of your drinking supply, whether by diverting existing geological water features or by pumping from wells or collecting rainwater).
  • On a related note, there should be a water cycle and rain barrels.
  • The deeper tech tree to escape on one’s own requires deeper invasion of the surrounding territory and extraction of resources (such as unobtainium to power the ship’s propulsion), reflecting the devastation wrought by pursuing solo achievement or solo subsistence while pretending that there’s no such thing as societal support.
  • Inversely, the shallower tech tree for summoning help reflects how we can achieve great things more easily, and better respect and protect the environment we live in, when we work together in mutual aid.

I’ve never made a “Factorio” mod (and don’t have the time or inclination to do so), so I don’t know how much of this is possible within that game’s engine and how much would require a whole new game. If you have the ability and the will to make this a reality, please do so and let me and the rest of the world know how it goes!

Leaving Apple


2018-08-15 04:40:33 -08:00

I’m leaving the Fruit Company. My last day is August 17.

I don’t have anything else lined up yet. My immediate plan is a period of funemployment, including a trip back home to SoCal for a bit. Then, I’ll return to San Francisco, and look to begin my next chapter.

I’ll be forever grateful for the past four years. My life has changed in more ways than I can count, and I’ve made so many new friends, and done great work and learned a lot. And San Francisco is my adopted home—there is no feeling quite like returning here after being anywhere else.

Photo of 1 Infinite Loop.

Photo of Apple Park.

I don’t know what’s next, but I’m excited to find out.

Wonder Clips are a particular kind of clip used for clamping fabrics—especially leather and vinyl, for which pins are inappropriate—to be sewn. I have a box of 50 Wonder Clips that I use for most projects.

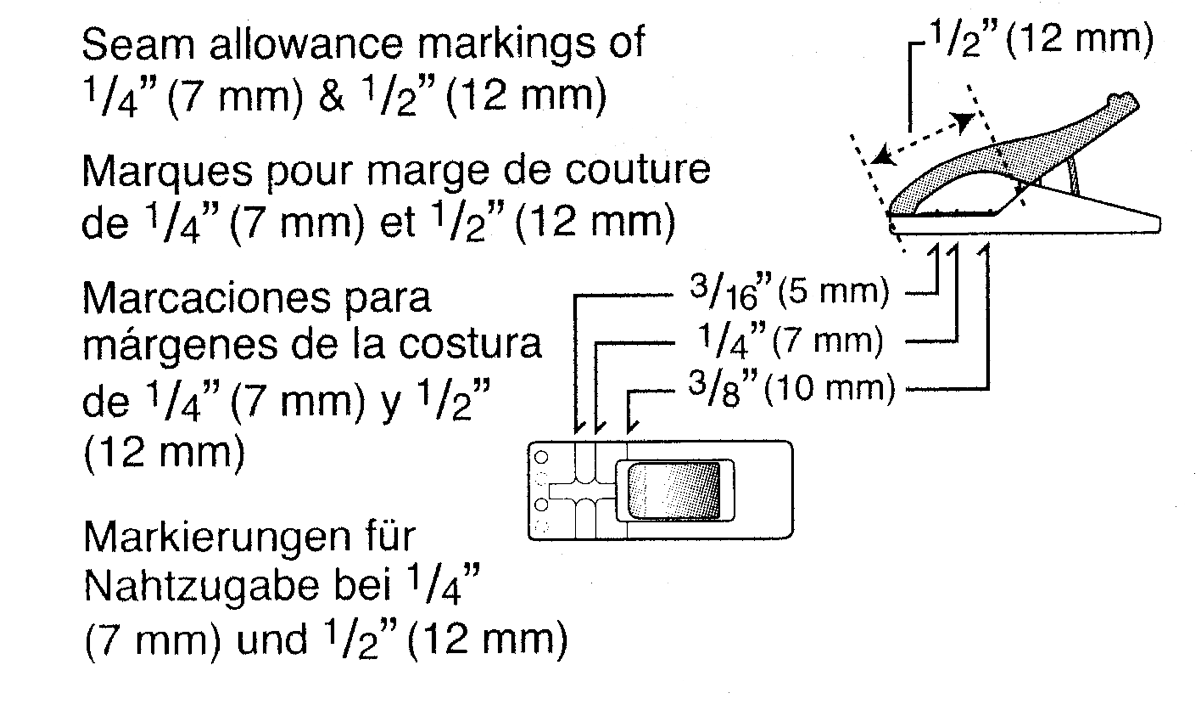
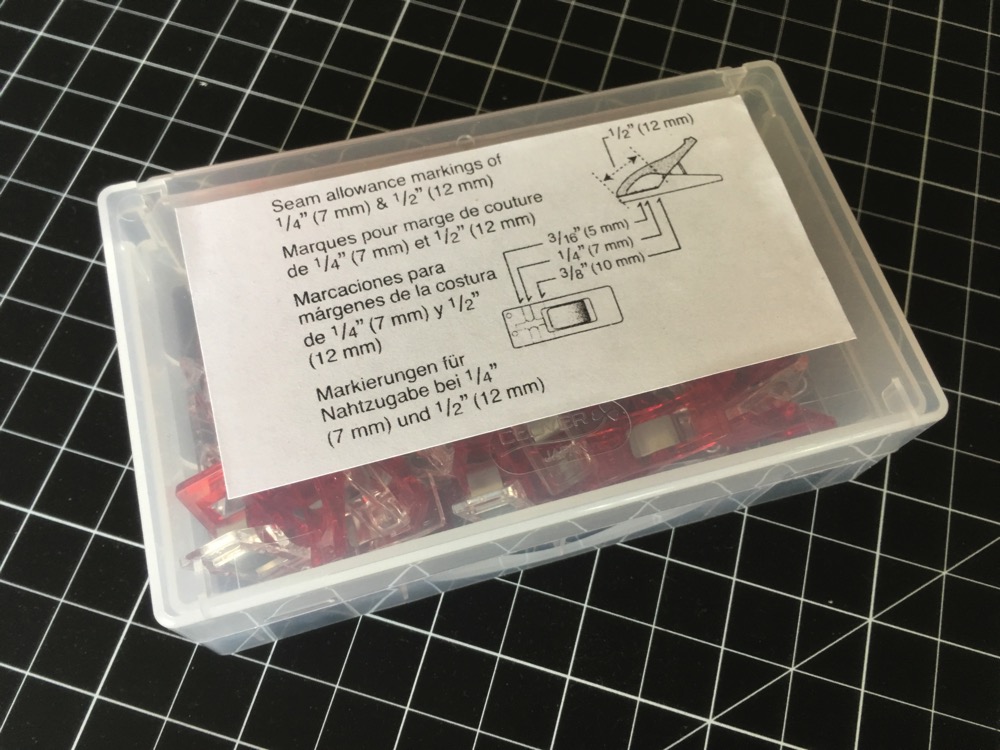
One of the features of Wonder Clips (compared to, say, clothespins) is markings on each clip at several depths, so you can use how much of the piece is in the clip’s mouth to measure the seam allowance at each clip. The packaging includes a quick reference:

Wonder clips measuring guide

I scanned this in and converted it to black and white, and also made a printable version for Avery 5444 labels. 5444 is a 4×6″ sheet that should work in most printers; that PDF will produce two seam-allowance reference labels of just the right size to be applied to the top of the 50-count Wonder Clips box.

My box of Wonder Clips, with the label applied.

Scarcity vs plenty


2017-12-29 19:15:18 -08:00

I’ve been thinking a lot about political rhetoric here in the US, and one thing I’ve identified in it is a dichotomy, or maybe a spectrum, between poles of Scarcity and Plenty.

Read the rest of this entry »

Adding bat fins to a wrist brace


2017-09-04 22:42:20 -08:00

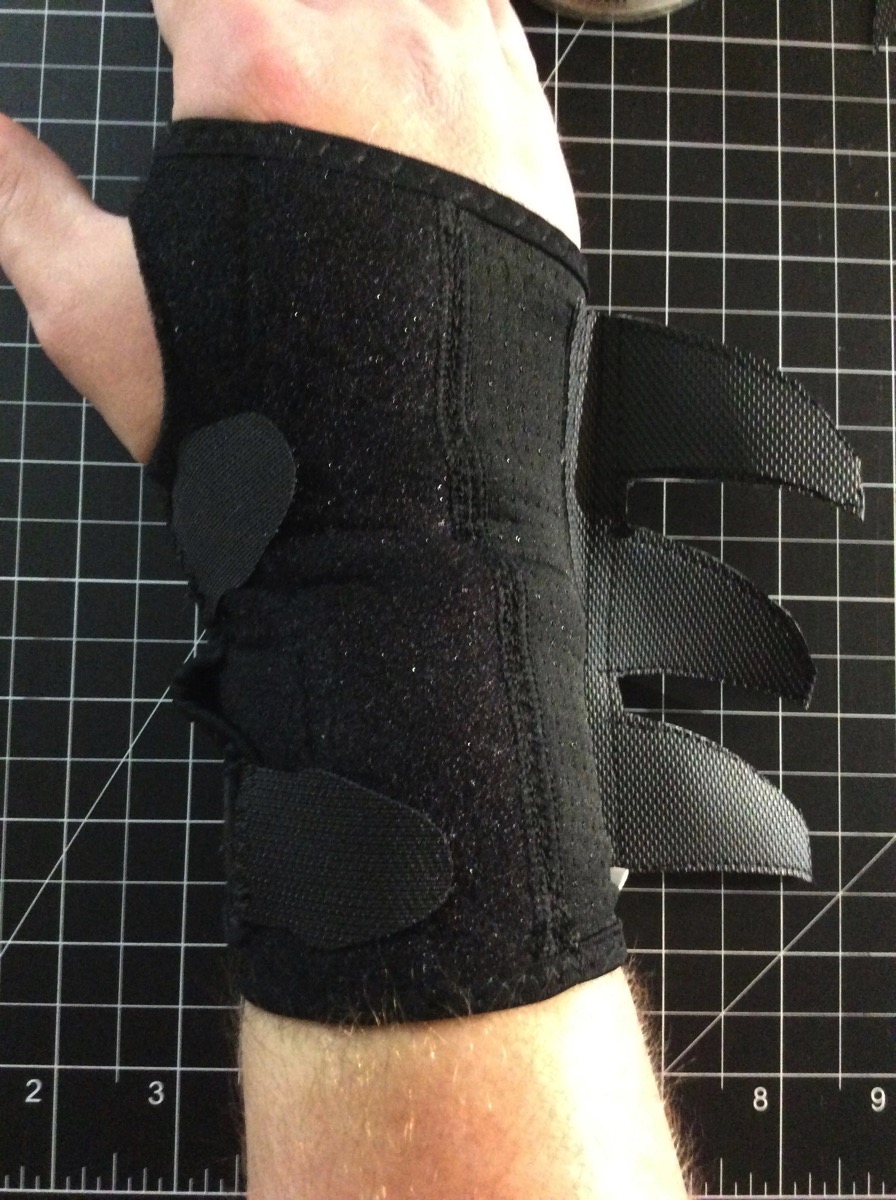
If you own a wrist brace, but feel like it’s missing a certain something:

Photo of the augmented wrist brace being worn.
Like the fins from Batman’s gloves!

here’s how you can add that to your wrist brace.

You’ll need:

  • A sewing machine
  • Black thread (polyester is fine)
  • Fabric. You’ve got lots of options, but what you need is something either innately stiff, like vinyl, or thin but stiffened by thin cardboard or stiff interfacing. I used this polyester-backed vinyl.
  • Either the 3D-printed template or the 2D-printed pattern to cut out of the fabric.
  • A leather sewing machine needle, if indeed you use leather or vinyl fabric or you use cardboard as interfacing
  • Tailor’s chalk
  • A wrist brace you can sew the fins onto (I used the Walgreens one, which has a thin stretch-fabric section that covers the appropriate spot on the arm)

Read the rest of this entry »

How to QA


2017-07-03 10:37:02 -08:00

In my day job, I’m a QA (quality assurance) engineer for a Large Software Company. Today I’ll tell you how to prepare yourself to do a job like mine.

Fair warning: “QA” is a big tent; the details of a QA job vary widely, and your QA job may be very different from mine.

File bugs

(Ira Glass voice) File a lot of bugs. File a huge volume of bugs.

The ultimate responsibility of a QA team overall, and of QA engineers individually, is to produce actionable bug reports that can and do get fixed. The details vary widely, but everything comes back to that.

A good bug report says:

  • what you did
  • what you expected to happen
  • what actually happened, and how that differed

That’s the minimum, actually. That’s the least that’s needed for a bug report to be actionable.

Ideally, a bug report should also include needed diagnostic info (such as a sysdiagnose on Apple platforms), screenshots/video if applicable—as much info as possible, at least at first, to be sorted through for the gems of info that illuminate the actual problem. As a QA engineer, providing as much of this info you can gather is Actually Your Job.

Ah, but what to file? If you’re QAing something manually, you’re looking for:

  • any sort of friction (possible interface design issues)
  • any sort of fault (crashes, hangs, data loss)
  • anything in between (anything that did not do what you expected it to do)
  • anything you don’t know what you expect it to do (can be a design/empathy-for-the-user issue)

Also test anything that had been broken before. Look for regressions (previous problem returned) or new problems (“OK, you fixed X, but now it has problem Y”).

Practice, practice, practice

For filing formal bug reports, two good ways are filing Apple developer bugs and filing bugs with open-source projects.

A few caveats re open-source:

  • Many open-source projects need fixes more than they need more bug reports, so don’t be surprised if folks don’t rush to thank you for adding to the pile. Concentrate on high-value bugs (security vulnerabilities, crashes, providing desperately-needed steps to reproduce) rather than nitpicks. (Making this judgment call is itself something that’s valuable to practice.)
  • Search for duplicates first. Apple actually generally likes duplicates and uses them to influence triage and prioritization decisions, but open-source projects may resent the extra scut work of duping bugs together. (Finding existing bug reports is an underrated skill that is also valuable to practice.)
  • I’m a cishet white guy. Your mileage may vary a lot regarding how you and your contributions are received if you are not—anything from well-intentioned over-helpfulness (mansplaining, assumed noviceness) to outright misogyny/racism/anti-trans assholery.

Some open-source projects do code review and/or API review, which can be good practice for spotting designs that invite bugs (random example: “you’re taking a pointer but not the size of the buffer, so the API can’t check that it won’t go out of bounds”).

In that sort of setting, practice asking questions. These could be clarifying (“what does it mean if this returns nil/0?” “This is typed as a String. Are there constants, or what sort of strings should folks pass here?”) or more Socratic (“what does this API do if I pass a pointer to a buffer that’s too small? how does it detect that?”). Even if the immediate response is “that can’t happen” or “don’t do that”, established members of the community/team may back up your question with pressure to resolve the issue (“this should take a length with the buffer, or better yet return a Data”).

Lastly, volunteer for beta tests. I’ve beta-tested Flying Meat’s Acorn once or twice, and I think Panic have also solicited beta testers in the past. Beta-testing is extremely good practice for exploring an in-development product looking for friction and faults and writing up your findings.

As a beta tester, write up everything. Don’t be shy—if it looks wrong, write it up. I have sent in multiple pages of issues and you know what? That makes you worth your weight in gold. (90% of volunteer beta testers are just there for the possibility of a free license. Any developer who’s running a beta test program wants bug reports. They want them urgently—preferably while the product is still in beta.) Even if half the stuff on my list is stuff they meant to do, it’s still worth a second look if a beta tester (or more than one) objects to it, and the other half of the stuff on my list is stuff they may not want to ship with.

The QA mindset

Use your imagination. Try things you wouldn’t ordinarily. Follow the “what does that do?” impulse. Find the cold paths.

Everything that the product engineers thought of is probably really well-tested, and any issues that remain have turned into invisible corners. Your job is to remind them of the invisible corners and tell them about the things they haven’t encountered at all.

Question everything. Is that design optimal? Is the UI copy clear? Could a new user understand both? Was that actually the correct result? Was it the best result?

If you find yourself asking “What does that do?”, that can be a sign of inaccessibility to novices. Inversely, you should learn the product’s domain so you can spot things that don’t make sense in the domain. Try to develop the ability to do both: know the product’s domain and simultaneously spot barriers in the product to users entering that domain.

Be an advocate for users

Make sure the interface is accessible (overly-similar names can cause problems for dyslexic folks; reliance on color or images can cause problems for color-blind or visually-impaired folks).

Familiarize yourself with accessibility tools (on the Mac: Accessibility Inspector, everything in the Accessibility control panel, SimDaltonism) and use them on the product, and file bugs when you get stymied.

Challenge ableist/misogynistic/gender-binarist/racist/otherwise-problematic copy or artwork, using the dual justifications of “this is the right thing to do” and “not doing this is going to repel users/customers and/or cause PR trouble”.

Your QA job may vary

As I mentioned above, “QA” is a big tent. What I’ve described is an important baseline mindset and skillset to a QA engineer, but major portions of an individual QA job could be more sysadmin-oriented (e.g., administering an automated testing or CI fleet) and/or include work with specialized, company-specific internal tools that you’ll have no way to practice the use of outside of that department.

Know at least one scripting language such as Python or Ruby, whether for use in your own QA work (e.g., generating test data, filtering logs) or for working on automation systems (e.g., maintaining Python or JavaScript scripts that drive UI tests). If you’re starting from scratch (and absent any particular job-specific requirements), I’d recommend Python, which you can pick up in a few months, and from which you can learn similar languages like Ruby afterward.

Especially as more automated QA (unit testing, UI automation) becomes more the norm, I’d strongly recommend developing your system administration skills on any platforms you may end up working on. It’s been awhile since I had to start from scratch on this, so I invite you to suggest resources in the comments for learning system administration (on the Mac or otherwise) in 2017.

Chess variant idea(s)


2017-05-13 15:24:54 -08:00

Each player has one spy among their opponent’s pieces.

On your own turn, you can switch out one of your opponent’s pieces for an equivalent piece in your color (e.g., black rook for white rook), then move it as one of your own. Ever after, it is one of your pieces.

Possible variants:

  • Reveal your spy on your opponent’s turn instead of your own (you take their turn instead of them taking it).
  • Reveal your spy on any turn.
  • More than two spies.
  • Unlimited spies.
  • Double agents (after revealing your spy, your opponent can reveal that it was their own spy, taking the piece back, ending your control of it).
  • Arbitrary-multiplier agents (revealing a double agent does not end control: a N-ple agent can always be revealed to be an N+1-ple agent).
  • A requirement that you choose your spy beforehand and seal the knowledge in an envelope (rather than choosing the spy to “reveal” at any time). Open the envelope when you reveal your spy.

I don’t know enough about chess to be able to predict how well this would work, or whether anyone has thought of this before (it’s quite likely).

Leather dice bag project


2017-05-07 08:37:26 -08:00

Last year, I took a sewing class and bought a sewing machine. Since then, I’ve taken another sewing class, bought another sewing machine, and done my first solo project: a leather dice bag, to keep my D&D dice in. (I was keeping them in the tube they came in, but it’s harder to get the dice back in than just pouring them into a bag, and it doesn’t look anywhere near as cool.)

This wasn’t the first drawstring bag I’d made; I’d done one previously at the first sewing class (there’s a whirlwind tour of operating a sewing machine and then they drop you straight into making things; it rocks), and I made a couple of prototypes from cheap muslin before I started actually sewing the leather.

This was the first time I’d worked with leather, however, and that was interesting. Leather is grippier than most fabrics, so you actually need to use a different presser foot on your sewing machine—specifically, a roller foot. Fortunately, I’d bought a no-name variety pack of presser feet off Amazon Warehouse Deals awhile back, so I had one ready to go.

This is largely going to be a photo tour; I took photos the whole way through the project. I posted the photos on Flickr and will be embedding them here.

Read the rest of this entry »

Super simple solder spool spindle


2016-11-14 20:53:46 -08:00

(Also works for spools of wire.)

  • One ³⁄₈″-inner-diameter galvanized pipe cap
  • One ³⁄₈″-inner-diameter 4″- or 5″-long galvanized pipe nipple
  • One ³⁄₈″-inner-diameter to ¹⁄₂″-inner-diameter galvanized pipe reducer
  • One ¹⁄₂″-inner-diameter coupler
  • One ¹⁄₂″-inner-diameter floor flange

Screw them all together, in the reverse order, putting the cap on last after you put the spools onto the pipe.

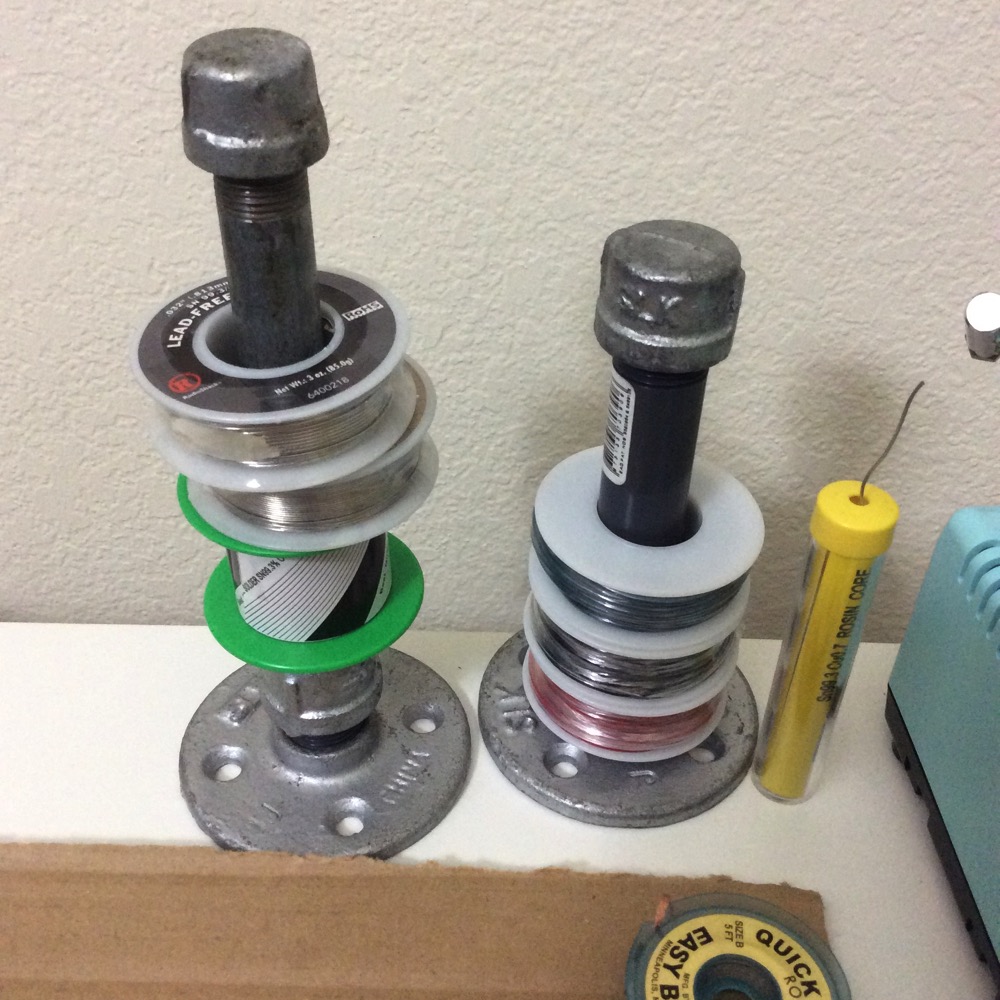
Photo of my solder spindle, along with a prototype of it holding some wire spools.
Left: My solder spindle built from the above recipe. This is with the 5″ pipe nipple.
Right: My wire spindle, built using ¹⁄₂″-inner-diameter all the way down, which it turns out is too big for one of the solder spools. (It was the first draft; the final spindle on the left is the second iteration.)

Learning to solder with the Make kit


2016-10-30 16:49:08 -08:00

I bought the Make: Getting Started with Soldering Kit at the Bay Area Maker Faire earlier this year. I recently completed the set of blinky badges included.

The one on the far left is from months ago. I’ve improved a lot since then, as seen by the rest of the badges.

It’s a good start, but incomplete. You will also need:

  • Goggles. The web page for the kit explicitly acknowledges this. You need eye protection because a blob of solder can go flying when you’re cleaning your iron. This happened to me—fortunately it didn’t go in my eye, but I made damn sure right then to get out my safety glasses and wear them for all further soldering.

    I had the freebie Google-branded safety glasses that they hand out at Maker Faires, but if you don’t have any, get some.

  • A soldering iron that isn’t trash. The iron included in the kit takes forever to heat up, and it’s oxidising all the while. Don’t waste time and energy on it—spend the extra $50 or so to get a good iron.

    Mine is a Weller WES51; it heats to operating temperature in under a minute, and has an LED to indicate when it’s ready.

  • A desoldering iron. I found trying to desolder my mistakes using the included solder-sucker tricky. It might have gone better with the better soldering iron, but I already had this thing from Radio Shack by then. It’s not ideal, particularly in how long it takes to heat up, but it’s still better than an unheated desoldering pump.

    Note that you need to tin the tip of a desoldering iron just the same as a soldering iron. In this case, the “tip” is the flat, ring-shaped surface directly around the hole. Lay some solder across the hole, then suck in any excess and spit it out onto your sponge.

  • Tip cleaning wire. I use this Hakko model. The wad of metal is an abrasive cleaner that you’ll need any time you get too much build-up on the tip and the wet sponge isn’t enough. Ideally that should be rare, but if you find yourself unable to tin your tip because the solder won’t melt or won’t adhere (“dewetting”) and the wet sponge doesn’t help, you probably need to jam your tip around in one of these for a bit.

  • Educational resources. The Make kit comes with a little booklet that isn’t bad, but I needed other sources of info:

macOS installer cards


2016-09-29 20:16:20 -08:00

Being both a creature of habit and a digital packrat, I never install macOS from the “Install macOS” app.

Instead, what I do is have a cache of 8 GB class-10 microSDHC cards (usually bought from Micro Center, but they make great Amazon filler items, too), which I permanently assign as macOS installer media.

(I would buy SDHC cards, but Micro Center sells the microSDHC cards for cheaper—50¢ cheaper as I write this.)

Populating the card

Once you have a card, you’ll need to put the bits on it. DiskMaker X is the easiest way to do this, though there is also a manual process.

Labeling it

Anonymous cards all of the same capacity and speed and possibly even description does not scale well as an inventory system. Ideally, your card comes in a clamshell case, like the Micro Center ones do, or you can reassign such a case that came with another card. You can probably even buy empty microSD cases, like you can CD jewel-cases.

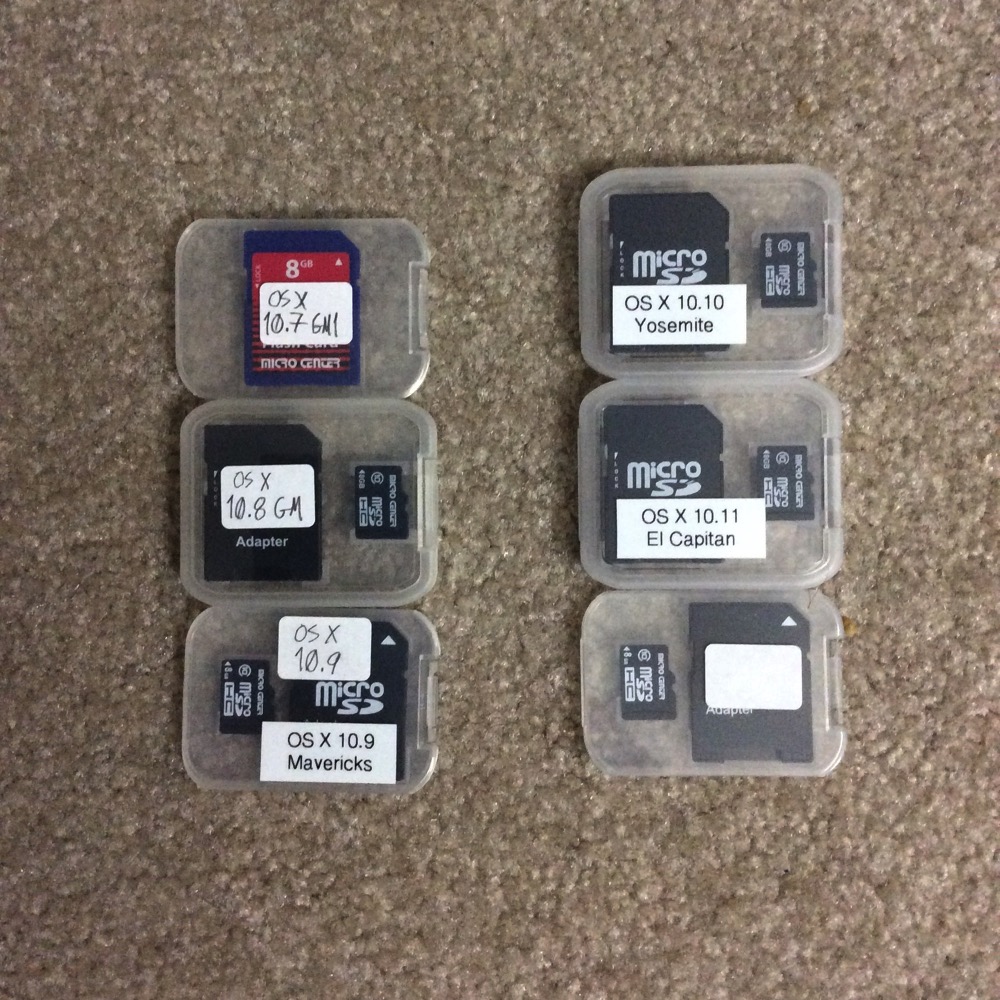
I have a Brother labeler that I use to print a small label with the release’s version and marketing name on it: “OS X 10.7 Lion”, “OS X 10.8 Mountain Lion”, “OS X 10.9 Mavericks”, “OS X 10.10 Yosemite”, “OS X 10.11 El Capitan”, and now “macOS 10.12 Sierra”. That label goes on the front of the case.

Photo of my flash memory cards on which I have the past several years' macOS installers. Lion was on an SD rather than microSD card; Micro Center have changed their case form factor a few times; I started printing rather than hand-writing labels with 10.9, and I haven't yet labeled the card that will go to Sierra.
I wrote this while the Sierra installer application was downloading.

And then done

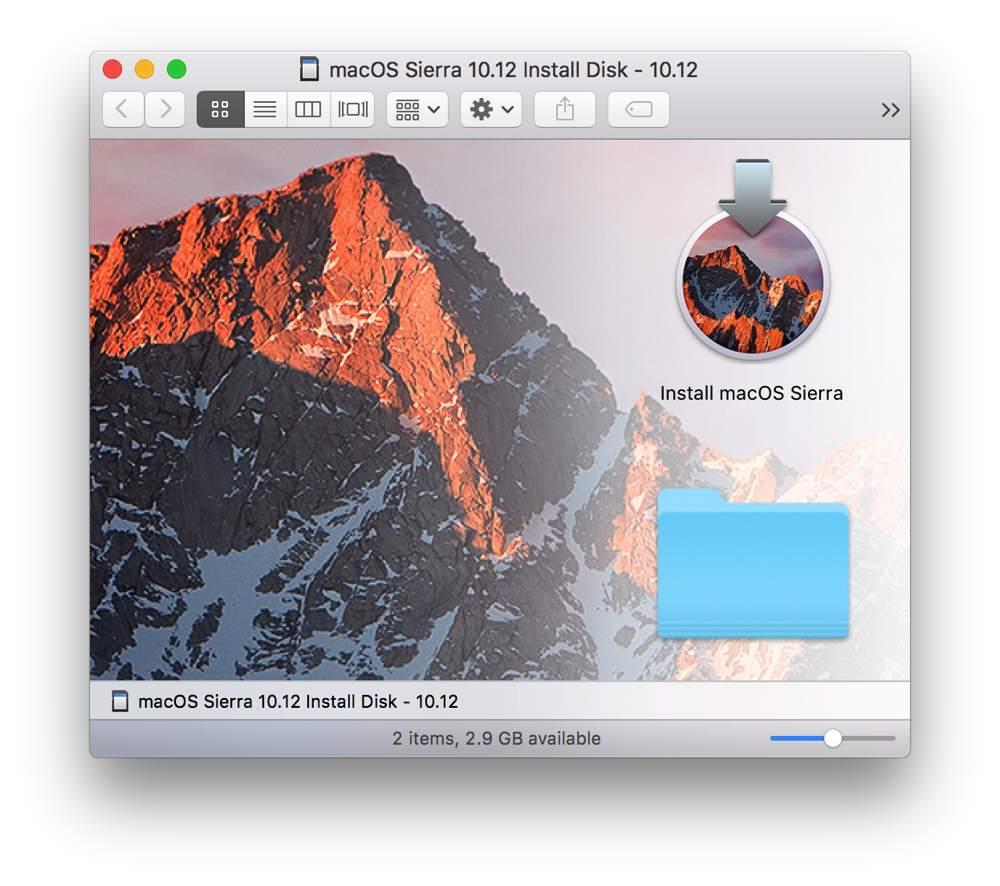
The very pretty installation volume that DiskMaker X created for Sierra, complete with window background matching the installer icon.

Now you have labeled, permanent installer media that you can use forever (or however long the cards last). If you ever need to roll back to an old version, reinstall the dot-zero from the card and then combo-update up to whatever version you want.

Normal


2016-09-12 21:48:59 -08:00

I just got this ad for Jane Kim, who’s running for State Senate here in California:

“JOIN US as we work to lift more families into the middle class through better public education”! and “Median Annual Wage for City College Graduates: $59,800. Median Annual Wage for High School Graduates: $48,700”

Leaving aside the matters of whether those are livable wages in the City, particularly after taxes and any available savings contributions, and especially for “families” as stated in the headline…

“Join us as we work to lift more families into the middle class…”

A “middle class” necessarily implies a lower class and a higher class.

Right off the bat, this proposition does not even consider lifting families into the upper class. Just the middle class—that’ll do for now, right?

Lifting “more families into the middle class” implies not eliminating the middle class—there’ll still be one, which means there’ll still be a lower class, which means there’ll still be people/families in it.

Certainly this proposition does not suggest ending classes altogether—no; there’ll still be classes, at least three of them. And some will be in the upper class and some will be in the lower class and hopefully more of the latter will move up… to the middle.

Oh, OK.

I feel like this is a lukewarm dish. That’s all you’ve got to offer? You want to make this not only a headline on your flyer, but literally the entire topic of an entire flyer?

I’m not even saying it’s a bad idea. Just… it lacks ambition. It feels resigned. This is the best we can do, it implies.

Really?

NB: I feel I should make explicit that I’m not against Kim necessarily; I haven’t looked at any other candidates. And maybe she’s got lots of good policies and/or ideas. Just, this one ad caught my eye and got under my skin.

So you want to run an open-source project


2016-09-11 14:12:30 -08:00

How much of this you’ll want to do will depend on just how much of a Thing you want your project to be, on a scale from “I’m just gonna drop some code on GitHub” to “I want to wear the title of ‘maintainer’”.

GitHub

You don’t have to use GitHub as such; Gitlab and Bitbucket are alternatives, and they’re all more or less equivalent. But GitHub has network effects in its favor: Most potential contributors are there.

“Contributors” doesn’t just mean code. Anybody can clone your repository, check something in, and email you the patch. But writing issue tickets and editing the wiki (if you choose to have one) are valuable, too, and those typically require an account.

Your project on GitHub (or wherever) will include one or more of the following:

  • Code/contents (the Git repository from which GitHub and Gitlab take their names)
  • An issue tracker (more on that later)
  • Forks (other people’s copies of your repository, to which they have their own access to push changes)
  • Merge requests (changes made in one fork, then submitted “upstream” toward the original repository for consideration and possible integration into the “main” code base)
  • A wiki (documentation)
  • A website

Travis

Like with GitHub, there are alternatives. Travis is the one I’ve used.

Travis is a continuous-integration system. Whenever someone pushes changes to your repository, or submits a merge request, Travis will build your project and run your tests, according to instructions you provide. It’ll then provide an indication—on GitHub, right on the merge request page—of how well or poorly that went.

There’s a related service called Coveralls that tracks the code coverage in your project—how much of your code is being run by your tests. Code paths that the tests aren’t going through are potential bug sites: When that code path does get traveled, what happens might not be what you expect.

Coveralls tells you how much of your code was exercised, as a percentage, and also gives you a line-by-line map of what code was run and what code wasn’t.

Project infrastructure documents: README, LICENSE, CONTRIBUTING/CODE_OF_CONDUCT

(If you write these in Markdown, they’ll have the .md extension: README.md, etc.)

README

Your README is your Getting Started guide for both users and contributors. Awesome Labs has a template you can follow (optimized for iOS libraries); the basic points you should cover include:

  • What is the product? What does it do? Why do I need it?
  • What does it look like? (Screenshots/example terminal sessions/example code)
  • What does it require?
  • How do I install it?
  • How do I use it, at least in the most common case?
  • How do I uninstall it (if applicable)?

LICENSE

This is where you put your statement of copyright, and the license agreement for your program, outlining what sorts of copying you explicitly allow and which ones you explicitly don’t. Common ones include variants of the BSD and MIT licenses, GPLv2, and GPLv3.

GitHub suggests a few popular licenses when you create a new repository, and provides an advanced section with many more licenses where you can compare their finer points.

CONTRIBUTING

This file describes guidelines for contributors, including:

  • Requirements of the contributions themselves. Examples of such requirements include:
    • Please add tests for any new features, and update tests for any behavior changes.
    • Please run the tests and be sure they pass before submitting your merge request.
    • Your change must pass all tests on all supported platforms. See the README for our platform requirements.
    • Please match the style of existing code. In particular, please use one tab/four spaces/eight spaces/6.34 spaces per indent, and please put opening braces ({) on the same line/their own line.
    • Please submit the complete, original series of changes—don’t squash merge.
    • Please squash-merge your changes—we don’t want the complete, original series of changes.
  • Information on how to contribute, if it differs at all from the usual “fork the project, commit and push your change, then submit a merge request”.
  • Requirements of contributors (e.g., a code of conduct such as the Contributor Covenant).
  • Info about any project mailing lists, IRC channels, Slack channels, etc., perhaps with their own code of conduct, such as the Community Covenant.

Codes of conduct are important for making explicit the standards of behavior you expect from project members and contributors. Don’t tolerate jerks—if somebody breaks your rules, even if their contributions are good on technical merit, kick them out. (You define what “kick them out” means, and may want to document it in your CONTRIBUTING file.)

Known jerks continuing to be tolerated/welcomed in your project is a visible “stay away” sign to other people who might otherwise bring equally good contributions with less hassle.

Issue tracker

Issue trackers are two things:

Your project management tool

You use issue tickets to track the work that has been done and that needs doing.

Most issue trackers provide a category/tag/label feature to identify on each ticket what sort of work it is. You can also create labels for priorities, if you want to track how essential or postponable each item is. (Some issue trackers have a separate priority field.)

Have a “help wanted” or “up for grabs” tag you can put on bugs that you don’t want to do yourself, and mention it in your CONTRIBUTING instructions. “help wanted” bugs are the ones you explicitly reserve for new contributors to do. Most should be simple or good introductions to the codebase, but you can also include harder jobs where (for reasons of your own time) you’re willing to accept the patch but not write it yourself.

You may also be able to create milestones for future releases you’re planning, into which you put each ticket to track when that work should be done (or at least landed), and, inversely, what work must be done before a release can ship.

Everyone else’s wish list

You’ll get a lot of bug reports and feature requests. Many of them will be duplicates, which you’ll close with a reference to the original/anointed ticket for the same bug/request/task.

If your project grows large/popular enough, you may choose to lock down the issue tracker so only contributors can add or edit tickets, and then take requests and bug reports instead through a support email address or form. Whoever reads that email then updates tickets as needed and sends ticket links or ticket numbers to support querents.

You will need to say no to some things, and some people will be displeased. You will also need to postpone some things because they aren’t as important or there isn’t a clear path forward (e.g., no steps to reproduce), and some people will be displeased because they want their feature/a fix now. There are no two ways about it; you are going to make some people unhappy. It’s not your fault.

Be polite; be fair; be the better person. Sometimes that still won’t be enough—some people won’t accept anything less than “yes, right away, it’ll be fixed in the next ten minutes”. And that sucks. But it’s not your fault.

Code review

Code review is where one or more contributors (and/or the maintainer) look at a proposed (or even already committed) change, looking for errors and potential improvements.

Some guidelines:

  • Review the patch, not the person. Don’t call the contributor an idiot or accuse them of wasting their time. Be gentle; be constructive. Yes, even if the patch is total trash—make it a teachable moment. Recognize language barriers and early learners. (But also don’t waste your time excessively—sometimes you will have to give up on someone who is a time sink. Even then, be nice.)
  • Prefer questions to statements. Be open-minded, not reactionary. Be willing to accept that an approach that isn’t what you would have done may be better. At the very least, be willing to accept it if it isn’t worse.
  • Praise good ideas, novel (but not overly clever) approaches, attention to performance, reliability, and ease-of-use, and hard work. Code review isn’t just a place to point out what they did wrong—it’s also a place to appreciate, explicitly, what they did right.

The simplest form is to look at the diff (the proposed change) in each merge request. You can comment on the merge request as a whole, and, on most services, on individual lines within the diff. Use these comments to ask for clarification, ask for documentation/comments, suggest changes, or suggest alternative approaches.

There are dedicated code review tools, such as Phabricator and ReviewBoard. I’ve used Phabricator; it’s good. I haven’t used ReviewBoard.

On a GitHub project, I typically just use the built-in merge request interface.

Package managers

They are many, and which ones you have to choose from will depend on what you’re making. For libraries for Apple platforms, there are CocoaPods and Carthage. For tools for macOS, there are Homebrew, MacPorts, and Fink.

Your README should include information on which package managers you support, and how to obtain your software through them. Expect people to request that you add your software on other package managers, or somebody to add it themselves and other people to subsequently complain to you when it doesn’t work. You decide what you do when these happen.

Documentation

It should start with your README, but ideally should not end there.

If you’re making a library, have header/API documentation. On Apple platforms, Xcode now has built-in support for this; it’ll display the contents of your documentation comments when you option-click a symbol in C, Objective-C, or Swift code.

Another place to put documentation (and also do broader planning than fits comfortably in an issue ticket) is your project’s wiki.

Accurately ripping ISO 9660 CDs on a modern Mac


2016-08-28 15:53:35 -08:00

Here’s how diskutil list describes a CD-ROM I bought at the Big Book Sale in Fort Mason:

/dev/disk14 (external, physical):
   #:                       TYPE NAME                    SIZE       IDENTIFIER
   0:        CD_partition_scheme                        *97.5 MB    disk14
   1:     Apple_partition_scheme                         84.9 MB    disk14s1
   2:        Apple_partition_map                         1.5 KB     disk14s1s1
   3:                        ISO                         46.1 KB    disk14s1s2
   4:                  Apple_HFS Operation Neptune CD    84.5 MB    disk14s1s3

This is an ISO 9660 “hybrid” disc. It presents a Mac volume when mounted on a Mac and a DOS/Windows volume when mounted on a DOS or Windows machine.

The HFS volume here is a fiction; the real ISO 9660 volume (despite its name of “Apple_partition_scheme”) is disk14s1—the first partition.

If you copy this partition, with something like:

sudo cp /dev/disk14s1 Operation_Neptune.iso

You will then have an accurate ISO 9660 disk image that you can mount on your Mac, and thus see the Mac contents, or on your DOS or Windows machine, and see those contents.

Colorized man pages: Understood and customized


2016-08-15 21:18:01 -08:00

man() {
    env \
        LESS_TERMCAP_mb=$(printf "\e[1;31m") \
        LESS_TERMCAP_md=$(printf "\e[1;31m") \
        LESS_TERMCAP_me=$(printf "\e[0m") \
        LESS_TERMCAP_se=$(printf "\e[0m") \
        LESS_TERMCAP_so=$(printf "\e[1;44;33m") \
        LESS_TERMCAP_ue=$(printf "\e[0m") \
        LESS_TERMCAP_us=$(printf "\e[1;32m") \
            man "$@"
}

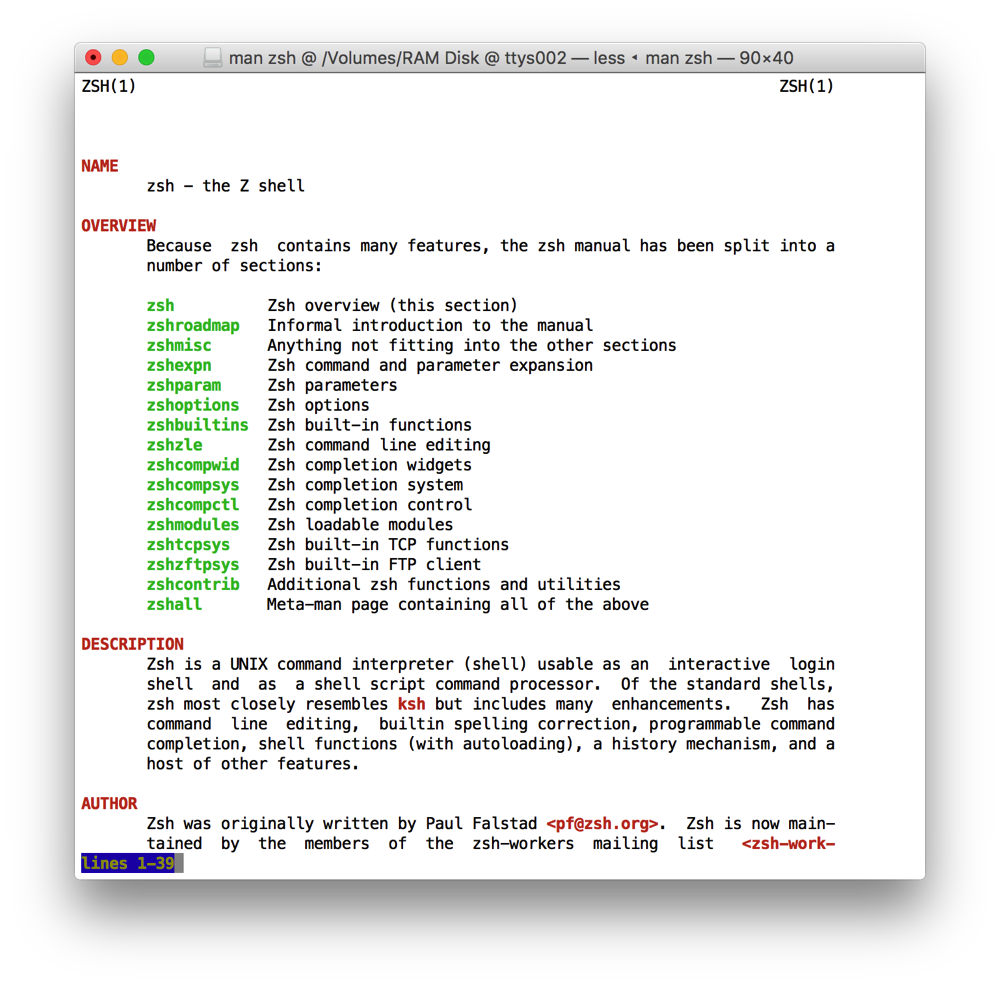
Screenshot of Terminal showing the zsh manpage with the above customizations.

Pretty neat, right? Let’s tear it apart, see what it’s doing, and think about how we might customize it to suit ourselves.

Read the rest of this entry »

Back again


2016-08-06 14:48:02 -08:00

Sorry for the long period of downtime. It was caused by two things:

  • My previous host, Kaizen Garden, apparently went poof with no warning. (That was why the whole website was down for awhile.)
  • I got most of the site back up on its new home, NearlyFreeSpeech.net, but got frustrated when I tried to restore the blog, so I just left it renamed out of sight until I next felt like making a run at it.

That was today. I finally sat down and got it all working, and fully upgraded WordPress while I was at it. The blog is back, everyone! Yay!

You will see some missing images. Apparently the backups I had only covered the WordPress database, not anything I’d uploaded as an attachment—those I only have through 2008. Oops.

Some of them I’ll be able to reconstruct. Fortunately I had good alt text on at least some of them, so I should be able to figure out what was there, and you should be able to make do in the meantime. And some of the images are definitely higher priority than others—the trigonometry figures, for example, will be among the first to come back.

So, please bear with me—the long recovery of this blog isn’t quite done yet. But this is progress.

Unicode date formats, YYYY?!


2015-10-24 08:41:08 -08:00

Last year, I tweeted:

This year, I noticed that the problem comes earlier, so I sent out an early reminder:

But exactly what problem am I referring to? Dan Wood wondered exactly what the YYYY issue is and what languages it affects.

So here’s a short explainer, not bound by the constraints of Twitter.

Year for week-of-year

You may have heard of “ISO 8601 format” (2015-01-01), but in fact, that’s only one of three formats that ISO 8601 defines:

  • Calendar format: 2015-01-01
  • Week format: 2015-W01-04
  • Ordinal format: 2015-001

The ordinal format is straightforward: It’s the NNNth day of the calendar year.

But the week format does not work that way. The first week of a year is not even guaranteed to contain January 1st! Rather, -W01-01 (the first day of the first week) is the Monday of the week that contains the year’s first Thursday. (Yes, that is the actual definition from the ISO 8601 standard.)

As such, ISO defines a parallel track of years that have the same year numbers as calendar years, but start and end on different dates (and always start on a Monday). ISO-week-year 2015 starts on the Monday of the week containing 2015’s first Thursday; that Monday is Monday, 2014-12-29 (2015-W01-01). 2015-01-01 is Thursday, 2015-W01-04.

Unicode date formats

YYYY and yyyy are Unicode date format patterns. These offer quite a bit more flexibility than the old str[fp]time(3) formats, particularly in choosing different representations of the same value (e.g., “September” vs “Sep” vs “09” vs “9”).

  • YYYY is defined as the “year for week-of-year”: that is, the year for ISO week dates.
  • yyyy is defined as the calendar year.

Whom this affects

The second part of Dan Wood’s question is what languages this affects.

NSDateFormatter* and CFDateFormatter both accept the Unicode date format syntax.

Contrary to what I’d previously assumed, PHP does not use Unicode date formats. As befits PHP, it uses something that looks the same but works subtly differently: “Y” is always the full calendar year, whereas “y” is a two-digit calendar year. ISO week years are “o”.

I actually don’t know of any others. Feel free to chime in in the comments if you know any other languages or frameworks that include built-in support for Unicode date formats.

* On the Mac, an NSDateFormatter configured for “10.0 behavior” accepts str[fp]time(3) formats; “10.4 behavior” is Unicode date formats. All other current Apple OSs, including iOS, have NSDateFormatters with 10.4 behavior only. CFDateFormatter has never supported str[fp]time(3) formats.