Archive for the 'Sewing' Category

Skillet handle holder

Sunday, October 27th, 2024

I cook with a couple of cast iron skillets—a 6-inch one and a 10-inch one—and, after each cooking session is complete, I wash the skillet so the fats and food bits left behind don’t set. In order to do this, I need to hold onto the handle—but by that point, the handle is very hot. Even with cast iron’s notoriously slow internal distribution of heat, the handle will still be 200°F or more.

My kitchen towel is often wet from hand-washing by that point, so I can’t very well use that as an insulator—the water will conduct the heat very efficiently. And I’m not stocking the kitchen with half a dozen towels at a time.

Pot-holders work, but it’s easy for a pot-holder to get misaligned and me to end up touching hot metal anyway. What I need is something I can slip onto the handle for that final cleaning step.

I’ve been using the Ove Glove, but wanted something easier to wash.*

Lodge sells silicone pot handle covers, but I’d rather not spend $10 a pop for more plastic.

What I realized is that I can modify a pot-holder by folding it over and sewing it closed. So I bought a two-pack of black all-cotton pot-holders from Dollar Tree and got started.

An unmodified black square pot-holder, with a loop for hanging at the middle of one edge, and a care label sewn in at the middle of another edge.

The first step was to seam-rip all of the original bias tape away from the edge, exposing the edges of the pot-holder body. This binding also includes the loop that can be used to hang the pot-holder, and secures the label with the care instructions. I want to keep both of these in the new design.

I cut the original bias tape (from the end opposite the loop) to a length that I could put back on one edge, including both adjacent corners. This edge becomes the perimeter of the opening.

The pot-holder with its original bias tape removed, exposing the edge of the cotton batting inside. A length of the original bias tape has been clipped back onto one edge of the pot-holder, while another length of the bias tape lay alongside to show its one-inch width.

Then I made some fresh bias tape from black cotton quilting fabric. I measured the length around one and a half sides of the pot-holder, which is the length of binding that will run from the open end down one side and along the closed end. The width is three inches, producing 1½-inch (36 mm) bias tape.

I don’t have a bias tape maker in that width (my widest one is 24 mm), so I had to apply the folds manually using pins and my ironing board. All-metal tailoring pins are helpful here because you can iron directly over them.

The inch-and-a-half black bias tape. One end of it is shown here against a small green cutting mat.
I cut off the diagonal ends to leave a right-angle end before sewing.

The reason for the jumbo bias tape is that twice the thickness of the pot-holder is _thick_. I used a 100-diameter denim needle and reduced my presser foot pressure by two full turns, and my Singer Heavy Duty machine still struggled at times. And you can really tell where the cotton batting is being compressed by the lockstitch.

I decided to put the care label at the closed end. One thing I’d do differently: I think I’d prefer the label on the underside. The side I put the label on ends up facing up and tickling my palm when I’m holding the skillet with my left hand.

The loop also goes at the closed end, at the very end of the new bias tape. I cut it off from the original bias tape and stuck one end in under the new bias tape on each side.

The finished holder, shot at an oblique angle to show the opening in the foreground. At the far end is the care label and the loop.

The finished product is very much a universal skillet handle holder, longer than either of my skillets’ handles; theoretically I could have trimmed it down to fit one of my skillets more exactly, and done the same with the other pot-holder to make one tailored for the other skillet. But I’m happy with this for now.

Holding my ten-inch skillet by the handle, which is encased in the cotton holder.

* I had misremembered the Ove Glove as not being machine-washable, but I just looked up the care instructions and it is. Then I checked on the care label for the pot-holders and apparently those, despite being all-cotton, are “hand wash only”. Oops. (Neither can be tumble-dried.) When the time comes, I’ll probably machine-wash the pot-holder handle holder anyway and see what happens.

Clover Wonder Clips seam-allowance quick-reference label
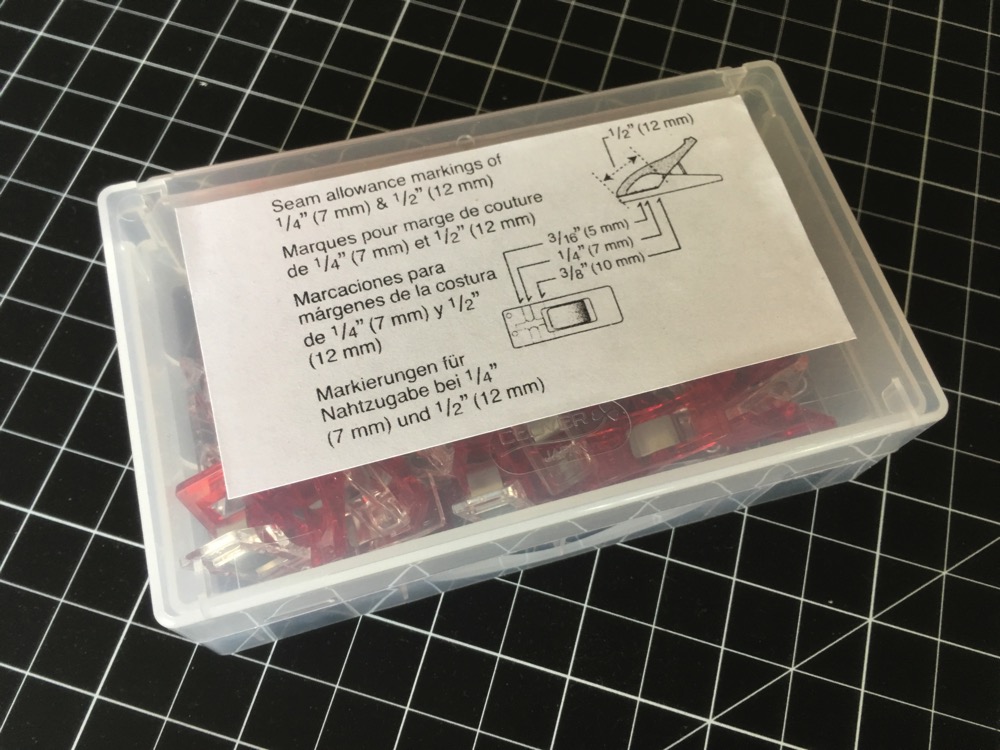
Monday, May 14th, 2018

Wonder Clips are a particular kind of clip used for clamping fabrics—especially leather and vinyl, for which pins are inappropriate—to be sewn. I have a box of 50 Wonder Clips that I use for most projects.

One of the features of Wonder Clips (compared to, say, clothespins) is markings on each clip at several depths, so you can use how much of the piece is in the clip’s mouth to measure the seam allowance at each clip. The packaging includes a quick reference:

Wonder clips measuring guide

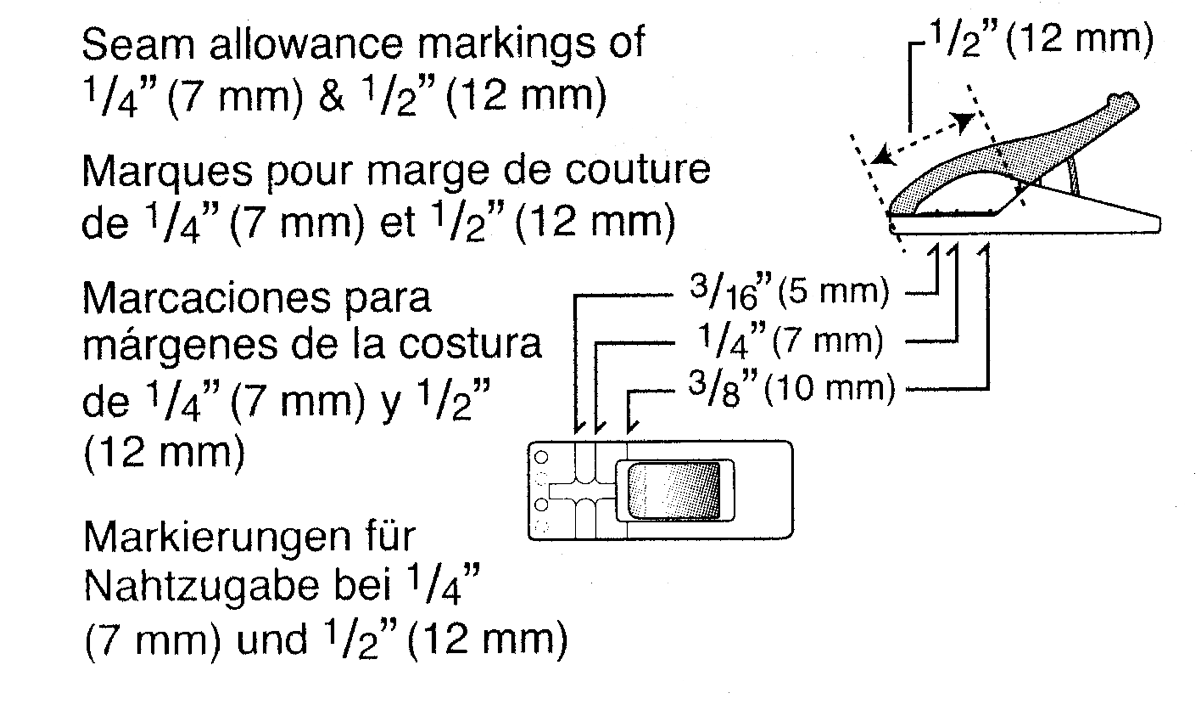
I scanned this in and converted it to black and white, and also made a printable version for Avery 5444 labels. 5444 is a 4×6″ sheet that should work in most printers; that PDF will produce two seam-allowance reference labels of just the right size to be applied to the top of the 50-count Wonder Clips box.

My box of Wonder Clips, with the label applied.

Adding bat fins to a wrist brace

Monday, September 4th, 2017

If you own a wrist brace, but feel like it’s missing a certain something:

Photo of the augmented wrist brace being worn.
Like the fins from Batman’s gloves!

here’s how you can add that to your wrist brace.

You’ll need:

  • A sewing machine
  • Black thread (polyester is fine)
  • Fabric. You’ve got lots of options, but what you need is something either innately stiff, like vinyl, or thin but stiffened by thin cardboard or stiff interfacing. I used this polyester-backed vinyl.
  • Either the 3D-printed template or the 2D-printed pattern to cut out of the fabric.
  • A leather sewing machine needle, if indeed you use leather or vinyl fabric or you use cardboard as interfacing
  • Tailor’s chalk
  • A wrist brace you can sew the fins onto (I used the Walgreens one, which has a thin stretch-fabric section that covers the appropriate spot on the arm)

(more…)