Archive for the 'Graphics' Category

How trigonometry works

Monday, June 10th, 2013

I’ve never been a very mathy person, and I came to trigonometry particularly late in life—surprisingly so, considering I’m a programmer who has to draw graphics from time to time. (Guess why I started learning it.)

So, for folks like me who can’t read Greek, here’s an introduction to trigonometry.


Trigonometry largely revolves around three basic functions:

  • Cosine
  • Sine
  • Tangent

You know these from the famous mnemonic acronym “SOHCAHTOA”, which is where I’ll start from.

The acronym summarizes the three functions thusly:

  • sine = opposite / hypotenuse
  • cosine = adjacent / hypotenuse
  • tangent = opposite / adjacent

Very buzzwordy, and nonsensical when every time you use them, you pass in an angle. And yet, 100% correct.

The cosine, sine, and tangent functions work by creating an imaginary triangle whose hypotenuse has the given angle, and returning the ratio of two of that triangle’s sides.

Given the angle of 30° (or π × 30180 radians, or τ × 30360 radians):

Diagram of a right triangle of 30° within a circle

All three functions create this triangle, and then return the ratio of two of its sides.

Note the proximity of the three sides to the origin.

  • The opposite side is the vertical side, literally on the opposite side of the triangle from the origin.
  • The adjacent side is the horizontal side, extending from the origin to the opposite side. It’s the adjacent side because it touches (is adjacent to) the origin.
  • The hypotenuse is the (usually) diagonal side that extends from one end of the adjacent side (namely, from the origin) to one end of the opposite side (namely, the end that isn’t touching the other end of the adjacent side).

Let’s consider a different case for each function—namely, for each function, the case in which it returns 1.

Cosine

Definition: adjacent / hypotenuse

Circle with a 0° triangle from its center

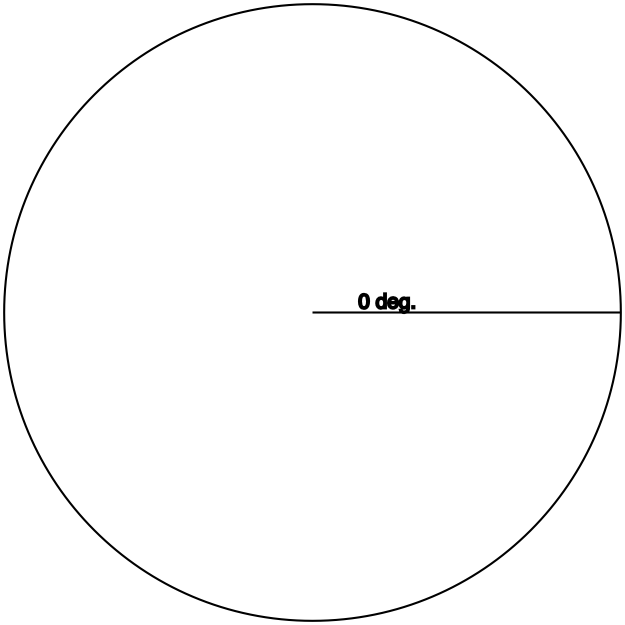
With the hypotenuse at 0°, there basically is no opposite side: The hypotenuse is in exactly the same space as the adjacent side, from the origin to the lines’ ends. Thus, they are equal, so the ratio is 1.

Sine

Definition: opposite / hypotenuse

Circle with a 90° triangle from its center

With the hypotenuse at 90° (or τ/4), there basically is no adjacent side: The hypotenuse is in exactly the same space as the opposite side, from the origin to the lines’ ends. Thus, they are equal, so the ratio is 1.

Cosine and sine: What if we swap them?

Try sin 0 or cos τ/4. What do you get?

Zero, of course. The 0° triangle has effectively no opposite side, so the sine of that (tri)angle is 01, which is zero.

Likewise, the 90° triangle has effectively no adjacent side, so the cosine (adjacent/hypotenuse) of that (tri)angle is 01.

Tangent

Definition: opposite / adjacent

You should be able to guess what the triangle for which tangent returns 1 looks like. Go on, take a guess before you scroll down.


Circle with a 45° triangle from its center

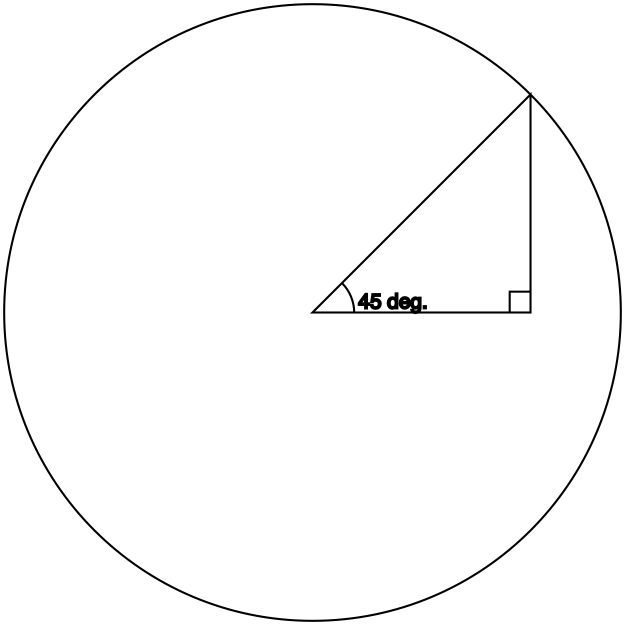
A 45° (tri)angle’s adjacent and opposite sides are equal, which is what makes the tangent function return 1.

Cosine and sine: The unit circle

Cosine and sine return the ratio of one side or the other to the hypotenuse.

Accordingly, the length of the hypotenuse affects the result. But, again, these functions take only an angle, so where do you tell it what hypotenuse to use? And why do these functions, on any calculator and in any programming language, return only a single number?

The trigonometric functions are defined in terms of the unit circle, which is a circle with radius 1.

If you look at the diagrams above, you’ll notice that the hypotenuse of the triangle always extends to the perimeter of the circle—that is, it’s always equal to the radius. This is no accident: The hypotenuse of the constructed triangle is the radius of the circle. And since the radius of the unit circle is 1, that means the hypotenuse of the imaginary triangle is 1.

Thus, the fractions that cosine and sine return are adjacent / 1 and opposite / 1. That’s why they return single numbers: the “/ 1” is simplified out.

From this follows the method to compute cosine or sine for an arc with a different radius: Multiply the cosine or sine by the desired radius.

Cosine and sine: What if we use an angle greater than 90°?

What happens if we take the cosine and sine of an angle like, say, 4 radians (about 230°)?

Let’s draw out the triangle:

Circle with a 230° triangle from its center

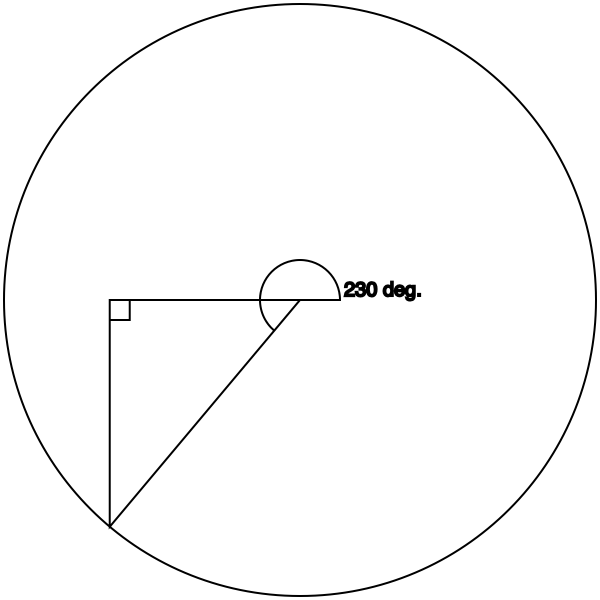
Geometrically, the origin is 0,0. As long as we’re in the 0–90° range, no problem, because both the x (cosine) and y (sine) values in that quadrant are positive. But now we’re in negative territory.

With the hypotenuse in this quadrant, the adjacent and opposite sides are now negative numbers. cos π = cos τ2 is -1, and sin (τ×34) is likewise -1. For this triangle, they’re similarly negative, though not -1.

(Exercise: What about the other two quadrants? What are the cosine and sine of, say, 110° and 300°?)

Tangent: What if we use an angle greater than 45°?

As we saw above, if we give the tangent function an angle of τ/8, the ratio is 1. What if we go higher?

Well, then the ratio goes higher. Very quickly.

Graph of tan(x) for x = 0 → τ/4

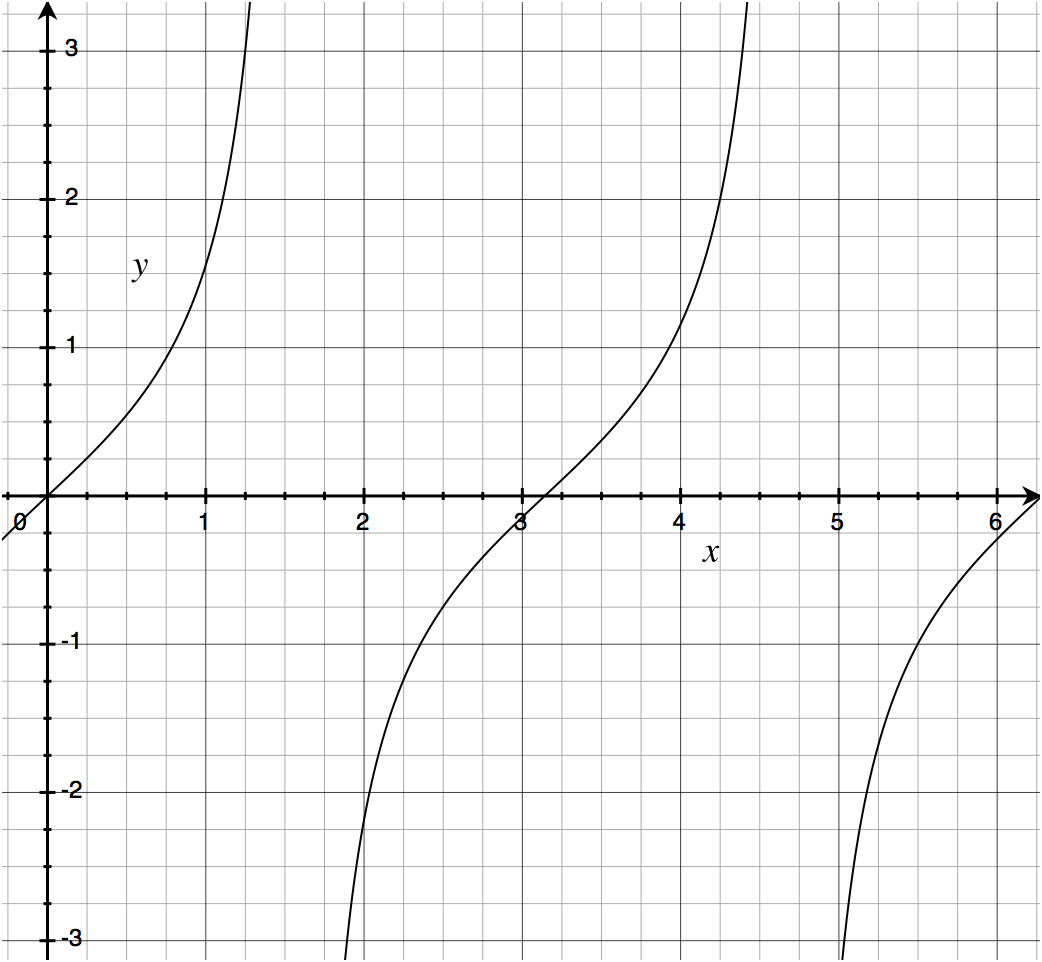
The half-curve at left is the quadrant from 0 to τ/4 (the upper-right quadrant).
The curve in the middle is the two quadrants from τ/4 to τ×34 (the entire left half of the circle).
The half-curve at right is the quadrant from τ×34 to τ (the lower-right quadrant).

In words, the tangent function returns a value from 0 to 1 (inclusive) for any angle that is a multiple of π plus or minus τ4 (45°). 0 counts (it’s 0π), as does π, as does π2 (= τ = 360°), and so on. Likewise 45°, 360-45=315°, 180-45=135°, 180+45=215°, etc.

Segmentation of a circle by what sort of values tan(x) returns

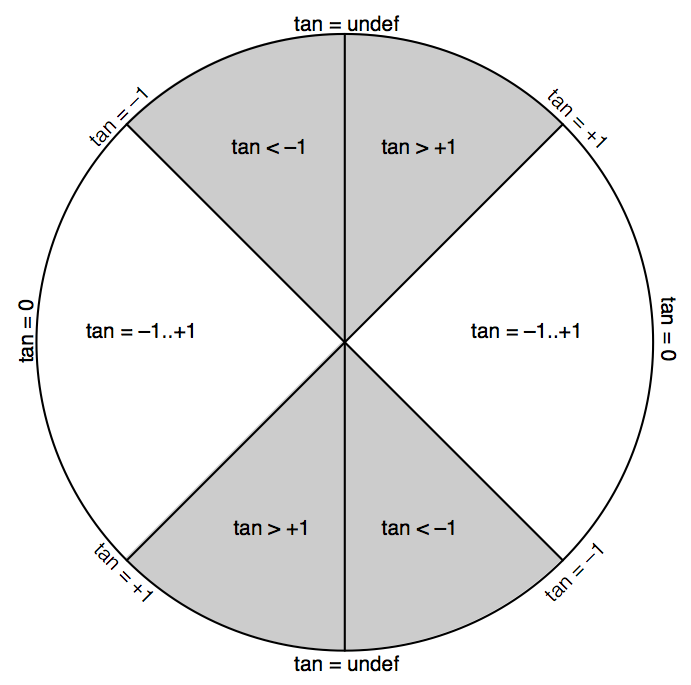
Outside of those left and right quadrants, the tangent function curves very quickly off the chart—it approaches infinity.

(Programmer note: In some environments, there are both positive and negative values of zero, in which case tan 0 returns positive zero and tan π returns negative zero. Mathematically, there is only one zero and it is neither positive nor negative.)

Tangent is the only one of the three that can barf on its input. Namely, a hypotenuse angle of τ/4 (90°) equates to the opposite (vertical) side being 1 and the adjacent (horizontal) side being 0 (as shown above for the sine function), so tan τ4 = 1/0, which is undefined. The same goes for tan τ34, which equates to -10.

The tangent of an angle is its slope, which you can use to reduce an angle down to whether it is more horizontal (-1..+1), more vertical (< -1 or > +1), perfectly horizontal (0), or perfectly vertical (undefined).

As a practical matter, whenever I need to compute a slope ratio, I special-case perfectly vertical angles to result in ∞.

Cosine and sine: Width and height

From the above definitions, the practical use of cosine and sine emerges: They return the width and height of the right triangle whose hypotenuse has that angle.

As described above, these results are typically interpreted in terms of the unit circle (a circle with radius 1), meaning that the hypotenuse of the triangle is 1. Thus, if you’re working with an arc or circle with a different radius, you need to multiply your cosine or sine value by that radius.

A practical problem

For example, let’s say your friend has a 50″ TV, and you’re wondering what its width and height is. Maybe she’s moving, or giving or selling it to you, or both, so one of you is going to need to know whether and where it’ll fit.

The length of the hypotenuse is the radius of the circle; in the unit circle, it’s 1, but we’re dealing with a hypotenuse (diagonal measurement of the screen) whose length is something else. Our radius is 50″.

Next, we need the angle. No need for a protractor; TVs typically have an aspect ratio of either 16:9 (widescreen) or 4:3 (“standard”). The aspect ratio is width / height, which is the inverse of the slope ratio: the ratio that the tangent function gives us (which is opposite / adjacent, or height / width). Dividing 1 by the aspect ratio gives us the slope.

Only problem is now we need to go the opposite direction of tangent: we need to go from the slope ratio to the angle.

No problem! That’s what the atan (arctangent) function is for. (Each of the trigonometric functions has an inverse, with the same name but prefixed with “arc” for reasons I have yet to figure out.)

atan takes a slope ratio and gives us, in radians (fraction of τ), the angle that corresponds to it.

Let’s assume it’s an HDTV. (I don’t want to think about trying to move an old 50″ rear-projection SDTV.) The aspect ratio is 16/9, so the slope is 9/16 (remember, tangent is opposite over adjacent); atan 916 is about 29–30°, or about 0.5 radians.

Diagram of a right triangle of 30° within a circle

I promise that my choice of 30° for the first example and subsequently deciding to measure an HDTV as the example use case was merely a coincidence.

So we have our angle, 0.5 radians, and our radius, which is 50″. From this, we compute the width and height of the television:

  • Take the cosine and sine of the angle. (Roughly 0.867 and 0.577, respectively, but use your calculator.)
  • Multiply each of these by 50 to get the width and height (respectively) in inches. (Roughly 44″ and 29″, respectively, rounding up for interior-decorative pessimism.)
  • Add an inch or two to each number to account for the frame around the viewable area of the display.

So the TV needs about 45 by 30 inches of clear space in order to not block anything.

Apple documentation search that works

Sunday, March 6th, 2011

You’ve probably tried searching Apple’s developer documentation like this:

The filter field on the ADC documentation library navigation page.

Edit: That’s the filter field, which is not what this post is about. The filter sucks. This isn’t just an easy way to use the filter field; it’s an entirely different solution. Read on.

You’ve probably been searching it like this:

Google.

(And yes, I know about site:developer.apple.com. That often isn’t much better than without it. Again, read on.)

There is a better way.

Better than that: A best way.

Setup

First, you must use Google Chrome or OmniWeb.

Go to your list of custom searches. In Chrome, open the Preferences and click on Manage:

Screenshot with arrow pointing to the Manage button.

In OmniWeb, open the Preferences and click on Shortcuts:

Screenshot of OmniWeb's Shortcuts pane.

Then add one or both of these searches:

For the Mac

Chrome OmniWeb
Name ADC Mac OS X Library
Keyword adcmac adcmac@
URL http://developer.apple.com/library/mac/search/?q=%s http://developer.apple.com/library/mac/search/?q=%@

For iOS

Chrome OmniWeb
Name ADC iOS Library
Keyword adcios adcios@
URL http://developer.apple.com/library/ios/search/?q=%s http://developer.apple.com/library/ios/search/?q=%@

Result

Notice how the results page gives you both guides and references at once, even giving specific-chapter links when relevant. You even get relevant technotes and Q&As. No wild goose chases, no PDF mines, no third-party old backup copies, no having to scroll past six hits of mailing-list threads and Stack Overflow questions. You get the docs, the right docs, and nothing but the docs.

For this specific purpose, you now have something better than Google.

Nearest Neighbor Image Unit

Saturday, February 6th, 2010

I originally wrote this as an application using NSImage (with NSImageInterpolationNone), but decided to rewrite it as an Image Unit. So, here it is.

Ship-It Saturday: IconGrabber 2.0.1

Sunday, January 3rd, 2010

The last time I released a version of IconGrabber was only a week after Valve released Half-Life 2—way back in 2004. That game wasn’t even on my radar then, since I couldn’t run it on my PowerPC-based Mac!

Just over five years later, I’ve played all of the Half-Life 2 games and love them, and IconGrabber returns with some bug fixes and support for the new bigger icon sizes introduced in Tiger and Leopard. Version 2.0.1 is available from the IconGrabber home page.

iPhone app settings

Wednesday, January 7th, 2009

One of the ongoing debates among users of iPhone OS devices is whether an app’s settings belong in the app itself, or the Settings app.

I’m of the opinion that this wouldn’t even be a debate if it weren’t for Apple’s prescription in the iPhone HIG that every iPhone app’s settings should be in the Settings app. Mac apps don’t come with prefpanes for their preferences (with the exception of faceless background apps like Growl). Windows apps don’t, either, that I know of. GNOME and KDE apps don’t pollute Ubuntu’s Control Panel.

The iPhone is the only OS I know of whose developer recommends that app developers put their application settings in the system-wide Settings app.

As we’ve seen several times on every platform, it’s OK to break one of the local Human Interface Guidelines if and only if the violation makes the interface better.

I think this guideline is one that iPhone developers should violate flagrantly.

But there’s a problem. The iPhone doesn’t really have an icon for a Settings button. Most developers seem to use the Info icon that one of the frameworks apparently provides, but this isn’t the proper use of that icon. The Info icon means info, not application settings.

Another choice is the gear icon for Action buttons:

NSActionTemplate.

But, again, we have a conflation of functions. The button in question is not an Action button; it is a Settings button. This icon is not a Settings icon. (I suspect that most people who use the Action icon use it because it doesn’t have any particular association with “action”, either, other than Apple’s endorsement of it for that.)

The Iconfactory, wisely, chose differently in Twitterrific. I suspect that this was largely coincidence, as the Mac version of Twitterrific came first and already had a Settings icon; for the iPhone version, the developers simply used the same icon. It works well enough:

as seen in this screenshot of Twitterrific.

But it’s not perfect. A wrench does not say “settings”. (I offer myself as evidence: When I first saw it in the Mac version, I didn’t know it was the Preferences button.) Generally, a wrench means “edit this”, as in the context of a game.

What we need is an icon that says “settings”. Ideally, this icon should either convey the notion of a changeable state value (as the previously-favored light switch [Mac OS X through Tiger] and slider [Mac OS] did), or build on an existing association with the concept of settings.

Let’s go with the latter. I nominate the Settings app’s icon:

iPhone Settings icon

Familiar enough, wouldn’t you say?

That’s Apple’s version. Here’s my button-icon (a.k.a. template) version, in the 16-px size:

Settings button icon 16-px version.

I tried it out in the iPhone version of Twitterrific on my iPod touch. Before and a mock-up of after:

Before.
After.

After I created this icon, I wondered what it would look like in the Mac version of Twitterrific.

Here’s the original:

…with the wrench icon.

… And right away we have a problem. These buttons are already framed; my white frame will glare here.

Fortunately, that’s easy to solve. With ten seconds of work, I created a frameless version. Here’s what that looks like:

Twitterrific-Mac-newSettingsIcon.png

I think we could all get used to this icon. This wouldn’t have worked at all before Apple changed the icon of System Preferences to match the iPhone Settings app, but now it can.

I don’t think it’s perfect. Perhaps a real icon designer (I’m just a programmer) can refine it. But I think it’s a good first draft. I’m curious to hear your opinions; please post constructive feedback in the comments.

If you want to use this icon, go ahead. Here’s the original Opacity document , from which you can build all the many variations of the icon. (Click on Inspector, then Factories, then find the version you want in the list and click its Build button.)

“Photoshop sucks” updated

Sunday, March 23rd, 2008

Upon inspiration by a comment, I’ve just updated my rant from a couple years ago, “Photoshop sucks”, to include a list of alternatives. Topping the list, of course, is Acorn; also included are Core Image Fun House, Pixelmator, DrawIt, and Iris.

I’m very glad that there are now solutions to the problem that is Photoshop. I dislike bitching about something without a solution to offer; now I have six to offer, so that rant is now complete.

A public thank-you

Monday, March 17th, 2008

This goes out to whichever engineers at Apple fixed the Image Unit template to not suck.

Before Xcode 2.5, that template was useless. Now, it contains everything I need already set up, to the maximum extent possible.

Thank you, Apple engineers.

What to do if Core Image is ignoring your slider attributes

Wednesday, February 27th, 2008

So you’re writing an Image Unit, and it has a couple of numeric parameters. You expect that Core Image Fun House will show a slider for each of them, and it does—but no matter what you do, the slider’s minimum and maximum are both 0. Furthermore, Core Image Fun House doesn’t show your parameters’ real display names; it simply makes them up from the parameters’ KVC keys.

The problem is that you are specifying those attributes in the wrong place in your Description.plist. And yes, I know you’re specifying them where the project template had them—so was I. The template has it wrong.

One of the filter attributes that Core Image recognizes is CIInputs. The value for this key is an array of dictionaries; each dictionary represents one parameter to the filter. The template has all the parameter attributes in these dictionaries. That makes sense, but it’s not where Core Image looks for them.

In reality, Core Image only looks for three keys in those dictionaries:

  • CIAttributeName
  • CIAttributeClass
  • CIAttributeDefault

Anything else, it simply ignores.

The correct place to put all those other keys (including CIAttributeSliderMin, CIAttributeSliderMax, and CIAttributeDisplayName) is in another dictionary—one for each parameter. These dictionaries go inside the CIFilterAttributes dictionary. In other words, the CIFilterAttributes dictionary should contain:

  • CIInputs => Aforementioned array of (now very small) dictionaries
  • inputFoo => Dictionary fully describing the inputFoo parameter, including slider attributes and display name
  • inputBar => Dictionary fully describing the inputBar parameter, including slider attributes and display name
  • inputBaz => Dictionary fully describing the inputBaz parameter, including slider attributes and display name

Finally, an example:

<key>CIFilterAttributes</key>
<dict>
    ⋮
    <key>CIInputs</key>
    <array>
        <dict>
            <key>CIAttributeClass</key>
            <string>CIImage</string>
            <key>CIAttributeName</key>
            <string>inputImage</string>
        </dict>
        <dict>
            <key>CIAttributeClass</key>
            <string>NSNumber</string>
            <key>CIAttributeDefault</key>
            <real>1.0</real>
            <key>CIAttributeName</key>
            <string>inputWhitePoint</string>
        </dict>
        <dict>
            <key>CIAttributeClass</key>
            <string>NSNumber</string>
            <key>CIAttributeDefault</key>
            <real>0.0</real>
            <key>CIAttributeName</key>
            <string>inputBlackPoint</string>
        </dict>
    </array>
    <key>inputWhitePoint</key>
    <dict>
        <key>CIAttributeClass</key>
        <string>NSNumber</string>
        <key>CIAttributeDefault</key>
        <real>1.0</real>
        <key>CIAttributeDisplayName</key>
        <string>White point</string>
        <key>CIAttributeIdentity</key>
        <real>1.0</real>
        <key>CIAttributeMin</key>
        <real>0.0</real>
        <key>CIAttributeMax</key>
        <real>1.0</real>
        <key>CIAttributeName</key>
        <string>inputWhitePoint</string>
        <key>CIAttributeSliderMin</key>
        <real>0.0</real>
        <key>CIAttributeSliderMax</key>
        <real>1.0</real>
        <key>CIAttributeType</key>
        <string>CIAttributeTypeScalar</string>
    </dict>
    <key>inputBlackPoint</key>
    <dict>
        <key>CIAttributeClass</key>
        <string>NSNumber</string>
        <key>CIAttributeDefault</key>
        <real>0.0</real>
        <key>CIAttributeDisplayName</key>
        <string>Black point</string>
        <key>CIAttributeIdentity</key>
        <real>0.0</real>
        <key>CIAttributeMin</key>
        <real>0.0</real>
        <key>CIAttributeMax</key>
        <real>1.0</real>
        <key>CIAttributeName</key>
        <string>inputBlackPoint</string>
        <key>CIAttributeSliderMin</key>
        <real>0.0</real>
        <key>CIAttributeSliderMax</key>
        <real>1.0</real>
        <key>CIAttributeType</key>
        <string>CIAttributeTypeScalar</string>
    </dict>
</dict>

You can see how the descriptions under CIInputs are as terse as possible; everything besides the absolute necessities is specified in the outer dictionaries.

How to convert an alpha channel to a mask

Monday, February 18th, 2008

Updated 2008-04-17 to clarify the marked-up screenshot of the Color Matrix view. If you’ve seen this post before, check out the before and after.

So, let’s say you want to convert an image to a mask.

Triangle, circle, rectangle

Mask from triangle, circle, rectangle

This is easy to do with the Color Matrix filter in Core Image.

If you’ve ever looked at the Color Matrix filter out of curiosity, you were probably frightened by its imposing array of 20 text fields:

The fields are in five rows of four columns. The first four rows are “Red Vector”, “Green Vector”, “Blue Vector”, and “Alpha Vector”. The fifth row is “Bias Vector”; unlike the others, it is an addend rather than a multiplier, and it does not correspond to a color component.

Don’t worry. The fields are actually very simple, though not explained in the UI:

  • The Red, Green, Blue, and Alpha rows each represent a component of an output pixel.
  • Each column represents a component of an input pixel.
  • Each cell in the component rows is a multiplier.
  • Each cell in the “Bias vector” row is an addend.

This image expresses graphically the same explanation that the previous list provided.

(The documentation for the Color Matrix filter actually does explain it, but I like my explanation better for not using fancy math terms like “dot product”.)

So with this tool, our task is redefined like so:

How to replace the color channels of an image with the alpha channel, and set the alpha channel to all-100%

  1. Set the three color-component vectors (Red Vector, Green Vector, and Blue Vector) to 0, 0, 0, 1. (In other words, multiply every input color component by 0, and the input alpha by 1, and set all three color components to that.)
  2. Set the Alpha Vector to 0, 0, 0, 0. (In other words, multiply all input components by 0, and set the output alpha component to that. In other other words, set every output alpha component to 0.)
  3. Set the Bias Vector also to 0, 0, 0, 1. (In other words, add 0 to all three color components, and add 1 to the alpha component.)

You can generalize this to the extraction of other channels. Let’s say you want to make a mask of the blue channel:

  1. Set the three color-component vectors to 0, 0, 1, 0. (For every output color component, multiply every color component by 0, except for blue. Multiply blue by 1—i.e., don’t change it.)
  2. Set the Alpha Vector to 0, 0, 0, 0. (Multiply every alpha component by 0—i.e., set every output alpha component to 0.)
  3. Set the Bias Vector to 0, 0, 0, 1. (Add 1 to the alpha component. This step is invariant; you always add to the alpha component.)

To demonstrate this, here’s a red-blue gradient (shown in Acorn  to visualize the gradient image’s own transparency):

The gradient image is an oval, filled with an upper-left-to-lower-right red-to-blue gradient, on a transparent background.

If we extract the blue channel, as shown above, we get this:

A mask where the blue parts of the source image are white, and all else is black.

Note how the red parts of the gradient are black, because we extracted the blue channel, and there was little to no blue there.

Likewise, if we extract the red channel, we get this:

A mask where the red parts of the source image are white, and all else is black.

In this case, the converse of the blue-channel mask.

(By the way, in case you’re wondering: No, I don’t know what caused the white pixels along the edge. It could be a Lineform bug, or a Core Image bug, or a graphics-card bug. I didn’t keep the original Lineform file for the source image, stupidly, but in case you’d like to test it on your own machine, I re-created it. Here’s a PDF of the replica; you can use image to convert it to PNG. I can confirm that I saw similar results with this image to the results with the image I used for this post.)

You can even mix up the colors of an image. Suppose we want to reverse that gradient:

  1. Set the Red Vector to 0, 0, 1, 0. (In other words, replace red with blue.)
  2. Set the Blue Vector to 1, 0, 0, 0. (In other words, replace blue with red.)
  3. Leave the Alpha and Bias Vectors at the default values. (In other words, we’re leaving the alpha channel unchanged this time.)

The same oval-shaped gradient image from above, but with red and blue swapped.
The red-to-blue gradient is now a blue-to-red gradient.

So what is this good for?

Well, mainly, so you can create mask images. Several filters require these, such as the Blend with Mask filter in the Stylize category. The Color Matrix filter makes this easy, although you still have to save the mask image somewhere.

It’s even easier in Opacity, where you can create a Color Matrix filter layer, configure it using the Layer Inspector, then hide it by clicking its eye icon. This way, the filter layer won’t show up in the rendered document (or in any of its build products), but you can still use its result as the mask to another filter layer.

Opacity

Wednesday, February 13th, 2008

As you may have read on wootest’s weblog, Like Thought Software released its new image editor, Opacity, today.

Before I go any further, here’s full disclosure: The developer invited me to beta-test the app, and I did. He also gave me a free license for this purpose (the app normally costs $89 USD). Also, I have some code in the app, because it uses IconFamily, which I contributed a patch to a long time ago.

OK, that’s everything. Now, to borrow from wootest’s disclaimer on the same topic:

Don’t confuse this as simple tit-for-tat back-scratching, though. Had I … had no involvement whatsoever, the application would still have been every bit as brilliant, and I would have come out just as strongly in favor of it.

I love this app.

Opacity is an image editor designed to enable app developers to create multiple-resolution and any-resolution graphics easily. It’s built for that specific purpose, and the Opacity website even says so. This app really is not intended for anything other than user-interface graphics.

Key points:

  • It’s mostly vector-based, but it also has primitive raster tools.
  • It has non-destructive Core Image filter layers, similar to Photoshop’s adjustment layers. (Contrast with Acorn, which makes you apply each filter permanently. You can’t go back and edit the filter parameters.)
  • It has built-in templates for most common icon types.

Opacity has several important features over past editors:

  • It has built-in support for multiple resolutions. Every Opacity document has one or more resolutions, and you can add and delete them at will.
  • It has a target-based workflow. Each Opacity document is, essentially, a “project” for one image; every target in the document results in one image file in an external format, such as TIFF or IconFamily (.icns). (The application now calls these “factories”, but early betas did, in fact, call them targets, and I prefer that terminology.) You can build each target factory or all targets factories at will, and there’s an option to build all whenever you Save.
  • You are not limited to the stock suite of transformations (e.g., Rotate 90°, Scale, Flip Vertical); you can make your own.
  • You can create folder layers to group layers (especially filter layers) together, and these folder layers can be nested as deeply as you want.
  • When configuring a Core Image filter that accepts an image as a parameter (e.g., Shaded Material, Blend with Mask, or one of the Transition or Composite filters), you can use any layer in the document—even folder layers.

Opacity is not perfect. Some things don’t quite work like you would expect: for example, vector objects do automatically appear in every resolution, but pixels that you draw or paste don’t automatically get mirrored to the other resolutions; instead, Opacity waits for your explicit say-so (the Clone Current Layer’s Pixels to Other Resolutions command). Opacity also still has a couple of major bugs: Flip Horizontal, for example, takes way too long in one document that I created. Personally, I didn’t expect it to go final this early, and I recommend that you wait until at least 1.0.1.

But those are dark linings in a silver cloud. Once all the major bugs are fixed, I believe that this app is how you will create your application’s custom toolbar and button images for the modern resolution-independent world.

How to make a 512-px version of the Network icon

Saturday, February 2nd, 2008

You will go from the pure-blue .Mac icon……to the purplish-gray Network icon.

UPDATE 2008-01-02: Ahruman commented that you can just use NSNetwork in IconGrabber. No need to go through all these steps and fake one.

If you’ve ever needed a high-resolution version of the Network icon for anything, you may have noticed that Mac OS X does not ship with one. When you select the Network and Copy it, then create a new document from the clipboard in Preview or Acorn, the largest size available is 128-px.

Fortunately, the .Mac icon is available in 512-px, and you can easily change it into the Network icon.

You will, of course, need Leopard (for no other version of Mac OS X has 512-px icons).

  1. Obtain the built-in image NSImageNamedDotMac in either Core Image Fun House or Acorn.
  2. Apply a Hue Adjust filter: +5°.
  3. Apply a Color Controls filter: Saturation × 0.25.

The easiest way to get the .Mac image is IconGrabber. Enter the name “NSDotMac”, then click Draw, then set the size to 512×512, then save. (Note: On an Intel Mac, you’ll need to build from source, because the pre-built version for PowerPCs doesn’t run on Intel for some reason.)

I do believe we have a record

Monday, September 24th, 2007
pngout \        %~/Projects/@otherpeoplesprojects/growl/trunk/Core/Resources(0)
> NotifyOSX.growlStyle/Contents/Resources/sidetitle.png 
 In:                             NotifyOSX.growlStyle/Contents/Resources/sidetitle.png
 In:   29644 bytes
Out:                             NotifyOSX.growlStyle/Contents/Resources/sidetitle.png
Out:     527 bytes               
Chg:  -29117 bytes (  1% of original)

Report-an-Apple-Bug Friday! 58

Saturday, May 12th, 2007

Slightly late because I had to devise a way to determine whether a GIF file is interlaced. (I settled on GifBuilder, in case you’re curious.) This ties in with the next two bugs; I’ll blog both at once next week.

This bug is NSImageInterlaced documented as working on half of known interlaceable types. It was filed on 2007-05-12 at 00:27 PDT.

(more…)

Report-an-Apple-Bug Friday! 57

Friday, April 27th, 2007

This bug is NSFrameRectWithWidth uses the current color, not the stroke color. It was filed on 2007-04-27 at 16:17 PDT.

(more…)

A novel way to reduce the size of a grayscale PNG file

Sunday, April 8th, 2007

Today, I scanned in one of my old drawings: a study of five-pointed stars that I made when I was trying to figure out how to draw a proper star (this was at the time of me working on Keynote Bingo MWSF2007 Edition, and a derivative of the same star is used in TuneTagger).

The odd thing is, after I corrected the image using Preview’s Black Point and Aperture controls (no relation to the photo-management program), the image weighed about two-fifths as much:

du -b Five-pointed\ star\ study* %~/Pictures(0)
1403443 Five-pointed star study-adjusted levels.png
3346498 Five-pointed star study.png

(These sizes are after pngout, but even if I re-correct the original image and save it elsewhere, it comes out 1790244 bytes long.)

Go figure.

Why Mac programmers should learn PostScript

Saturday, April 7th, 2007

I’ll follow this up with a tutorial called “PostScript for Cocoa programmers”, but today brings my list of reasons why you should care in the first place.

(more…)

New utility: exif-confer

Monday, March 26th, 2007

Not too long ago, I was at the bank and decided to take this photo of a couple of magazines sitting next to each other. As you can see, I edited out the bank’s address.

I did this using Lineform. The problem is, Lineform is a vector app, so it doesn’t keep any EXIF data from the original image (most of the time, that would not make sense). In my situation, I did want to keep the EXIF info, but there’s no way to make Lineform do that.

So I wrote a command-line tool to bring EXIF properties over from one image to another image. I call this image exif-confer. Enjoy.

How to make the HP Photosmart M425 work on a Mac

Monday, March 12th, 2007
  1. Get out the HP drivers CD.
  2. Put it in one of these.
  3. Push the button.

Silly me, trying to use a device with the Mac drivers that come with the device. Turns out it works just fine with the built-in Mac OS X drivers, either via PTP (whatever that is), or as a mass-storage device. In fact, Image Capture works the same either way.

With the HP drivers, a program called “HPCamera_PTP” would crash whenever I plugged in the camera, whether I did this in Image Capture or iPhoto. I found that switching the camera to mass-storage mode (“Disk Drive” in the USB Configuration menu) worked around that problem nicely, and Image Capture (and iPhoto) even work transparently in this mode.

Later, I was tinkering with Image Capture in some way (I forget why) and noticed that it has its own PTP driver. This gave me an idea, and having long ago uninstalled the HP uselessware, I switched the camera back to PTP mode (“Digital Camera” in the USB Configuration menu) and plugged it back in. Huzzah! It worked exactly as it did in mass-storage mode.

Kudos to Apple for making it do the Right Thing either way. Antikudos to HP for making non-functional drivers.

I also got a new scanner yesterday, a CanoScan LiDE 600F. Unfortunately, it doesn’t work without drivers. Fortunately, its drivers work. (Both devices let me use Image Capture without touching any of the apps that come with them, which I consider mandatory given the nearly-consistent asstasticity of the UIs of such apps in general.)

What’s the resolution of your screen?

Sunday, February 4th, 2007

A few weeks ago, I installed Adobe Reader to view a particular PDF, and noticed something interesting in its Preferences:

Its Resolution setting is set by default to “System setting: 98 dpi”.

“Wow”, I thought, “I wonder how it knows that.” So I went looking through the Quartz Display Services documentation, and found it.

The function is CGDisplayScreenSize. It returns a struct CGSize containing the number of millimeters in each dimension of the physical size of the screen. Convert to inches and divide the number of pixels by it, and you’ve got DPI.

Not all displays support EDID (which is what the docs for CGDisplayScreenSize say it uses); if yours doesn’t, CGDisplayScreenSize will return CGSizeZero. Watch for this; failure to account for this possibility will lead to division-by-zero errors.

Here’s an app to demonstrate this technique:

ShowAllResolutions' main window: “Resolution from Quartz Display Services: 98.52×96.33 dpi. Resolution from NSScreen: 72 dpi.”

ShowAllResolutions will show one of these windows on each display on your computer, and it should update if your display configuration changes (e.g. you change resolution or plug/unplug a display). If CGDisplayScreenSize comes back with CGZeroSize, ShowAllResolutions will state its resolution as 0 dpi both ways.

The practical usage of this is for things like Adobe Reader and Preview (note: Preview doesn’t do this), and their photographic equivalents. If you’re writing an image editor of any kind, you should consider using the screen resolution to correct the magnification factor so that a 8.5×11″ image takes up exactly 8.5″ across (and 11″ down, if possible).

“Ah,”, you say, “but what about Resolution Independence?”.

The theory of Resolution Independence is that in some future version of Mac OS X (possibly Leopard), the OS will automatically set the UI scale factor so that the interface objects will be some fixed number of (meters|inches) in size, rather than some absolute number of pixels. So in my case, it would set the UI scale factor to roughly 98/72, or about 1+⅓.

This is a great idea, but it screws up the Adobe Reader theory of automatic magnification. With its setting that asks you what resolution your display is, it inherently assumes that your virtual display is 72 dpi—that is, that your UI is not scaled. Multiplying by 98/72 is not appropriate when the entire UI has already been multiplied by this same factor; you would essentially be doing the multiplication twice (the OS does it once, and then you do it again).

The solution to that is in the bottom half of that window. While I was working on ShowAllResolutions, I noticed that NSScreen also has a means to ascertain the screen’s resolution: [[[myScreen deviceDescription] objectForKey:NSDeviceResolution] sizeValue]. It’s not the same as the Quartz Display Services function, as you can see; it seemingly returns { 72, 72 } constantly.

Except it doesn’t.

In fact, the size that it returns is premultiplied by the UI scale factor; if you set your scale factor to 2 in Quartz Debug and launch ShowAllResolutions, you’ll see that NSScreen now returns { 144, 144 }.

The Resolution-Independent version of Mac OS X will probably use CGDisplayScreenSize to set the scale factor automatically, so that on that version of Mac OS X, NSScreen will probably return { 98.52, 98.52 }, { 96.33, 96.33 }, or { 98.52, 96.33 } for me. At that point, dividing the resolution you derived from CGDisplayScreenSize by the resolution you got from NSScreen will be a no-op, and the PDF view will not be doubly-magnified after all. It will be magnified by 133+⅓% by the UI scale factor, and then magnified again by 100% (CGDisplayScreenSize divided by NSDeviceResolution) by the app.

Obviously, that’s assuming that the app actually uses NSScreen to get the virtual resolution, or corrects for HIGetScaleFactor() itself. Adobe Reader doesn’t do that, unfortunately, so it suffers the double-multiplication problem.

So, the summary:

  • To scale your drawing so that its size matches up to real-world measurements, scale by NSDeviceResolution divided by { 72.0f, 72.0f }. For example, in my case, you would scale by { 98.52, 96.33 } / { 72.0, 72.0 } (that is, the x-axis by 98.52/72 and the y-axis by 96.33/72). The correct screen to ask for its resolution is generally [[self window] screen] (where self is a kind of NSView).
  • You do not need to worry about HIGetScaleFactor most of the time. It is only useful for things like -[NSStatusBar thickness], which return a number of pixels rather than points (which is inconvenient in, say, your status item’s content view).

A Core-Image-less Image Unit

Wednesday, January 17th, 2007

Can you imagine an Image Unit that didn’t actually use Core Image?

I just wrote one.

Well, OK, so I did use CIFilter and CIImage — you can’t get away without those. But I did not use a CIKernel. That’s right: This simple filter does its work without a kernel.

For the uninitiated, a kernel is what QuartzCore compiles to either a pixel shader or a series of vector (AltiVec or SSE) instructions. All Image Units (as far as I know) use one — not only because it’s faster than any other way, but because that’s all you see in the documentation.

But I was curious. Could an Image Unit be written that didn’t use a kernel? I saw nothing to prevent it, and indeed, it does work just fine.

The image unit that I wrote simply scales the image by a multiplier, using AppKit. I call it the AppKit-scaling Image Unit. Feel free to try it out or peek at the source code; my usual BSD license applies.

Obviously, this Image Unit shouldn’t require a Core Image-capable GPU.