Another Voices That Matter conference coupon


2011-01-28 08:02:37 -08:00

The next Voices That Matter iPhone developers’ conference is April 9–10 in Seattle. Early-bird pricing lasts until February 25, and the coupon code this time is SEABLOG. The total for the “core conference” with both discounts is $395 USD.

As usual, I don’t expect to be there. Have fun without me!

PSA: Removing objects from arrays


2011-01-01 12:04:40 -08:00

  1. You create an NSMutableArray.
  2. You add the same object to it twice.
  3. You send the array one removeObjectIdenticalTo: message, passing the object you added.

What is the count of the array?

If you said 1, you’re wrong.

Worse, you might think the opposite of addObject: is removeObject: (especially if you’d never heard of the …IdenticalTo: version), but that’s even more wrong: removeObject: finds the object(s) to remove by testing equality (sending them isEqual: messages), not simply searching for the object you passed in.* That means it may remove objects that aren’t the object you passed in, but are equal to it. So, unless you really do want to remove any objects equal to the one you have, you should prefer removeObjectIdenticalTo:.

But that still removes the object entirely from the array, regardless of how many times it’s there. Unless you really want that, you more probably want this:

NSUInteger idx = [myArray indexOfObjectIdenticalTo:obj];
[myArray removeObjectAtIndex:idx];

And even then, that will remove the object from the first place you added it in at, not the last, so if you specifically need to remove it from the last place you added it (LIFO instead of FIFO), then you need to enumerate the array backwards, counting an index down as you go, remove the object at the index upon finding the object, and finally break out of the loop.

To make that easy and avert the otherwise high likelihood of off-by-one errors in many independent implementations, here’s a category you can add to your projects. Use anywhere you need the opposite of -[NSMutableArray addObject:].

* This doesn’t matter for sets, since it dupe-checks every object coming in based on equality anyway. With a set, removing the equal object and removing the same object are the same thing, which is why NSMutableSet doesn’t have removeObjectIdenticalTo:. Not so for arrays, which is why NSMutableArray does.

My Christmas playlist


2010-12-10 03:19:27 -08:00

I made this for Mom and I to listen to last year on the way up to and back from my aunt and uncle’s house for Christmas. Now, I share it with you.

The order of the songs is deliberate. I ask that you listen to them in this order.

Some of these are iTunes links, some are Amazon links, and some are free songs and/or albums.

Title Artist
It’s Beginning to Look a Lot Like Christmas (iTunes) Harry Connick, Jr.
It Came Upon A Midnight Clear (Amazon) Frank Sinatra
Wizards In Winter (Instrumental) (Amazon) Trans-Siberian Orchestra
Deck The Halls (Amazon) Mannheim Steamroller
The Little Drummer Boy (iTunes) Bob Seger & The Silver Bullet Band
Christmas (Baby Please Come Home) Slow Club
Oh Come Emmanuel (Amazon) (free) Aliqua
Oh Holy Night (Amazon) Richie McDonald
Greensleeves (iTunes) Gary Hoey
The Night Before Christmas * The Smithereens
Must Be Santa (iTunes) Bob Dylan
Feliz Navidad (iTunes) José Feliciano
Jingle Bells (free, on the 2002 album) Adam Kempa
God Rest Ye Merry, Gentlemen (Amazon) Mannheim Steamroller
Silent Night (Amazon) House Of Heroes
Sleigh Ride (free, on the 2003 album) Adam Kempa
Christmas Canon (Amazon) Trans-Siberian Orchestra
Carol of the Bells (Amazon) The Bird And The Bee
O Come All Ye Faithful (iTunes) Amy Grant
Christmas (Baby Please Come Home) (free) Blue Skies for Black Hearts
The First Noel (iTunes) David Archuleta
God Rest (iTunes) Gary Hoey
Deck the Halls (Amazon) Mario Lanza;Henri René and His Orchestra
Twelve Days of Christmas (iTunes) Mexicani Marimba Band
Greensleeves (iTunes) Vince Guaraldi
O Holy Night (free, on the 2009 album) Blasé Splee
The Nutcracker, Op. 71, Act 2: Character Dances (Divertissement) – Dance of the Reed Pipes (iTunes) Kirov Orchestra & Valery Gergiev
We Three Kings (free) Blondie
Little Drummer Boy (free, on the 2005 album) Canada
Joy To The World (Amazon) Symphony Brass of Chicago
Silent Night (iTunes) Johnny Cash
Ave Maria (yes, ripped from YouTube—I’d buy it if I could) Barbara Bonney
This is the point at which the program properly ends, but it has four more tracks—
which we might call “bonus tracks”—to pad out the time to two hours.
The Little Baby Jesus (free, on the 2009 album) American Mars
El Bells (free, on the 2003 album) El Boxeo
Silent Night (free) Vandaveer
Countdown To Christmas (free) Glam Chops

The total time is 2 hours, 2 minutes, and 38 seconds.

* I actually got this one from eMusic as a free download, but it isn’t free anymore.

End of the Graveyard


2010-12-04 15:46:08 -08:00

The iPhone Application Graveyard is now closed.

I’ve been meaning to do this for months; I’m just now getting around to doing it.

I have a few reasons:

The Graveyard has served its purpose.

The iPhone App Store today is more open and more free than it originally was. The rules are now available to App Store developers, and several apps that Apple previously either rejected or “pocket rejected”, most prominently Google Voice, are now available in the Store.

I don’t know how much of this is attributable to the Graveyard and how much is just Apple having figured these things out, but to whatever extent the Graveyard is responsible, it has done all it can.

The Graveyard can do no more.

Apple’s made very clear that they intend to “curate” the App Store. It will never be a completely free, do-as-thou-wilt market like the Mac market still is, and I have no hope that Apple will ever make the iPhone App Store optional like the Mac App Store will be.

I see no way that the App Stores can ever be more free without losing that curation factor. And it is a factor—I can’t ignore that Apple checking every application probably, hopefully filters out some effluent from the influent stream.

I don’t update it.

I’ve got a dozen different things to do that are more important than updating the Graveyard.

I want to work at Apple.

Cold, hard reality is that I want to work for Apple, and they will not hire a person that has a page on their website decrying their policies. (Don’t get me wrong: I wouldn’t expect them to.) This isn’t the only reason why I’m killing the Graveyard—everything I wrote above is true—but it is one of them.

So, this position is now open.

If you want to keep the Graveyard alive, you can do that by taking it over.

The Graveyard is implemented as a couple of plain-text hand-edited databases and a Python script that converts them to the web page (as a static HTML file) and Atom feed (as a static XML file). This is how the Graveyard stayed up in the face of being Fireballed, Macworlded, etc.

You can keep it that way, or you might turn it into a wiki. I leave the choice to you.

If you want to take over the Graveyard, email me. I’m sure you know my email address by now. I’ll send whoever I think can best run it a zip archive of the data files and Python script.

You may also be interested in the Application Submission Feedback site. I don’t know who runs it, but it’s a great guide to what you can’t do in the App Store.

Four rules of debugging


2010-11-13 21:13:16 -08:00

  1. It is not the compiler’s fault.
  2. It is almost certainly not the kernel’s fault.
  3. It is probably not the library’s/framework’s fault.
  4. It is most probably your fault.

Helping people


2010-11-06 17:03:33 -08:00

There’s a recurring theme I keep seeing in questions on Stack Overflow.

I’ve said those words a few times now. I’ve said it twice at my recognizing-Cocoa-bugs presentation, which I’ve given at one CocoaHeads and at the MacTech Conference (just concluded yesterday). I’ve also said it a few other times at CocoaHeads, usually in preface to explaining something that’s both germane to the current conversation and the common source of confusion in the questions I’m then referring to. Plus, I’ve said it a couple of times in posts here.

In the concluding session of the conference, Edward Marczak, MacTech’s executive editor, cited a number of tweets related to various cool things that happened in the past few days. One of them was from me, inviting attendees to flag me down for one of my useful-Cocoa-links cards, which I’d previously offered up to audience members in my session. He told the audience how cool he thought it was that I’d thought ahead and made those cards.

The reason I’d made those cards was because I’d identified a pattern. In my answers on Stack Overflow, I often cite one or more of a few key documents:

or tell the questioner to listen to or turn on some warning or other and link to my warnings blog post as part of that.

My introductory document for Cocoa and Cocoa Touch, in its own introduction, identifies a similar genesis: Everything on that page is something I’d had to explain to multiple people on Stack Overflow, so I decided to put it all in one place for easy linking (by me) and easy reading (by new Cocoa or Cocoa Touch programmers). That document is also among the links on the card.

Each of the things I got praised for in that concluding session, and thanked for (besides Growl, which is mostly a lot of other people’s work) outside of sessions, I made because I’d identified a need by spotting a pattern.

There’s no reason you can’t do this, too. What have you done multiple times lately? Especially, what have you done or made or found for other people multiple times?

Somewhere on Eric Raymond’s site, there’s an explanation of the difference between newbies and wizards. It’s not that the wizards know all that much more than the newbies (though they often do have a stronger/deeper conceptual understanding); asked for the name of a function, say, the wizard will probably not know it exactly (unless it is very simple, such as CFRetain, or one they use very frequently, such as CFRetain).

The difference between them is that the wizard knows where to look stuff up. I sometimes refer to this as “swapping things in”, the analogy being virtual memory: I remember very little at any given moment, precisely because I know where I can get it from when I need to get it back into my mental working set.

The wizard knows how to help themself.

How can you enable people to help themselves?


Here’s that card, if you want one.

NaNoDrawMo ten-minute challenge


2010-10-30 11:24:36 -08:00

Last year, a lot of us who attempted NaNoDrawMo, Steven Frank’s 50-drawings-in-one-month challenge, failed to meet the 50-drawing goal. I think I came up with 30… ish.

The problem is that drawing something takes so damned long that it’s hard to find time to do it.

Solution: Make it take less time!

I propose the following self-enforced constraint: Pick a subject, then draw as much of it as you can in ten minutes.

This should train us through trade-offs to realize which parts of the drawing are most important to communicating what it’s supposed to be. I won’t mind if you draw the same things multiple times in order to get it down—I’m sure I will.

In order to help you follow this ten-minute limit, I’ve created a timer. Start the timer, then start your drawing. When the bell rings, you’re done—scan it (if appropriate) and upload it to the group.

(Aside: The bell doesn’t work in MobileSafari. Anyone know how to fix it?)

I hope this will help each of us achieve a higher success rate in this year’s NaNoDrawMo.

Manpage Monday: memset_pattern(3)


2010-09-06 07:41:36 -08:00

From the manpage:

     void
     memset_pattern4(void *b, const void *pattern4, size_t len);

     void
     memset_pattern8(void *b, const void *pattern8, size_t len);

     void
     memset_pattern16(void *b, const void *pattern16, size_t len);

These are analogous to memset(), except that they fill memory with a replicated pattern either 4, 8, or 16 bytes long.

Handy if you want to scribble 0xdeadbeef (or any other value of your choice) over something.

As noted in the manpage, these functions require Mac OS X 10.5 or later. I don’t know about iOS.

Ship-It Saturday: PRHEmptySingleton repository


2010-09-04 09:06:05 -08:00

The singleton-done-right example from my article on the subject is now in a Mercurial repository on Bitbucket. The repository includes not only the class (which I’ve put in the public domain), but also a test suite for some of the test cases listed in the post.

There are some adventurous testing techniques at work here.

First, since we don’t want multiple test runs to use the same singleton instance, the test cases actually run in subprocesses. Each test method is prefaced with this code:

if (!isInSubprocess) {
    [self runTestInSubprocess:_cmd];
    return;
}

That method calls fork.

In the child process, the test case sets isInSubprocess to YES, then tells itself to perform that selector; this gets execution back to the test method, which checks the variable again, finds that it’s true this time, and continues on with the test.

The parent process calls waitpid and checks the result; if the child failed, the parent propagates the failure. If the child crashed (got a signal), the parent raises the same signal; if the child simply exited abnormally, then the parent exits with the same status.

Second, there’s test case #6:

  • If [super init] returns a different object, alloc/init won’t break.

That one is hard to test, because PRHEmptySingleton’s superclass is NSObject, and -[NSObject init] doesn’t return a different object. (Not in any version of Foundation I’ve ever encountered, anyway.)

So, the first step is to create an intermediate class that does return a different object. But that doesn’t help as long as PRHEmptySingleton is still a direct subclass of NSObject.

The simple solution would be to just change PRHEmptySingleton’s superclass, but that reduces the purity of the testing: A test should be able to work without modifying the code under test, and any changes to the code under test should be permanent changes that aren’t only to enable the test; you should be able to explain the changes as if the test case did not exist.

So what I did was to import everything in my prefix header, even more than I usually do, and then import my intermediate class’s header, and then use the preprocessor to ensure that any direct subclasses of NSObject declared elsewhere are declared as subclasses of the intermediate class. Thus, the prefix header causes PRHEmptySingleton to be a subclass of the intermediate class with no changes to PRHEmptySingleton’s header. It’s a bit of a hack, and doing this sort of thing could potentially cause problems in a larger program or test suite, but in this context, it works.

With that, five of the six test cases in the original post are now covered (I’m not sure how to cover #3 without changing PRHEmptySingleton.[hm]), and the code is under version control, so you can subscribe to and track changes.

Please use singletons responsibly.

Portable centimetric measuring tape


2010-08-14 23:11:43 -08:00

This is a roll-up measuring tape that tucks neatly into my wallet, mostly so that I can compare sizes of products in the store without having to buy them or go find a ruler.

File: Centimetric_Ruler-portable.pdf

A US Letter page containing the ruler (20 cm long) and a specification for the cardboard handle you glue the ruler to.

Photos:

Photo of the portable centimetric measuring tape, rolled up, sitting on a table.

Photo of the portable centimetric measuring tape, with 6 cm unrolled, sitting on a table.

In case you’re wondering about the pattern of the mm markings, I borrowed it from this New Zealand ruler that Dave posted about.

If I were to assemble this again, I would glue the “tape” to the other end of the handle, so that I can unroll the tape from left to right using my right hand. If you’re left-handed, you might prefer to assemble yours the same way I did assemble mine.

Dueling conferences


2010-08-05 22:59:14 -08:00

There are two four five six development conferences coming up this fall:

Here’s an iCalendar file of these events.

The cheapest conference is 360|MacDev, at $300 ($200 with early-bird pricing). The second-cheapest is Voices That Matter, costing $395 with the coupon and early-bird pricing. SecondConf is a little more expensive, at $449, and 360|iDev is a little more expensive than that, at $599. The iPhone/iPad DevCon is hard to compare; it’s either the most expensive at $1395 ($1065 with early-bird pricing) or the least expensive at free, depending on which kind of ticket you get. Ignoring the DevCon, MacTech’s conference is the most expensive at $899, but is also the broadest, consisting of development (both Mac and iOS) plus an IT track.

I will not be at the Voices That Matter conference, SecondConf, the DevCon, or 360|iDev (I’m still not an iPhone/iPad developer), nor 360|MacDev (too far), but I will be at the MacTech conference. In fact, I’ll be presenting.

My presentation, intended for new Cocoa and Cocoa Touch developers, will be a demonstration of what various kinds of bugs look like in Cocoa and Cocoa Touch applications, along with how to hunt down and fix those bugs.

Whichever conference you go to, have fun, and if you’re coming to the MacTech conference, I hope to meet you there.

UPDATE 2010-09-10: Added SecondConf and iPhone/iPad DevCon (thanks to Jeff in the comments for telling me about the latter).

UPDATE 2010-09-11: Added 360|iDev after its organizers followed me on Twitter. Five conferences in seven weeks—maybe some of you could get together and consolidate next year? And again a few minutes later: And 360|MacDev, making six in 11 weeks.

Being a reader of Dave’s Mechanical Pencils has gotten me interested in block erasers as companions to the pencils themselves. My first mechanical pencil was a Pentel Twist-Erase III (QE515), which I chose for its wide and long built-in eraser, but, thanks to Dave, I have since switched over to a Uni Kuru Toga * for writing and a block eraser for erasing.

But which eraser?

Here in the United States, the most available eraser is the Pentel Hi-Polymer ZEH-10, usually in three- or four-packs. As a fan of the Twist-Erase eraser, I knew Pentel could make a good eraser (even though Dave disagreed about the Twist-Erase), so I wondered how good Pentel’s block erasers were. At the same time, once I started reading Dave’s Mechanical Pencils, I wondered how the Pentel block erasers might compare to Dave’s favorite, the Staedtler Mars.

For years, all I’d ever seen were Paper-Mate erasers, store-brand erasers, and the ZEH-10, which is the larger of Pentel’s two ZEH models. Indeed, that was the only Pentel eraser I knew about until I saw Dave’s review of the ZES-08 (the “Hi-Polymer Soft”, which sounds like it’s a different eraser compound). Then, not long ago, I spotted a three-pack of ZEH-05 (the smaller one) erasers at Stater Bros. for $2, and snapped it up.

Then all that remained was to pick up a Staedtler Mars eraser and compare them. Art Supply Warehouse to the rescue: They sell them individually for 99¢ each. Other stores sell them in four-packs for $3. (If nothing else, Pentel’s ZEH erasers are cheaper: A four-pack of ZEH-10s is currently $2.64 at Target, while ASW sells the ZEH-05 individually for 72¢.)

Prior to my buying either of those, I’d bought a three-pack of store-brand pencil leads at Target for $2. That package included a block eraser. So, since I have it, I might as well include it in the comparison.

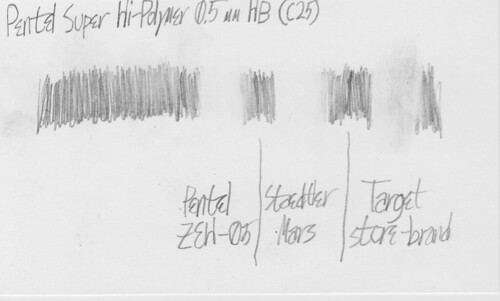
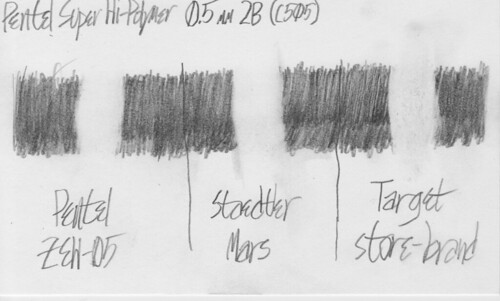
For that comparison, I used Pentel Super Hi-Polymer (a.k.a. “Ain”) lead in the HB and 2B grades on a blank store-brand (“Corner Office”) 3″×5″ index card from Walgreens.

Let us begin.

Comparison with HB lead. ZEH-05: Flawless victory. Staedtler Mars: Just a little bit less effective. Target store-brand: Pitiful.

Comparison with 2B lead. ZEH-05: Pretty close to perfect. Staedtler Mars: Well-erased, but with much smearing at the edges. Target store-brand: Not so well-erased; smearing in the middle, perhaps because it's a thinner eraser.

And both comparisons with level adjustments to better show the differences:

Comparison with HB lead. Here, too, Staedtler Mars' inferiority is just barely apparent—it's pretty much a dead heat. Target store-brand, of course, still loses by a wide margin.

Comparison with 2B lead. No real change between the ZEH-05 and Staedtler Mars; Target store-brand's loss is much more apparent now.

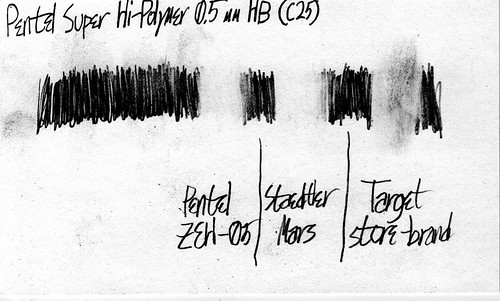
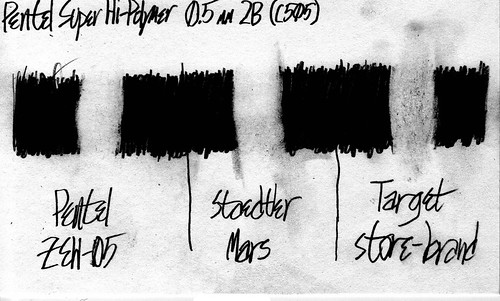
For erasing, Pentel’s ZEH-05 wins. It’s evenly matched with Staedtler Mars on the HB test, but erases a bit better with less smearing on the 2B test. And it’s cheaper to boot!

Now let’s look at shots of the erasers after each job and see how dirty they got:

Comparison with HB lead. The ZEH-05 barely got dirty at all; the Staedtler Mars got a bit dirty; the Target store-brand eraser is filthy.

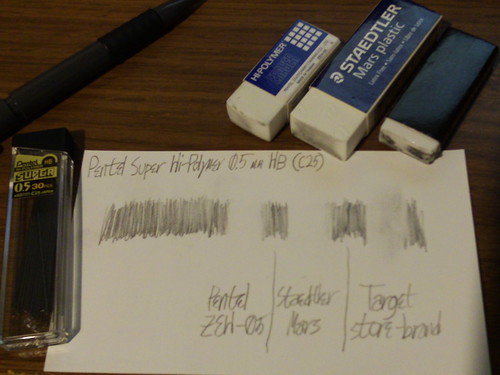
I cleaned the Target eraser (by “erasing” a blank piece of rough cardboard) between tests.

Comparison with 2B lead. The ZEH-05 is dirty in the middle; the Staedtler Mars is about equally dirty over a larger surface; the Target store-brand eraser is about as dirty as before.

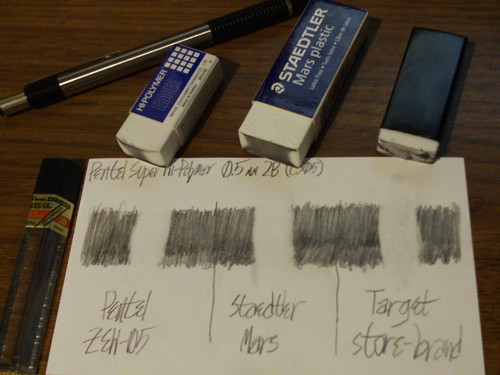
As far as dirtiness, it’s pretty much a dead heat between the Pentel and the Staedtler Mars. The ZEH-05 appears dirty over less area because I’d used it more before I began testing, so it has a slightly rounder surface. Over the two erasers’ dirtied areas, the 2B test got them about equally dirty.

The Target store-brand eraser lost badly on all tests. It didn’t do as good a job of erasing, and (perhaps relatedly) the dirtied eraser compound didn’t come off the eraser body. It stuck to it. Reminds me a bit of the Pentel Tri-Eraser, which has the same problem.

In case you’re wondering, I brought the Tri-Eraser into competition after taking the above scans and photos, and found that it is almost but not quite as good as the Staedtler Mars. It doesn’t erase quite as well as the Pentel and Staedtler block erasers, because of that dirty-eraser-compound-sticks-to-the-eraser-core problem. The one advantage it has over the Staedtler Mars is the same as Dave found: Not as much smearing as the Staedtler Mars did.

So, there you have it: The Staedtler Mars does a good job, but the Pentel ZEH erasers (assuming the ZEH-10 and -05 are made of the same stuff) are both slightly better and a bit cheaper.

My homemade A7 notebook


2010-07-19 18:14:32 -08:00

I wanted a Moleskine Volant, but I didn’t want to pay $3 each for them.

So I made my own notebook instead. It’s A7, which is just a little wider than the Volants I’d been looking at.

Overall shot of the notebook.

I’d initially lettered the cover (to distinguish front from back) by hand, but wanted to make it a little more professional, so I bought a Fiskars Ultra ShapeXpress shape-cutter. Here’s a video showing it in action. I printed out a template of the cover text, cut it out, and filled it in with my pen.

The notebook is ruled, and I keep a Zebra TS-3 mechanical pencil clipped into it.

Photo of me holding it open.

Here’s the PDF of the rulings. I printed it double-sided onto regular copy paper. Obviously, I made it for US Letter, but it would be no different for A4, because each section is a little larger than A7, for reasons that will become clear in a moment.

Once printed, I cut the sections out with a paper-trimmer, then used a “medium” rounded corner punch, bought at Target in their scrapbooking section, to round off the corners (square corners will bunch up).

The cover is scrap cardboard from one of my T-shirt packs, cut to size using scissors (plus a ruler and pencil to mark where to cut) and rounded off with the same punch.

The binding is simple enough: Two staples in the spine of the book. This is why the sections I cut out are slightly larger than A7: Each page is A7, but I included a 5 mm gap between pages for the staples to go in. (This matters more for the outer sheets than for the inner ones.) If I were to leave out this gap, or shrink each notebook page by 2.5 mm to compensate, it would be possible to get four notebook sheets instead of three from an A4 sheet.

With this, I have a pocket-size notebook that’s very inexpensive (being made from materials I have anyway), recyclable, and customizable to my taste. For a future notebook, I might make it with half ruled pages and half plain pages.

Centimetric ruler/measuring tape


2010-07-03 08:52:46 -08:00

One mistake a lot of people make when trying to learn the metric system is trying to memorize and use conversion factors. Do you think people in other countries measure everything in inches and then convert to centimeters?

No, they have measuring tapes and rulers in centimeters or millimeters. Such rulers are easy to come by here in the US, but the measuring tapes are not.

So, in order to solve that problem and make it easier for fellow Americans to measure lengths in metric units, I present my Centimetric Ruler. It totals 2.5 meters, and looks like this:

Tick marks every 1 mm, with numbers over centimeter marks.

Despite the name, I use it as a measuring tape, coiled up and held in that shape (when not in use) by a small rubber band.

The page is US Letter (because that’s the paper I have), and you’ll need to cut out the pieces and tape them together. I recommend cutting through the tick marks so that there is no gap between them and the bottom of the “tape”.

Note that every 25th centimeter appears twice in the printout. This is to give you one centimeter in which to lay each segment over the previous/next one.

There’s nothing I can do for you for measuring mass (but scales that measure in grams are easy to come by; you can buy a digital one at Target for $20), but volume is easy, and demonstrates the elegance of the metric system pretty well:

  1. A liter is equal to the volume of a cube that is 1 decimeter (= ¹⁄₁₀ meter = 10 cm) to a side. That volume is 1 dm × 1 dm × 1 dm, or 1 dm³—one cubic decimeter.
  2. ¹⁄₁₀ of a decimeter is one centimeter (¹⁄₁₀₀ of a meter).
  3. Imagine, or construct, a cube one decimeter to a side. Starting from one corner, make a cut in each edge, one-tenth of the way from the corner. This will produce a cube that is one centimeter to a side—one cubic centimeter.
  4. Note that this cube is ¹⁄₁₀ of the larger cube in each dimension, which means its volume is (¹⁄₁₀ × ¹⁄₁₀ × ¹⁄₁₀) = ¹⁄₁₀₀₀ of the volume of the larger cube.
  5. The volume of the larger cube being one liter, the volume of the smaller cube is ¹⁄₁₀₀₀ of that. ¹⁄₁₀₀₀ of a liter. One milliliter.
  6. QED: One cubic centimeter (1 cc) = one milliliter (1 ml).

Knowing how volume and length relate to each other in metric, you can use the measuring tape (most easily on cuboid objects) to measure volume as well.

Audio


2010-06-20 21:28:49 -08:00

Matt Legend Gemmell tells you what to do and what not to do when making a product page. One point I felt worth expanding upon:

Either have a professional-sounding voiceover, without pauses and “um”s, with great audio quality, or don’t have a voiceover at all. Superimpose explanatory text titles instead. Be honest with yourself about how your voice sounds. If you’re the typical male engineer, your voice is probably going to be a major turn-off, and you probably can’t do talk-along without pausing, making various noises, and restarting your sentences. Get someone else to do it, or use text.

There’s nothing you can do about the innate quality of your voice, and if that sucks, then “get someone else to do it, or use text” is good advice. (Alternatively, you may be able to train yourself or be trained to speak better, depending on your exact problem. Mine used to be that I didn’t open my mouth enough, so everything sounded like I was talking through clenched teeth.)

But audio quality is something you can improve, and it matters. Care about this stuff; your potential customers do.

  • Buy a microphone. Yes, your laptop has one built-in. It sucks.

    The microphone itself may be all right, but it’s in indirect physical contact with a fan, a hard drive, and other noise-inducing parts. It’s also too far away from you. Good enough for voice chat, but not for recording. Buy a separate microphone and record with that.

  • Practice good microphone technique. Get fairly close to the microphone—about 6 inches/15 cm—and talk straight over it. Talking over it will avoid loud spikes (pops) on the recording from plosive sounds, such as the start and end of the word “pop”.

    You could buy a pop-filter and then talk straight into the microphone (through the filter), but I’m trying to keep your monetary and effort expenses low.

    Also, if you’re soft-spoken, speak up, like you’re talking to someone down the hallway. Don’t yell, but do project.

    And no matter what you do, don’t ever, ever touch the microphone, its stand, or its cord.

  • Set your gain. In simple terms, your input’s gain is how hard the microphone is listening. You want to avoid clipping—that’s where the signal maxes out (0 dB) and would go out of bounds if it could. You want the signal to be high enough for your voice to be clearly audible, while never, ever going high enough to clip.

    You’ll generally do this in the Sound pane of System Preferences, but your recording software may have its own control for this. Sound Studio does.

    The only way to find out the right amount of gain for you (and your microphone) is through experiment. Say something over and over while cranking up the gain, then go into actual recording, and when it clips, dial it back down and start over.

    Note that it is pretty hard to set the gain too low, except when it’s obviously too low, but it is very easy to set it too high. Err on the low side.

  • Edit. There are three components to this.

    • Cut out ums, ers, pauses, etc. You can record as much of that as you want—speak as you naturally do in recording. Then edit out anything between words.

      On a related note, pause for a second or so between sentences, both to breathe in and to make it easy for you to edit in re-takes.

      You may also want to write and print out an outline of the points you want to hit in your voice-over, as a map through the presentation for you to follow. Use OmniOutliner or TaskPaper, or pencil on paper (as long as you can read it easily). Read items between sentences; don’t read while you speak. Don’t write a script unless you can pull script-reading off. An outline (or script) will keep you from rambling and focus your sentences, reducing the number of ums, ers, pauses, and pointless sentences you need to cut out.

    • Remove noise. Amadeus Pro has a great tool for this. Use it.

    • Compress the edited recording. I don’t mean use a codec, I mean compress the levels—bring the quiet bits up so that they aren’t quiet anymore, while keeping the loud bits where they are (without clipping them).

      You should also use AUPeakLimiter (one of the built-in Audio Units), or an equivalent, to crank up the compressed levels to 0 dB. The difference with how you set the gain earlier is that you set the gain to keep your levels under 0 dB, whereas here, you’re amplifying to at 0 dB.

      90% of screencasts are not loud enough. I do not appreciate having to crank up my system volume to hear you. You can fix this.

All of this is not trivial, but it’s not hard, either. Practice will make it easier, and the result—clean audio on your screencast (or podcast)—will be worth it.

An iTunes imagine spot


2010-06-10 12:49:28 -08:00

Nik Fletcher writes:

If you’re an iPhone developer, you’ve probably been using AppViz, AppFigures or AppSales Mobile to download an process your iTunes sales reports. Today, however, Apple have released a new app of their own: iTunes Connect Mobile (iTunes Store Link)..

Wouldn’t it be cool if they released a version of iTunes Connect that could upload music and movies as well as view app statistics?

Imagine, for example, a moviemaker recording a movie on their iPhone 4, editing it in iMovie on their iPhone 4, and uploading it to iTunes from their iPhone 4.

Useful iTunes smart playlists


2010-05-20 23:00:22 -08:00

All of these are “All” (logical and/set intersection) playlists.

Music only

  • Playlist is Music (Library)
  • Kind does not contain “URL”
  • Kind does not contain “stream”
  • Kind does not contain “ideo” [sic]
  • Kind does not contain “PDF document”
  • Genre does not contain “Comedy”
  • Genre does not contain “Spoken Word”
  • Genre does not contain “Podcast”

Never played (music queue)

  • Playlist is “Music only”
  • Play Count is 0

≥ 3.5 stars

  • Playlist is “Music only”
  • Rating is greater than ★★★ · ·

iPod

The goal of this playlist is a balance between churn (so that I keep hearing music I haven’t heard in awhile) and quality (so that a bad or mediocre song does not take up space on my iPod that could have gone to a great song).

  • Playlist is “Music only”
  • Skip Count is less than 3
  • Playlist is “≥ 3.5 stars”
  • Time is less than 25 minutes (25:00)
  • Limit to 6 GB selected by least recently played

Customize standards and limit to your requirements.

Classical music (mostly excluded from this playlist by the Time criterion) enters my iPod through a separate playlist: a smart playlist selecting 12 hours of least-recently-played material from my “Programming music” dumb playlist.

Often-played but unrated music

If you’re like me, you have a lot of music that has racked up more than a few plays, but that you never rated. Most of this predates my installation of I Love Stars, with which I’ve rated nearly all of the music I’ve added since then.

By listening to this playlist with I Love Stars running, I’ll be able to rate all of these songs and so give the good-to-great ones a shot at being on my iPod. (I used to have “Play count ≥ 5” in the iPod smart playlist, but not everything that I have that has 5 or more plays merits inclusion on my iPod.)

  • Playlist is “Music only”
  • Play Count is greater than 4
  • Rating is · · · · ·

Even more free music statistics


2010-05-16 02:28:15 -08:00

Some facts and figures:

  • I got tired of waiting for music-queue zero and added the SXSW 2010 music to my queue on April 9th.
  • My music queue before adding the music was 367 songs totaling 1 day, 4 hours, 17 minutes, 11 seconds (under 1.2 days).
  • The 1,038 songs from SXSW 2010 totaled 2 days, 18 hours, 13 minutes, 15 seconds (about 2.75 days—my prediction was 2.5 days).
  • My music queue after adding the music contained 1,405 songs totaling 3 days, 22 hours, 30 minutes, and 26 seconds (about 3.9 days) of music.
  • I finally started listening to the SXSW music on April 18th, 9 days after adding it. That is, it took me 9 days to listen to the 1.2 days of music that preceded the SXSW music in the queue.
  • I have just finished listening to the SXSW 2010 music, early in the morning on May 16th, a month and a week after adding it and 28 days after beginning to listen to it. That is, it took me 28 days to listen to the 2.75 days of SXSW music.
  • My music queue, now empty of SXSW songs, has 1,199 songs totaling 3 days, 14 hours, 39 minutes, and 30 seconds (about 3.5 days) of music remaining. This includes 34 full albums, not counting samplers.

Maybe I’m beating a dead horse at this point, but there’s a lot of free music out there.

Non-obvious solutions


2010-05-09 23:19:06 -08:00

I’ve started a site cataloging non-obvious, simple, superior ways of performing everyday tasks.

The visual theme is Fluid by Andrew Wilkinson, with a custom background image I made in Pixelmator:

Feel free to use that image on your own site.

Those who’ve bought iPads have noticed that the iPhone API documentation comes in a special iPad-optimized flavor:

Basically, like an iPhone app for viewing the iPhone documentation. Here's a screenshot of the page in Safari on my Mac.

Yes, that’s desktop Safari showing it.

Contrary to my expectation, it does not use user-agent sniffing to detect an iPad. In fact, it’s detected by a JavaScript script (credit) when you go to an iPad-specific front page.

The code has a debugging feature, which they left in and you can (for now) enable to use the iPad display mode in your WebKit-based browser. Here’s how to enable it:

  1. Open any page on developer.apple.com.
  2. Open this URL:

    javascript:localStorage.setItem('debugSawtooth', 'true')
  3. Go to the iPad documentation list.

There are actually two interfaces, corresponding to the two orientations of a physical iPad. The one I showed above, with the API tree in a sidebar, is the landscape orientation; portrait moves the API tree into a pop-over, under a button labeled “Library”. The page chooses one or the other by the aspect ratio of the window.

“Sawtooth” has some drawbacks:

  • On a Mac, your scroll wheel (or two fingers) won’t work; you must drag the interface instead, which corresponds to finger-dragging on the actual device.
  • Once the interface loads, its size and orientation are fixed; it won’t adapt to a window resize until you reload. This, too, is only a problem on a Mac (you can’t resize your iPad).
  • There’s no way to copy a link to a specific document, unless you can find an internal link (the API-tree table view doesn’t count). This can be a problem if you want to link to, say, a framework reference.
  • You can’t get the Sawtooth interface unless you go through the iPad front page. If you go to a framework reference, class reference, programming guide, or other more specific page, you’ll get the regular interface. Same thing when going through the regular front page.

Even so, it’s pretty spiffy. I wish I had a version with all of the above problems fixed for viewing Mac API documentation.

* Credit: JR Ignacio found the JavaScript code and excerpted it into a GitHub paste.