Archive for the 'Toolchain' Category

New utility: Make RAM Disk

Saturday, September 29th, 2007

Make RAM Disk is a simple app to create and mount a RAM disk on Mac OS X 10.4 or later. It encapsulates my previously-stated series of terminal commands into a tiny little app—just launch it and go.

I use my RAM disk for three things:

  • Download holding area. I have Mail, Safari, OmniWeb, and Adium all set to download files to the RAM disk. If I decide I don’t want to keep the download, I just leave it there until shutdown (only works on my desktop Mac).
  • iShowU storage. I create a 1-GiB RAM Disk named “iShowU temp” which iShowU is set to use as its scratch disk. Using a RAM disk for this helps your recording frame rate.
  • Xcode build folder. On my laptop, I symlink the project’s build folder over to the RAM disk (e.g., mkdir /Volumes/RAM\ Disk/Adium-build && ln -s /Volumes/RAM\ Disk/Adium-build build). This cuts out a lot of the disk grinding that happens during a build, which I believe helps my battery life.

Enjoy!

Appcasts on Google

Thursday, September 27th, 2007

If you publish an appcast, you should also publish a robots.txt file that tells search engines such as Google not index the appcast file. I came to this realization after searching for “appcast editor”: the first four hits, and several of the others, are all just appcasts.

There is no point to having these indexed by Google, so save the bandwidth and help people’s search results—tell the search engines not to index them.

And I never did find an appcast editor. I guess I get to write it by hand in vim. (There’s one in MacCode, but it’s not working yet.)

UPDATE: I knew there was an appcast editor out there! It’s Feeder, by Reinvented Software. Thanks to Andy Kim for pointing it out in the comments.

zsh completion rocks

Monday, September 17th, 2007

Specifically, enable and configure zshcompsys. Here’s what this will get you (6 seconds; 144 K; requires any version of QuickTime):

UPDATE 2007-09-18 11:54 PDT: More info in the comments.

Quicksilver + SVN = yum

Friday, August 17th, 2007

Go directly to the plug-ins pane of your Quicksilver Preferences and install the Subversion module. Do not pass Go. Do not check out $200.

Best when combined with the comma trick.

So far, I’ve tried both add and ci, and they work in the obvious way. They even provide a notification (which goes through the Growl notifier for me—that’s another plug-in) with the command’s output.

WWDC 2007 session videos are out

Monday, July 30th, 2007

If you attended WWDC, you can head over to ADC on iTunes and see what you missed.

A simple way to make your NSLogs and NSAsserts more informative

Wednesday, June 13th, 2007

OK, so I’m not totally radio-silent. I learned about this in a WWDC session, but since it’s already public API in Tiger (actually, it’s a GCC extension), I can talk about it.

It’s a built-in macro called __PRETTY_FUNCTION__. This is a fully-qualified human-readable signature of the function you’re in. The GCC docs don’t mention this part, but it even works in Objective-C, in addition to C++ and plain C. Here’s a test app, containing this code:

@implementation Blah(blah)
- (void)blah {
    NSLog(@"%s", __PRETTY_FUNCTION__);
}
@end

And the output:

2007-06-14 07:50:37.733 printmethod[1800] -[Blah(blah) blah]

Notice that it includes the class name, category name (if any), and method selector.

Note that that’s a C-string, not an NSCFString. Be sure to set up your format string accordingly.

Bug in the accessors generator

Tuesday, June 5th, 2007
 unsigned short multiplierBase, multiplierPower;

The output from the accessors generator:

- (unsigned) short;
- (void) setShort:(unsigned)newShort;

- (unsigned) multiplierBase;
- (void) setMultiplierBase:(unsigned)newMultiplierBase;

- (unsigned) multiplierPower;
- (void) setMultiplierPower:(unsigned)newMultiplierPower;

This is both an advisory to you and a reminder to me. I’ll be tackling this after WWDC.

New utility: qtsetclip

Wednesday, April 11th, 2007

I’ve just released my latest command-line utility, qtsetclip. This is a utility that allows you to set the clipping region of a QuickTime movie to a rectangle you specify. I use it in producing the Adium screencasts, since Final Cut Express limits me to choosing among certain predefined resolutions. (Further details will appear on the Adium Blog on Saturday.)

How to quickly change several lines at once

Wednesday, January 24th, 2007

It’s 130.87 K, and just over four seconds, and will play under any version of QuickTime.

It shows me using vim to replace an old variable name (“fullScreenOverlayWindow”) with a new one (“panel”). The sequence of events:

  1. I move into position.
  2. I enter Visual Block mode by pressing ctrl-v.
  3. I jump to the end of the current word with e.
  4. I jump 7 lines down with 7j. This gives me a total of 8 lines selected (including the one I started on).
  5. I enter Change mode by pressing c.
  6. I type my shiny new variable name. (Notice that it only displays on the line where my cursor is; all the others stay blank for the duration of my Change.)
  7. I exit Change mode by pressing escape.
  8. I wait a beat.
  9. Voila!

Cocoa text editors like TextEdit and Xcode have rectangular selection, but not rectangular editing; you will obliterate all the lines, but only insert your new text into the first line. This is not useful.

Why you should use #pragma mark

Saturday, January 20th, 2007

It’s a minute and a half, and it’s 200 K, and you’ll need QuickTime 7 to watch it.


pragma mark at work in Xcode’s editor.

Useful as #pragma mark is, I wouldn’t recommend it for cross-platform code. GCC’s documentation of #pragma mark seems to suggest that it’s Darwin-only.

An iPhone SDK guess

Wednesday, January 10th, 2007

Maybe it will come with Xcode 3?

UPDATE 20:55: Never mind.

On initializing static variables

Thursday, January 4th, 2007

Did you know that you don’t have to initialize static variables? (If you’ve done any Cocoa programming, you know that statics are commonly treated as class ivars, most commonly to hold singleton instances.)

Quoth C99 (§6.7.8 paragraph 10):

… If an object that has static storage duration is not initialized explicitly, then:

  • if it has pointer type, it is initialized to a null pointer;
  • if it has arithmetic type, it is initialized to (positive or unsigned) zero;
  • if it is an aggregate [array or structure —PRH], every member is initialized (recursively) according to these rules;
  • if it is a union, the first named member is initialized (recursively) according to these rules.

And I’ve prepared a test app that shows that gcc 4.0.1 on OS X 10.4.8 does seem to comply with this handy part of the standard.

Happy not-initializing!

Compiling EPS files to PDF files using Xcode

Wednesday, December 6th, 2006

You may remember Daniel Jalkut’s blog post about resolution independence, with its demonstration of the superiority in quality of vector graphics over raster graphics (using an EPS file that I created for him ☺).

The problem with using an EPS file, as I pointed out to him when I emailed him the file originally, is that EPS files are very slow on OS X. The current (Tiger) implementation of NSEPSImageRep uses Quartz’s CGPSConverter to convert the EPS data to PDF data, then instantiates an NSPDFImageRep (kept in a private ivar) that it has do all the real work.

That PostScript-to-PDF conversion is the bottleneck. You don’t want that multiple-second delay (yes, really) at runtime. Better to take it before runtime. At the time, I suggested that he use pstopdf to convert to a PDF file, then put the PDF file into his Xcode project to be copied into the app bundle.

But what if you decide later to change the PostScript file? You need to remember to run pstopdf again. EPS files are just PostScript source code, so why not treat them like any other source code file? Or, a better question: How?

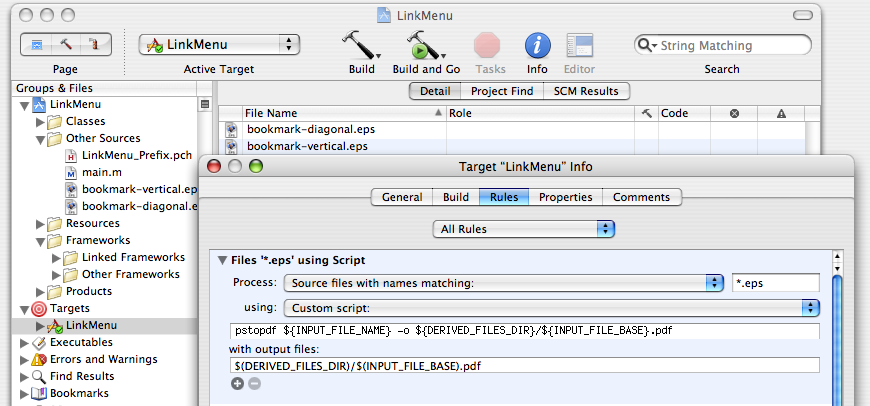
The answer is quite simple: Add a custom rule to your target in Xcode that runs pstopdf over EPS files. Then, you add the EPS file — not the PDF file — to the project, and Xcode will exhibit normal build-only-when-necessary behavior on the EPS file and copy the generated PDF file for you. And of course, you can have as many EPS files as you want — they’re source code files just like any others.

Screenshot of Xcode's Target Info window, showing the custom rule. The rule matches the glob pattern “*.eps” and runs the shell script “pstopdf ${INPUT_FILE_NAME} -o ${DERIVED_FILES_DIR}/${INPUT_FILE_BASE}.pdf”. It has one output file, which is “${DERIVED_FILES_DIR}/${INPUT_FILE_BASE}.pdf”. In the background is an Xcode project window showing a couple of EPS files in the “Other Sources” group.

Handy svn technique

Wednesday, November 29th, 2006

Easy way to create a repo and then immediately make your existing source code (foo) into a checkout:

  1. % svnadmin create foo_repo
  2. % mkdir foo_wc foo_wc/branches foo_wc/tags
  3. % mv foo foo_wc/trunk
  4. % svn co foo_repo foo_wc (Note that svn co requires a URL.)
  5. % cd foo_wc
  6. % svn add *
  7. % svn ci

Yes, that’s right: This doesn’t use svn import at all. svn import, in fact, is useless, since (a) it doesn’t give you a WC you can then operate on (you have to check it out again), and (b) it doesn’t let you do multiple things with the commit (e.g. create branches and tags directories at the top level of the repo; you would have to do a second commit).

New utility: image

Friday, November 17th, 2006

When I was writing “The fun of length-declared strings”, I needed to resize that lightbulb photo down to something more suitable for a blog post. Normally, I’d just use Photoshop, but I’m not on a PowerPC Mac anymore, so Photoshop 5.5 won’t run. So I needed to use other things.

The crop was easy; Preview can do that. But I also needed to scale it, and Preview can’t do that. I tried installing the (sigh) Photoshop CS2 tryout, but that didn’t work; the installer fails while it’s doing something ambiguous to Photoshop’s help files. No surprises there.

And I didn’t want to use iPhoto for it. That would mean importing it into my Library, and I only want to do that for my photos.

The alternatives are sips and GIMPShop. I passed on sips because I don’t know how sips scales images (i.e. which interpolation quality it uses), and because it makes you specify the dimensions backward for no obvious reason. GIMPShop is out of the question because (1) it is slow, and (2) it is an X11 application, and I do not like running X11 applications on my shiny Aqua desktop.

This left only one solution: Write my own. So that’s exactly what I did.

Introducing image. image is a utility that can both scale and convert images; this includes rasterization of vector art. Here are the examples from the webpage:

  • % image piechart.eps pdf
    Output: piechart.pdf
  • % image lightbulb.jpg 50%
    Output: lightbulb-50%.jpg
  • % image lightbulb.jpg 240
    Output: lightbulb-240.jpg (scaled proportionally)
  • % image lightbulb.jpg 320x240
    Output: lightbulb-320×240.jpg
  • % image lightbulb-orig.tiff 50% jpg lightbulb.jpg
    Output: lightbulb.jpg

Pretty useful, huh? I hope so.

Enjoy.

An insight into vi

Thursday, November 16th, 2006

Here are three of vi’s many commands:

$
Move to the last column in the line
%
Move to the opposite character in a pair (e.g. {→})
^
Move to the first non-whitespace column in the line

On a US keyboard, these three characters are contiguous: shift-4, -5, and -6, respectively.

This means that you can quickly navigate code like this with only your ring, middle, and index fingers on one hand:

⁰if(foo) {¹
doTheThingToTheThing();
²} else {³
doTheThingToTheOtherThing();
⁴}

  • From 4 to 0: %^%^
  • From 0 to 4: $%$%

Neat, huh?

How to apply changes in a framework to a versioned copy of it

Tuesday, November 14th, 2006

In Adium 1.0, we’ll have a number of external frameworks:

So whenever any of these frameworks changes — especially if it fixes a bug that we’ve been suffering from — we build the framework in our copy of their source code, and then we drop the new built framework into our source repo and commit it.

But I often see it done this way:

  1. svn rm Foo.framework
  2. svn ci Foo.framework
  3. cp -R ../../Foo/build/Release/Foo.framework Foo.framework
  4. svn add Foo.framework
  5. svn ci Foo.framework

This is wrong, for three reasons:

  • Commit history for the framework is lost. svn doesn’t relate the new framework to the old framework that previously occupied the same path.
  • Much space and bandwidth is wasted as all of the files in the framework (including nibs, images, plists) are copied yet again, even those that were not changed.
  • It takes two commits to do one job.

Here’s a better way.

  1. pushd ../../Foo/build/Release
  2. tar cf Foo-framework.tar Foo.framework
  3. mv Foo-framework.tar $OLDPWD
  4. popd
  5. tar xf Foo-framework.tar && rm Foo-framework.tar
  6. svn ci Foo.framework

tar will overwrite every file in the framework, and of course any new ones will be created. A quick svn st will show you which files are new (unversioned) or modified; if there are any unversioned files, you should of course svn add them before committing. And then when you commit, the commit history of all the files is preserved, so you can do svn log (or the equivalent operation in Trac) later, and svn will apply its own smarts about exactly what should be copied.

The only downside to this approach is that any files that no longer exist in the old framework won’t be removed. If you have reason to believe that any files were deleted, you should perform ls -R on both directories, diff -u the two results, and look for “-” lines. But most of the time, this isn’t necessary; how often does anything ever get removed from a framework?

So, anyway, please use tar, for the sake of the commit history. ☺

UPDATE 11:55: If you want an example, here’s Adium changeset number 18243, in which I did this to the LMX framework. See how small that changeset is?

UPDATE 14:08: Fixed SparklePlus link.

The best developer tool since Interface Builder

Tuesday, October 31st, 2006

Yesterday, wootest created an app called ThisService. I’ll put this disclaimer right up front: He is a reader of this blog, and he allowed me to test a prerelease version of ThisService. But neither of these facts affects the opinion that I’m about to state.

ThisService is the greatest developer tool since Interface Builder.

UNIX has an interface paradigm called the “filter”. This is an application that reads zero or more input from its standard input special-file, operates on or with the data in some way, and writes zero or more output to its standard output special-file. This simple design is amazingly versatile, and highly conducive to simple but effective IPC.

NeXT took the same concept and extended it to the GUI with what it called System Services. Some of you may have seen these; they live on in OS X, more or less unchanged as far as I’ve seen. And their operation is pretty much the same: take some input (or not), do something to or with it, and emit some output (or not).

So John Gruber, according to himself, had the idea for an application that takes a filter program and makes a system service from it, and put this idea to wootest. Didn’t take him long, apparently; I beta-tested it last night, and the app is now at 1.0.

ThisService 1.0 main window.

Pretty simple. You give ThisService the filter’s name, location, behavior, and an optional hotkey, and it will create a system service application for you.

Services are very versatile. Consider the Objective-C service, or the Copy File Path service, or CalcService, or Tidy Service. Quite a range of functions, no? But Apple does not make a very big deal of the Services system’s existence, and so the feature sits unused by most users. When’s the last time you visited the Services menu?

And yes, this is despite the fact that many Apple applications — some of them big-name, some of them more quiet necessities — provide services. In fact, core OS X apps provide most of the services on most people’s systems. This, of course, is because on the whole, nobody else knows about Services.

I think that ThisService will change all that. The fact you can now write an OS X service in Python/Perl/awk/C/$FAD_LANGUAGE in exactly the same way that you would write a UNIX filter makes creating services now trivial. So I think that we’ll see plenty of applications in the future built with ThisService, perhaps with a badge somewhere on the webpage proclaiming that fact, with instructions like this:

This application is an OS X “system service”.

  • To install it, simply drag it to your Home/Library/Services folder (first creating that folder if necessary). It will then be available in most applications.
  • To use it, choose “service-name” from the Services menu in the Application menu (the menu just to the right of the Apple menu).
  • To remove it, take it out of the Library/Services folder, e.g. to the Trash.

(Feel free to copy the above instructions, even if you don’t use ThisService to create your service.)

The first wave or two of these new services will be geek-oriented. Programmers will take their existing stashes of filters that they’ve created (such as mine) and make services out of them and put them on their websites. Thus, the first influx of service users will be geeks (including, but not limited to, other programmers).

But then I predict a larger resurgence in services. People will start making new services from other filters that have broader utility, like sort. There may even be a new attraction to making services directly, either from scratch, or from a UNIX filter but with a GUI on top to specify options (i.e. not using ThisService). And then I think the larger, non-technical userbase will start using services.

It will be a great day.

How to use svn merge

Sunday, October 29th, 2006

A number of my fellow Adium developers have observed that svn merge is hard to use. I think the main problem is that the command is quite general (it can be put to several different uses) and the documentation not particularly clear. In order to promote better understanding of the svn merge command, here’s what I know about it.

The command in a nutshell: svn merge is essentially svn diff $ARGS | patch -p0; the only real difference is that svn merge will handle addition, movement, and deletion of files, whereas patch won’t.

This now having been stated up front, let’s get into details.

Summary of tasks and how to do them

  1. svn merge sourceURL1[@N] sourceURL2[@M] [WCPATH]
  2. svn merge sourceWCPATH1@N sourceWCPATH2@M [WCPATH]
  3. svn merge [-c M | -r N:M] SOURCE[@REV] [WCPATH]
  • To apply changes from another directory (branch, tag, trunk): Use format #1 (or #2 if you have a checkout of it), supplying at least the first revision (N), and the second (M) if it is not HEAD. With format #1, you should not need to be using the same repository URL as the CWD for either one or both; you should be able to merge between two URLs, or between a single URL into your checkout of a different URL.

  • To travel back in time to a previous revision: Use format #3, with -rHEAD:THEN. For example, -rHEAD:42000.

  • To cherry-pick a changeset (apply only that changeset, not any others): Use format #3, with -cTHEN.

  • To undo a particular changeset without disturbing things that happened after it (hopefully): Use format #3, with -c –THEN. Note the minus sign. For example, to revert r42000, use “svn merge -c -42000 .”. You can also use the -r flag: “svn merge -r 42000:41999 .”. This may be advisable, for clarity reasons, if you have a script that must always revert a particular revision.

    In both examples, note the “.” and the space before it. “.” means the current directory, and is used here as the SOURCE argument to format #3. It’s a separate argument from the revision, so you need the space.

  • All formats apply their changes to the CWD by default. I don’t know what happens if the CWD is not a WC. You can specify a different destination for the changes by specifying a different WCPATH (the last argument in all the formats above).

  • In format #3, the first path that it accepts is a URL or local WC path to the object you want to diff. (Remember my initial statement about svn merge being essentially svn diff | patch -p0.) The second path is a local WC path to the destination for the changes that are observed.

Updated 2007-07-12: Fixed error in traveling back in time (I had the revs backward); added cherry-picking technique.

svn help merge, in RTF

The “svn help merge” text is an invaluable summary of the command’s operation, but it’s plain-text, and therefore somewhat hard to read on a screen. To that end, I created an RTF version and printed it out, and decided to put it up here in case anyone else wants to do the same.

Observations on the Mac Pro

Thursday, October 26th, 2006
  • Wow, this thing is big. So much larger than my Cube.
  • I need a DVI-to-ADC adapter to use my ADC-based monitor. Suck.
  • The Cube effect is yummy.
  • Finally, I get to play all these games and watch all these videos without asking to use mom’s iBook!
  • It’s nice to look at my CPU Usage (not-yet-finished 0.4) and see as many as three cores (did I mention that it’s a quad?) running at 0%.
  • I no longer need hubs. I no longer need the external USB speakers (with headphone jack) nor iMic, freeing up two USB ports (exactly how many my Cube had). So now I can plug my keyboard into the first, my monitor into the second, and my printer into the third. If I still need more ports (e.g. flash memory), I have two on the front.
  • Speaking of which, I no longer need my FireWire repeater either. I can plug my iPod into the front FireWire port.
  • The headphones also plug into the front, but they jut out too far for my comfort. I’ll buy an L connector at Radio Shack to avoid me shearing off the headphone connector in the jack.
  • The drive bay covers slide down, rather than flapping open like a drawbridge. That’s cool.
  • Computer name: “Four-Sided Cheese Grater”. (Did I mention that it’s a quad?)
  • Rosetta works well. ShadowIRC (PPC-only) doesn’t seem any slower on this machine than it did on my Cube.
  • Apps that behaved slowly on my Cube (e.g. QS) are quite fast on this one.
  • OmniWeb actually launches fairly quickly on this machine. Not like Safari, though: half a bounce.
  • I look forward to doing a make -j4 (or maybe more).
  • As Colin points out, I have gone from last to first in terms of Adium committer developer processing power. (UPDATE 05:57: Andreas Monitzer, one of our GSoC students, has a 3 GHz four-core Mac Pro; mine is only 2.66 GHz. Rats.)
  • I now have a much better reason for recompiling my various command-line utilities, as I tend to do whenever moving to a new machine. This time, I’m changing architectures.
  • The Mac Pro is wider than my Cube, making it a better platform for my headphones (each ear pivots, so I can stand it up on them rather than having to hang or lie the headphones somewhere).
  • In the box, there’s a 3″ DVI–DVI cable. One end is a female DVI connector; the other end is a male DVI connector. I see no difference in pinouts; therefore, I am at a loss to explain what this cable is for.
  • There’s no Eject button on the computer; you’re supposed to use the one on the keyboard for that, but I’d rather not unplug my perfectly-good iKey just to get an Eject button. So I’ll just have to add the Eject menu extra to my menu bar.
  • No more convection cooling. ☹
  • Startup time (from *bong* to loginwindow): 18 seconds. This compares to 45 seconds for the Cube. The progress bar goes from 0 to 100% in less than a second.