Archive for the 'Software distribution' Category

How to make me lose all interest in your app and not even want to try it much less buy it

Tuesday, April 26th, 2011

Choose any—or, preferably, none:

  • Make custom buttons, but don’t hire a professional designer to design them. Draw your UI in your pirated copy of Photoshop and make the best buttons you, fellow non-graphically-superpowered programmer, can manage, which look like you downloaded them from GeoCities in 1995 or got them out of a “1001 Buttons!” book from the same year.
  • Make custom UI controls (especially buttons) simply because you can.
  • Fill your App Store page’s “screenshots” section with images that are not purely screenshots. Showing an iPhone 4 with your app on it is a minus. Showing an older iPhone is another minus. Putting in your own inane blather marketing copy with your paint program’s text tool is a minus. Putting the iPhone and/or text on any kind of background is a minus. Any image that does not show the app at all is 500 minuses.
  • Show screenshots, but only of some of the app. Leave me wondering whether your app has the feature or UI pattern I’m looking for. (If your app is free, I’ll try it and find out. If it’s not, I won’t.)
  • Custom backgrounds without (good) custom UI. Extra debit if your background is plain white.
  • Abbr btn nms.

How to keep me actually interested and maybe even get me to buy your app:

  • If you make custom UI, make it awesome. Make a truly original UI that would belong on the cover of Macworld. Make it a custom UI with a purpose that guides and justifies the customizations. (Beware the difference between “purpose” and “theme”.) Otherwise, stick to plain Cocoa Touch controls wherever possible. Functional beats ugly.
  • If you go functional, follow the HIG. Either way, keep things clean and well-organized. Don’t force too much into a single screen. If you “have to” pack multiple things on a line, that’s too much. If you “have to” abbreviate words, that’s too much. Consider cutting features; simplicity is a virtue. If you need to break things out into other views, do it.
  • The screenshots section is for screenshots only. If you need to indicate a gesture, composite in a finger and an arrow, and don’t do that in more than one screenshot. No added text. Ever.

Don’t miss the comments. I’m sure some of you have some other don’ts to suggest that I forgot.

End of the Graveyard

Saturday, December 4th, 2010

The iPhone Application Graveyard is now closed.

I’ve been meaning to do this for months; I’m just now getting around to doing it.

I have a few reasons:

The Graveyard has served its purpose.

The iPhone App Store today is more open and more free than it originally was. The rules are now available to App Store developers, and several apps that Apple previously either rejected or “pocket rejected”, most prominently Google Voice, are now available in the Store.

I don’t know how much of this is attributable to the Graveyard and how much is just Apple having figured these things out, but to whatever extent the Graveyard is responsible, it has done all it can.

The Graveyard can do no more.

Apple’s made very clear that they intend to “curate” the App Store. It will never be a completely free, do-as-thou-wilt market like the Mac market still is, and I have no hope that Apple will ever make the iPhone App Store optional like the Mac App Store will be.

I see no way that the App Stores can ever be more free without losing that curation factor. And it is a factor—I can’t ignore that Apple checking every application probably, hopefully filters out some effluent from the influent stream.

I don’t update it.

I’ve got a dozen different things to do that are more important than updating the Graveyard.

I want to work at Apple.

Cold, hard reality is that I want to work for Apple, and they will not hire a person that has a page on their website decrying their policies. (Don’t get me wrong: I wouldn’t expect them to.) This isn’t the only reason why I’m killing the Graveyard—everything I wrote above is true—but it is one of them.

So, this position is now open.

If you want to keep the Graveyard alive, you can do that by taking it over.

The Graveyard is implemented as a couple of plain-text hand-edited databases and a Python script that converts them to the web page (as a static HTML file) and Atom feed (as a static XML file). This is how the Graveyard stayed up in the face of being Fireballed, Macworlded, etc.

You can keep it that way, or you might turn it into a wiki. I leave the choice to you.

If you want to take over the Graveyard, email me. I’m sure you know my email address by now. I’ll send whoever I think can best run it a zip archive of the data files and Python script.

You may also be interested in the Application Submission Feedback site. I don’t know who runs it, but it’s a great guide to what you can’t do in the App Store.

Audio

Sunday, June 20th, 2010

Matt Legend Gemmell tells you what to do and what not to do when making a product page. One point I felt worth expanding upon:

Either have a professional-sounding voiceover, without pauses and “um”s, with great audio quality, or don’t have a voiceover at all. Superimpose explanatory text titles instead. Be honest with yourself about how your voice sounds. If you’re the typical male engineer, your voice is probably going to be a major turn-off, and you probably can’t do talk-along without pausing, making various noises, and restarting your sentences. Get someone else to do it, or use text.

There’s nothing you can do about the innate quality of your voice, and if that sucks, then “get someone else to do it, or use text” is good advice. (Alternatively, you may be able to train yourself or be trained to speak better, depending on your exact problem. Mine used to be that I didn’t open my mouth enough, so everything sounded like I was talking through clenched teeth.)

But audio quality is something you can improve, and it matters. Care about this stuff; your potential customers do.

  • Buy a microphone. Yes, your laptop has one built-in. It sucks.

    The microphone itself may be all right, but it’s in indirect physical contact with a fan, a hard drive, and other noise-inducing parts. It’s also too far away from you. Good enough for voice chat, but not for recording. Buy a separate microphone and record with that.

  • Practice good microphone technique. Get fairly close to the microphone—about 6 inches/15 cm—and talk straight over it. Talking over it will avoid loud spikes (pops) on the recording from plosive sounds, such as the start and end of the word “pop”.

    You could buy a pop-filter and then talk straight into the microphone (through the filter), but I’m trying to keep your monetary and effort expenses low.

    Also, if you’re soft-spoken, speak up, like you’re talking to someone down the hallway. Don’t yell, but do project.

    And no matter what you do, don’t ever, ever touch the microphone, its stand, or its cord.

  • Set your gain. In simple terms, your input’s gain is how hard the microphone is listening. You want to avoid clipping—that’s where the signal maxes out (0 dB) and would go out of bounds if it could. You want the signal to be high enough for your voice to be clearly audible, while never, ever going high enough to clip.

    You’ll generally do this in the Sound pane of System Preferences, but your recording software may have its own control for this. Sound Studio does.

    The only way to find out the right amount of gain for you (and your microphone) is through experiment. Say something over and over while cranking up the gain, then go into actual recording, and when it clips, dial it back down and start over.

    Note that it is pretty hard to set the gain too low, except when it’s obviously too low, but it is very easy to set it too high. Err on the low side.

  • Edit. There are three components to this.

    • Cut out ums, ers, pauses, etc. You can record as much of that as you want—speak as you naturally do in recording. Then edit out anything between words.

      On a related note, pause for a second or so between sentences, both to breathe in and to make it easy for you to edit in re-takes.

      You may also want to write and print out an outline of the points you want to hit in your voice-over, as a map through the presentation for you to follow. Use OmniOutliner or TaskPaper, or pencil on paper (as long as you can read it easily). Read items between sentences; don’t read while you speak. Don’t write a script unless you can pull script-reading off. An outline (or script) will keep you from rambling and focus your sentences, reducing the number of ums, ers, pauses, and pointless sentences you need to cut out.

    • Remove noise. Amadeus Pro has a great tool for this. Use it.

    • Compress the edited recording. I don’t mean use a codec, I mean compress the levels—bring the quiet bits up so that they aren’t quiet anymore, while keeping the loud bits where they are (without clipping them).

      You should also use AUPeakLimiter (one of the built-in Audio Units), or an equivalent, to crank up the compressed levels to 0 dB. The difference with how you set the gain earlier is that you set the gain to keep your levels under 0 dB, whereas here, you’re amplifying to at 0 dB.

      90% of screencasts are not loud enough. I do not appreciate having to crank up my system volume to hear you. You can fix this.

All of this is not trivial, but it’s not hard, either. Practice will make it easier, and the result—clean audio on your screencast (or podcast)—will be worth it.

System vs. Target in PackageMaker

Saturday, July 25th, 2009

The PackageMaker user guide doesn’t explain the difference between “system” and “target” in PackageMaker’s pop-up of Requirement criteria:

For example, “System OS Version” versus “Target OS Version”.

So now that I’ve figured it out, I’ll fill in the gap for you.

  • System is the volume that the installing user is booted from.
  • Target is the volume that the Requirement is testing. (Your Requirements are applied for each volume.)

So if you want to make your Installer package installable to any bootable volume, make it installable to any volume and add a Requirement for Target OS Version. (Another method you may try is “File Exists on Target: /Library”.)

If, on the other hand, you want to make your Installer package installable to the Home folder, make it installable only to the Home folder and add a Requirement for System OS version.

How you can get this wrong

If you make your package installable to the Home folder but test the Target OS Version, your package is broken: It does not work for those of us who have our Home folder on a non-bootable volume (in my case, separate from two other, bootable volumes). You must use the System OS Version, and hope for the best.

If you make your package installable to any volume but test the System OS Version, your package is broken: The user will be able to install your software to a volume whose version of the OS cannot run it. You must use the Target OS Version.

As far as I know, there’s no way to make a package that does both properly, since the choice of any volume, booted volume only, or Home only is per-package, not per-choice or per-contents.

Dramatic twist ending

The above is good if you’re targeting Leopard. If you still support Tiger, there’s a twist. (Obligatory video link.)

GrowlMail is a good example. As a Mail bundle, it requires a couple of user-default settings to work. That makes installing to /Library pointless, because the settings will only be set for the user who installed it, so it won’t work for any other users on the system.

Leopard allows installing to ~, so that’s easy: I use System OS Version, as I suggested above.

But Tiger’s Installer can’t install to ~. The same Installer package that works on Leopard does not work on Tiger (I even tested with earlier betas—it has never worked in any 1.1.6 beta). I don’t know how nobody noticed this, not even our Tiger testers.

The Installer package for Tiger must target /Library, since I can’t do the proper thing on that OS version, so I must make separate GrowlMail packages for Tiger and Leopard.

  • The Leopard package installs to ~/Library and uses System OS version, as I suggested above.
  • The Tiger package installs to /Library and uses both Target OS Version and System OS Version:
    • If the user is running on 10.5 or later (System OS Version ≥ 10.5.0), the package tells them to use the other package. (The other package has a similar check.)
    • If a destination volume does not have 10.4 or later installed on it (Target OS Version < 10.4.0), the package tells them they can’t install there.

This is what you’ll find in Growl 1.1.6b4 and 1.1.6 final. It’ll go away in 1.2, since we’re dropping Tiger then.

New tool: The Symbolicator

Sunday, April 19th, 2009

The most significant behind-the-scenes change in Growl 1.1.5 is that we now build using the DWARF-with-dSYM debug symbol format.

Now, we distribute a fully-stripped executable for every release—even betas—and we keep the dSYM bundles on hand separately. The idea here is that we can use the dSYM bundles to obtain symbolic information (function name, filename, and line number) for the bare addresses in users’ crash logs.

Unfortunately, there are no good tools for symbolicating Mac OS X crash logs. If this were an iPhone app, we could just drag the crash logs into the Xcode Organizer window, but Xcode doesn’t do this for Mac crash logs.

I tried all the other tools as well, and every one of them had one of two problems:

  1. Didn’t work at all
  2. Needed the dSYM bundle and main bundle to be next to each other on disk

#2 is not a deal-breaker, but it is a hassle.

So I wrote my own symbolication tool.

The Symbolicator is a Python script that:

  1. Reads in a crash log.
  2. Finds the necessary dSYM bundles using Spotlight. (This means that you can put the dSYM bundles anywhere you want, and as long as Spotlight can find them, the Symbolicator will be able to use them.)
  3. Uses dwarfdump to extract the relevant symbol information.
  4. Replaces the address offsets with the symbol information (just like CrashReporter does when it has debug symbols to work with).
  5. Writes the symbolicated log to stdout.

Use it like this:

% symbolicator < unsymbolicated.crash > symbolicated.crash

Or use ThisService to make a service out of it.

If you want to see it in action right now, download Growl 1.1.5b1 and the corresponding dSYM bundles from the Growl beta page. Make Growl crash (killall -TRAP works well), then unpack the bundles and use the Symbolicator on the crash log. (If you unpack the bundles first, CrashReporter will symbolicate the log before you even get to it. Handy, unless you’re trying to test the Symbolicator. ☺)

To make this work on your own app, follow the instructions in the aforementioned ADC article, then make sure you archive the dSYM bundles for every release, including betas. On Growl, I added code to our Release Makefile for this.

Note: If your app is closed-source, you should not put your dSYM bundles on your website, since the debug symbols are arguably trade secrets (information about your source code). Keep them locally, perhaps on a flash-memory drive. Disclaimer: IANAL.

Things your ReadMe must include

Tuesday, May 20th, 2008
  • The name of your application
  • What it does
  • How to configure the application, if necessary (note: does not include installation)
  • Simple overview of how to use the software, once it’s configured (detailed manual should be in the Help menu)
  • How to uninstall the software, if necessary (i.e., if it isn’t an application)
  • FAQ
  • What it costs, if it’s not free
  • How to register it
  • A link to your website (in case a magazine distributes your app on its CD)
  • Contact information for support questions
  • Contact information for sales (registration/pricing/currency) questions

Things that you may want to include, but aren’t necessary

  • Screenshots
  • Troubleshooting information

Things that you shouldn’t include

  • Installation instructions: If it’s a plain app, you don’t need an installer; otherwise, make an Installer .pkg. In either case, you shouldn’t need instructions.

Formats I approve

  • RTF or RTFd
  • HTML or webarchive
  • Plain text

You may also want to provide a trampoline application to open a localized version of your ReadMe (for example, see the ReadMe on the Mac OS X DVD). Bonus points if you create a kit to make these, for the benefit of other developers.

Formats I disapprove

  • Word or OOXML format: Many people don’t have Word, and everything else handles these documents imperfectly. Use RTF instead.
  • OpenOffice format: Many (probably most) people don’t have OpenOffice. Use RTF instead.
  • PDF: Use PDF either for vector graphics (inside your app) or for documents you expect someone to print. If the user is going to have to print your ReadMe, you need an interface overhaul.

As usual, I invite suggestions, rebuttals, and amendments.

UPDATE 2008-05-24: Recommended including contact information, as suggested by ssp.

How to make a custom bundle act as a file

Sunday, October 14th, 2007

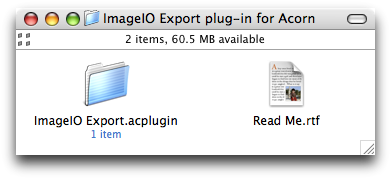
Recently, Gus Mueller had a blog post about a new plug-in for his image editor Acorn. One thing I noticed is that the plug-in is delivered as a folder:

The plug-in is a bundle, but since it shows up in Finder as a folder, users can navigate into it and poke around. It’s unlikely that anything really serious will come of it, but you never know what the average user will wreck when he or she goes exploring in the internals of something.

Fortunately, there are two solutions.

The ad-hoc solution: Turn on the bundle bit

The Mac OS X Xcode Tools include a program called SetFile that, among other things, lets you set the bundle bit on an item:

% SetFile -a B ImageIO\ Export.acplugin

Note that case matters here: If we use an uppercase B, the bit is set; if we use a lowercase b, the bit is cleared.

Those of you who came from the Classic Mac OS may remember that the bundle bit originally indicated that a file contained a ‘BNDL’ resource (which simplified scanning a folder full of applications to see which ones had some icons to display). I doubt Mac OS X uses it for that purpose anymore.

Its new purpose is for directories: Finder will check for the bundle bit, and if it finds it, it will list the directory as a package.

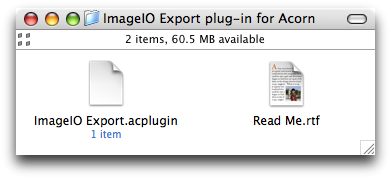
Packages are directories that Finder treats as files (such as .app bundles). That’s exactly what we want. Here’s how the plug-in appears after running the above command:

(Note that to get the change to show in Finder, you have to either quit the Finder—such as by logging out—or use AppleScript. I use a command-line tool I wrote that calls -[NSWorkspace noteFileSystemChanged:] with the path to the changed item.)

The permanent solution: Define all items of this type as packages

In the current version of Acorn, it’s up to Jens Ayton and other plug-in authors to set the bundle bit on their plug-ins. I think a lot of host apps have this problem.

However, a host app can take care of this for all its plug-ins. All it has to do is have a declaration of its plug-in type (in Acorn’s case, that’s .acplugin) in its Info.plist, with LSTypeIsPackage set to true in the declaration.

Then, plug-in authors don’t need to do anything, because all plug-ins of that type will be shown in the Finder as packages, simply because the declaration in the host app’s Info.plist says so. No more setting the bundle bit; in fact, that bit is then ignored.

Appcasts on Google

Thursday, September 27th, 2007

If you publish an appcast, you should also publish a robots.txt file that tells search engines such as Google not index the appcast file. I came to this realization after searching for “appcast editor”: the first four hits, and several of the others, are all just appcasts.

There is no point to having these indexed by Google, so save the bandwidth and help people’s search results—tell the search engines not to index them.

And I never did find an appcast editor. I guess I get to write it by hand in vim. (There’s one in MacCode, but it’s not working yet.)

UPDATE: I knew there was an appcast editor out there! It’s Feeder, by Reinvented Software. Thanks to Andy Kim for pointing it out in the comments.

Mac app checklist in TaskPaper format

Wednesday, August 8th, 2007

TaskPaper is a to-do list app from Hog Bay Software. It’s currently free during its public beta. Its main stand-apart feature is its plain-text document format.

I’ve just created a TaskPaper version of my Mac app checklist, to make it easier for you to follow it for each application you make. You can download it in plain format or stationery format.

UPDATE 18:06 PDT: I just added the Info.plist key names for the check-your-Info.plist item, so if you’re missing those, you should redownload the file(s).

UPDATE 19:48 PDT: I also just added the sub-items of the ReadMe item. Again, if you downloaded it earlier, you should get a fresh copy.

UPDATE 21:54 PDT: Added advice to choose Prevent Editing from TextEdit’s Format menu.

WWDC 2007 session videos are out

Monday, July 30th, 2007

If you attended WWDC, you can head over to ADC on iTunes and see what you missed.

Disk images suck: An examination of why, and of the alternatives

Sunday, May 13th, 2007

Here is a rundown of every file format you can use to distribute your software, along with their advantages and disadvantages. They are listed in ascending order of effectiveness.

In case you’re wondering, 7-zip and StuffIt X are not listed here because nobody has decompressors for them. I wrote this list for the context of software distribution; the days of saying “You will need StuffIt Expander to open this file” are long over.

Disk image

Advantage:

Sandboxes the application: If it won’t work from the disk image, it probably sucks

Disadvantage:

Confuses the average user; they typically run the application from the disk image, then encounter problems when they try to delete the image file or (much later) run a Sparkle update


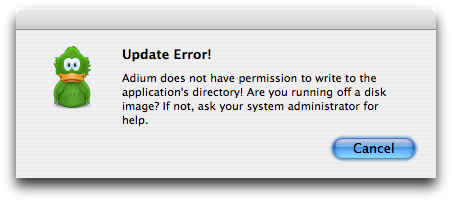
Back in March, an Adium user had a problem trying to perform the Sparkle update. It gave her an error:

“Update Error! Adium does not have permission to write to the application's directory! Are you running off a disk image? If not, ask your system administrator for help.”

This wouldn’t be so bad, except that she didn’t know what a disk image was, so she assumed that she was not running Adium from the disk image (I imagine she thought something like “surely I’d know what that was if I was using one”). She looked up the troubleshooting instructions in the Adium help (good), then critically misunderstood them (bad) with the result that she moved her Adium 2.0 folder out of the Application Support folder. (Don’t ask me to explain it. I don’t know, either.)

All this ultimately resulted from the fact that average users, including her, don’t recognize a disk image when they see it. They don’t expect a file to act as a drive.

The same non-obvious nature results in other problems: specifically, the error message “The operation cannot be completed because ‘SurfWriter-1.0.dmg’ is in use”. This occurs when the user tries to delete the disk image file without unmounting it first. Users who encounter this message end up contacting us (usually asking “how do i uninstall it”). This is only natural, because who would expect that a file is mounted, or that a file can be in use in another file?

It was then that I realized that disk images are not as great for the average user as I had previously believed.

You may be thinking “well, just put a background image with an arrow to an Applications folder”. We did that. It didn’t help this user.

The stories I heard from other developers suggest that people in general zero in on the application they want to use, without paying attention to anything else (e.g., arrows, help text, or symlinks). Besides, the questions I hear from the users via the feedback list suggest that users see the disk image window and think the application is already installed—they aren’t looking for or expecting installation instructions, so your big arrow means nothing to them.

I suspect that installers are partly to blame for that: I don’t know about Windows, but on Mac OS, installers would always open the folder containing the freshly-installed application, so that you could use it right away. I suspect that users mistake the disk image window for a freshly-installed-folder window.

Anyway, one solution to the tunnel-vision problem would be a “DRAG THIS OVER HERE” message in a big font—but that’s no good, because you can’t have localized background images. You’d have to pick one language, and hope that all your users know it, but anybody who doesn’t know the language you chose wouldn’t benefit from your nice obnoxiously big text. (On the other hand, this provides a second reason for unilingual builds: One disk image per language, with both the background and the application localized in that language only. Hmmmm.)

Another solution is a runtime check whether the app is running from the disk image. You’ll have to be careful with wording here, though—you need to be 100% sure that you’re running from a disk image, and write the alert text accordingly. There can be no vacillation like in the Adium alert box (which vacillates because it’s caused by a simple permission failure, not an actual search for the disk image nature); it must be a statement, not a question. And of course, you must tell the user the remedy (copy the app, then run the copy, then eject the disk image file and never mount it again).

One last point: bzip2 compression (-format UDBZ) requires Tiger. Your disk image won’t mount on any earlier version of the operating system; your users will think it’s corrupt, since that’s what the error message suggests, and they’ll contact you with that assumption. This probably doesn’t matter anymore, since the Omni Group’s software-update statistics say that 98.4% of users are on Tiger (as of 2007-05-12), but if you still support users of earlier OS versions, you need to use zlib compression (-format UDZO) instead.

Tarball

Advantages:

Smaller than disk images; unpacks into a folder or bare application

Disadvantage:

Safari mishandles bzip2’d tarballs pretty spectacularly; one must gzip one’s tarballs to avoid that problem, but then one loses out on yummy bzip compression


Safari, for some reason, saves a bzip2’d tarball as “foo.tbz.tar”, even though it is still a tbz. Unpacking it results in a tar archive named “foo.tbz”, followed by the folder that the tar archive exists to hold. So the actual unpacking behavior works as expected, but it badly screws up the filenames.

This all works correctly with tgz, but of course you can’t use gzip and have bzip2 compression.

Zip archive

Advantages:

Unpacks into a folder or bare application; can be created from the Finder

Disadvantage:

Bigger than anything else


Zip archives are the easiest to create, because you can simply right-click on the contents and choose “Create Archive of SurfWriter.app”. Unfortunately, the compression ratio is just not there; I consider zip files obsolete for this reason. You should be optimizing for your users’ download time, not your own compression time.

Internet-enabled disk image

Advantage:

Unpacks into a folder or bare application for the average user (Safari with “Open Safe Files” turned on); perfectly normal for everybody else

Disadvantages:

Won’t work the same way twice (when the user goes to unpack it the second time, it behaves as a perfectly normal disk image, with the attendant confusing UI); hard to create; unpacks slowly


This is the best of both worlds. The average user uses Safari and has “Open Safe Files” turned on; in this case, Safari will unpack the disk image just as if it were a tarball or zip archive. The sort of person who turns “Open Safe Files” off, or uses a different browser, is also the sort of person who can handle a normal disk image, and will indeed be handling it because that’s how the disk image behaves in those cases. The extremely-rare exceptions can be handled by the aforementioned runtime check.

They’re the hardest to create because you need to use a Terminal command (hdiutil internet-enable SurfWriter-1.0.dmg) to set the internet-enabled bit on the image. Dear Lazyweb: Please make a contextual menu item that generates an internet-enabled UDBZ disk image directly from a folder in one step, the same way I can make a zip archive in one step. (Michael Tsai, in a comment, says that his $20 DropDMG utility can do this, with Automator‘s help.)

Another disadvantage is that a disk image, internet-enabled or otherwise, takes much longer to process than a zip archive. I think this is because of the verification step, but the user won’t care. I think people will put up with it for most archives, but if your archive is huge (let’s say over 50 MiB), you may want to switch to a zip or tarball to save time. Of course, you’ll be sacrificing part of your bandwidth bill for that. (Thanks to Sven-S. Porst for bringing this up in another comment.)

Also, the format notes (UDBZ vs UDZO) for disk image above apply to internet-enabled disk images as well. Just in case you were wondering.

I bring this up because, having in mind my objections above to disk images, I released EasyMD5 as a zip archive. I did it this way because EasyMD5 is targeted at Adium users (specifically, those who have problems downloading Adium); experience has proven that I can’t assume that an Adium user will know how to deal with disk images. Everybody knows how to handle zip archives (hello, Chris!), so I made it a zip archive.

I hadn’t yet done the study of file sizes that I did and published yesterday. Now that I have, later today, I’ll replace the zip archive with an internet-enabled disk image.

UPDATE 11:37: Added mentions of Paul Kim’s proposal of a runtime check for the disk image nature, and clarified the Lazyweb request.

UPDATE 20:47: Updated to include comments from Sven-S. Porst and Michael Tsai.

Audio version of ‘Compression and archive formats’

Monday, January 16th, 2006

I made my earlier blog post into a podcast. It’s just under ten minutes long, and in chaptered AAC format. Have a listen.

I used ChapterToolMe to do the chapters. It’s nice.

How to distribute your software

Monday, January 16th, 2006

Recently, I went to Apple’s games site and downloaded a bunch of puzzle/arcade games. I was dismayed to find that many of these games were distributed in formats other than UDIF (the .dmg format). So clearly this matter bears some explanation.

This is the second part of a two-part post. Part 1 came previously; it discussed the difference between compression, archive, and disk-image formats and described the different specific formats in each category. Part 2 covers why you should use a plain dmg (no StuffIt or *zip sprinkles) to distribute your software. This was originally one long post, but I Kill Billed it.


Part 2: How to distribute your software

The sad current state of affairs is that much software is not distributed in a plain dmg. Here’s a brief hall of shame, in increasing order of silliness:

I’m not singling any of these products out (especially for .dmg.gz, .zip, and .sit, as these are absurdly common), nor am I critiquing the quality of the software; these are just examples of how not to distribute your application.


Regarding the last one: StuffIt format? WHY?!?!?! Mac OS X doesn’t even come with StuffIt Expander anymore!

And it’s not even StuffIt X (that would be .sitx); .sit is the older StuffIt 5 format, that doesn’t properly support application packages! Worse: because StuffIt 5 format does not support storage of UNIX permissions, StuffIt Expander relies on a preference setting to know whether to set a file as executable or not. So if you UnStuff an application from a StuffIt 5 archive, it might not even run. Doesn’t that make a great first user impression? And who’s going to suspect that their unarchiver is the cause of the problem?

In fact, it isn’t the cause of the problem at all. If you are still distributing your software in StuffIt format, you are to blame.


Panther added support in the Finder for zipping and unzipping files. Tiger added support in the Finder for gunzipping, bunzip2ing, and untarring files. All of these features are the wrong way to distribute an application.

First off, tarring a dmg is pointless. tar files exist to put multiple files into one file. A dmg is already a single file. There is no need to tar it.

Second, if you created your dmg correctly, it is already compressed (probably with zlib). ‘Correctly’ means making a read-only compressed image, either from a folder or from another (read/write) image. There is no need to compress it further. Be very surprised if the additional savings exceed 20 K. (the .dmg.tar.gz listed above is particularly egregious — hello, Mr. Redundancy Man!)

Third, if somebody on Jaguar (or earlier) downloads your zip file, and you created it using Finder, it will not unpack correctly in StuffIt Expander. Specifically, it will create ugly ‘__MACOSX’ folders. Your application might work (unless you actually did intend to use the resource fork for something, in which case it’s gone then), but littering a user’s system is not a way to build goodwill.

Fourth, the purpose of Finder’s zip support is to allow you to send files to Windows users. Distributing Mac software does not count.

There is only one valid use for zip: getting around stupid web servers that either don’t allow dmgs (*shakes fist at GeoCities*) or that don’t have a proper media type (application/octet-stream) set for it. If you have access to add that media type, do so, and distribute a plain dmg; otherwise, politely badger your admin. And until such time as they fix it, you should include a note on your downloads page acknowledging that having to zip your dmgs is lame.


Lest this article sound completely negative, let me explain the upsides of using UDIF.

The major advantage is that it sandboxes your application. An application shouldn’t install anything outside of its bundle (are you listening, Adobe?). If your application is written correctly, it is self-contained (everything it needs is in the .app bundle — this is what bundles are for) and does not require write access to the volume it is on. If your application can be run without problems from the dmg, then you are doing all right.

The second advantage is that a dmg does not require proprietary software (i.e. StuffIt). This seems to be a bigger advantage than it should be — StuffIt does not come with the OS anymore, and requiring people to download other software in order to use your software at all is not a good way to make them fans of it. Disk Copy/Disk Utility has always come with Mac OS X.

(Before you bring up Growl: Growl isn’t required by most of the applications that use it; it’s just value-added. Those applications that do require Growl are aimed specifically at existing Growl users.)

Third: with a dmg, you can easily embed a license agreement. There is no need for an installer to display it; Disk Copy/Disk Utility will do it for you.


That gives me an idea. Here are a couple of points about installers.

Unless you are installing a framework (that really needs to be installed into a Library directory) or a kernel extension, do not create an installer or an Installer package. There is no point.

The user should be able to try your application without installing it (remember what I said about it being usable from the dmg?). An installer is a barrier to this. You should make it as easy as possible for people to try your app.

Compression and archive formats: A description

Sunday, January 15th, 2006

Recently, I went to Apple’s games site and downloaded a bunch of puzzle/arcade games. I was dismayed to find that many of these games were distributed in formats other than UDIF (the .dmg format). So clearly this matter bears some explanation.

This is going a two-part post. Part 1 follows. Part 2 covers why you should use a plain dmg (no StuffIt or *zip sprinkles) to distribute your software. This was originally one long post, but I Kill Billed it.

UPDATE 2006-01-15: Changed the initials to capital letters (sentence case), so it reads better; changed to smart quotes. Also added mention of Compact Pro and a link to ESR’s article on The Art of UNIX Programming.

UPDATE 2006-02-17: Linkified Compact Pro.


Part 1: A brief history of compression and archiving

First, a couple definitions:

A compression format contains compressed data: data that has been fit into less space than it would without compression. gzip format is a good example of this; a gzip file is nothing but compressed data. It doesn’t even contain a filename — that’s worked out from the name of the gzip file. (for example, if you download Foo.tar.gz, and rename it Bar.tar.gz, and gunzip it, you will get a file named Bar.tar.)

An archive format aggregates one or more files into a single file. USTAR format (the format used by tar and pax; see below) is a good example of this. It isn’t compressed (unless you compress it with gzip, bzip2, or something else), but it is an archive format.


On Mac OS (that is, before Mac OS X), almost all software was distributed in StuffIt format. StuffIt was software developed by Aladdin Systems (now Allume Systems). (Before StuffIt caught on, the Mac market was majorly ruled by Compact Pro. But StuffIt, combined with apathy from the author, defeated it.)

The StuffIt format was both an archive format and a compression format: a StuffIt file was an archive of files whose contents were compressed. StuffIt achieved its greatest popularity with the advent of the internet — Mac OS applications could not be transmitted over networks, because most of their essential parts were in the resource fork, which was omitted when a file was sent to another operating system or copied to another file system. StuffIt, being data-fork only, kept everything intact. (MacBinary was another archive format, developed separately, that served that purpose, but did not offer compression.)

In the interest of being thorough, I should mention that MacBinary and BinHex were also used on top of StuffIt files (.sit.bin and .sit.hqx, respectively). MacBinarying a StuffIt file accomplished exactly nothing: you were wrapping what was already wrapped. BinHex was useful if the file was believed likely to undergo newline conversion (conversion between CR, which indicated a newline on the Apple II and Mac OS; LF, which indicated a newline on UNIX; and CRLF, which indicated a newline on DOS and Windows), but I think such situations were really the minority.

Eventually, Allume completely replaced the old StuffIt formats (there are at least four versions) with StuffIt X. StuffIt X supported much more detail in how the compression was specified, as well as Unicode filenames, 64-bit dates, packages (folders that behave as files, e.g. .app bundles) and stronger encryption. But it never achieved popular usage, for two reasons.

The first reason was simply that StuffIt 6-8 sucked. The larger reason is that OS X has its own facilities for archiving, compressing, and expanding files.


Mac OS had for many years (I used it on a Mac Plus and an SE/30, among other models) an application called Disk Copy. You’d open Disk Copy, then insert a floppy disk (80mm [aka 3.5″] disks were the prevailing medium of the day). Disk Copy would read from the disk, then prompt you to insert a blank disk or cancel. You could do this as many times as you wanted; thus, Disk Copy was a disk-duplication (i.e. copying) program.

In Disk Copy version 4.2 (I think), Apple added the ability to create disk images. A disk image is literally a snapshot of the contents of a disk. Disk Copy was able to both create and apply these disk images.

The idea was that you could make an image of a disk, make a hundred copies, sell them all, then come back with another box of disks and make a hundred more copies. Resumable duplication, in effect, without having to read the disk in each time. It was also possible to distribute disk images (by compressing them and/or sending them over the internet), so that the image could be applied to floppy disks by separate individuals.

Disk Copy also had the ability to ‘mount’ these images. This was the equivalent of putting the disk in, as it would show up on the desktop, but you could have incinerated the original real disk and it would still work — everything was read from the disk image. Once the internet got popular, it was possible to send a disk image to somebody else, and they could make their own floppy disks from the disk image.

Around the time of System 7.5, Apple began distributing SMIs: Self-Mounting Images. Regular disk images were Disk Copy documents, so when you opened one, Disk Copy would launch to take care of it. An SMI had the disk-mounting code in it, so you didn’t need Disk Copy anymore. I think Disk Copy was made a custom-install option at this point.

Disk Copy 6 introduced a new format called NDIF (New Disk Image Format), which came in several variants: a read/write format, a read-only uncompressed format, and two read-only compressed formats (one using an unknown codec, and the other using a proprietary Apple codec named KenCode).


Independently of all of this, UNIX in all its flavours (and later GNU operating systems as well) had a program called tar. tar is a tape archive program, designed for recording and playing back backup tapes.

At some point, tar gained the ability to make tape-archive files (now colloquially known as tarballs). This is the -f part of tar -cf. Tarballs, in this way, are analogous to disk images. The tar format was eventually standardised as USTAR.

The UNIX philosophy of software design is ‘do one thing well’. So the tar format (and its companion application, in all its various separate implementations) never gained any sort of compression. Instead, various compression programs are used in series upon the tar data. The original way to do this was tar -cf - | compress > foo.tar.Z.

Eventually, gzip replaced compress, and not long after, GNU tar introduced a -z option that made tar do the pipeline into gzip for you. Thus were compression and archiving merged in the UNIX world.


With Mac OS X, Disk Copy came back, and SMIs went away, and a new disk image format was introduced: UDIF. Like StuffIt X, UDIF was created to handle all the new and improved metadata supported by HFS+ — most conspicuously, Unicode filenames — as well as strong (AES-128) encryption. The old disk images had a filename extension of .img; this, unfortunately, was quite a common extension (used by at least one other imager and at least one picture format), so UDIF was given the filename extension of .dmg.

UDIF is a very flexible format. It comes in many variants. As of Mac OS X 10.4.3, these include:

  • Read-only, uncompressed
  • Read/write, uncompressed
  • Read-only, ADC compression (another Apple codec)
  • Read-only, zlib compression
  • Read-only, bzip2 compression
  • Entire device (?)
  • UDIF stub (?)
  • DVD/CD master
  • Sparse

(These were also taken from the manpage for hdiutil.)


Numerous other formats have existed for many years — specifically zip (on Windows) and gzip and bzip2 (on UNIX and Linux) — and StuffIt Expander has supported all of them since 3.0 (bzip2 since maybe 5).

But in OS X, StuffIt Expander (which came with the OS until Tiger) showed its age. Versions 6-8 were slow and ugly. This got better with version 9, but by that time, StuffIt Expander lost to the alternative that also came with the OS: Disk Copy (which merged with Disk First Aid and Drive Setup to form Disk Utility in Jaguar).

For several years, most software for Mac OS X was distributed in the form of a zlib-compressed dmg.

But now things have deteriorated.