My 3D printing setup
Here’s what I have today:
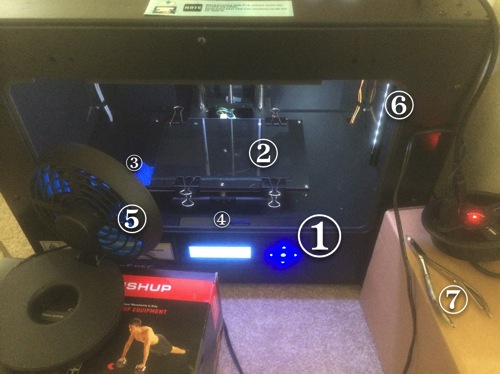
Hardware
-
The 3D printer is a PowerSpec 3D Pro from Micro Center. I believe it’s a rebrand of the FlashForge Creator Pro. For $800 (that was on Black Friday sale; it’s normally a kilobuck), you get a decent printer with two extruders and a heated bed. It fared average in Make magazine’s 2014 comparison, and I agreed with their assessment on the whole.
So far, I’ve only printed PLA, and I’m happy with that. I have no reason at present to switch to ABS.
-
The glass plate is from a dollar store picture frame. I had a choice between 5×7″ (smaller than the build platform) and 8×10″ (larger); I went smaller, which worked out well. A simple 1 mm shim was all I needed to adjust the platform height to offset the thickness of the plate.
The printer comes with Kapton tape applied to the print bed, and I have a roll of it from which I’ve replaced the tape once, but now that I’m printing on glass, I don’t think I’ll go back to Kapton. I may change my mind if I start printing ABS.
-
This is blue painter’s tape, on a corner of the print bed. Overrated, in my experience, but its terribleness at PLA adhesion is what makes it great for this specific purpose: prints I export with Simplify3D (more on that below) start with a glob of plastic in this corner, and having that land on painter’s tape makes it easy to remove whenever I want.
-
The SD card came with the printer. I’ve never connected the printer to my computer; I always run it autonomously, using the controls on the front.
-
I turn on this USB fan (Walgreens seasonal item) after a print to cool off the print and print bed. Once they’ve cooled enough, the part stops sticking to the glass and I can just pick it up—no pulling or prying required. This is the major advantage of glass.
-
Hanging down into the printer is a wonderful little USB gooseneck strip light. The printer has its own lighting, but it’s top down, so the area under the extruders is in shadow. Lighting from the side gives me a better view of the print action.
-
The cuticle nipper is among the tools I use to refine finished prints. They’re great for clipping off tiny burrs on edges and corners. I also have a nail file (they come in four-packs at the dollar store, and I don’t need that many nail files for my hands) that I use for similar purposes, including cleaning up where the cuticle nipper left off. Filing/sanding is one area where I feel my toolset is incomplete.
Not shown:
- Two rolls of PLA. On the spindles are one “clear” (more like translucent) and one white. The white currently isn’t even loaded into the printer; I could swap in another spool at any time.
- Other rolls of PLA. I have more white, some “natural” that I suspect may be equivalent to the “clear”, at least one spool of black, and half a kg of red (I want to make a pommel for Ikea’s red wind-up flashlight, and I want the colors to match).
- A roll of PVA. I haven’t used it yet, but its use in 3D printing is as a support material in PLA parts. You can use PVA to support bridges and overhangs, then dunk the part in water to dissolve the PLA away.
- The remaining Kapton tape.
- Two spatulas. One is just a normal metal spatula from Daiso. The other is an extra-wide “fish” spatula from Target’s summer section, bought on clearance after summer ended. I’ve only used that a couple of times, and I basically haven’t touched either since switching from Kapton to glass.
- Long cross tweezers, for extracting the odd bit of scrap plastic from the printer while the part is printing, or from the hot end while it’s still hot.
- 15 cm ruler, and a digital caliper from Harbor Freight
- Duster, for sweeping dust and bits of plastic off the print bed.
- The USB charger that the USB hub is plugged into. (The fan and strip light are both plugged into the hub.) The charger is the one that came with the fan.
Several of the things I’m making are meant to be stuck to a magnetic whiteboard, so I’ve got stuff for that:
- Magnets, obviously. I have strong permanent magnets—strong enough that the protective packaging is more protecting everyone and everything outside the package than protecting the magnets. A millimeter of plastic and a layer of silicone is enough distance to water them down to fridge-magnet pull.
- Super Glue, of the brush-on type.
- Disposable gloves, for handling the glue (“WARNING: BONDS SKIN INSTANTLY”) safely.
- GE “100% silicone”, for added grip. (I’ve had mixed success with this so far. I may need to lay it on thicker than I’ve been doing.)
- Plastic putty knives for applying the silicone to the parts.
- Metal putty knives for removing the silicone from the plastic putty knives.
Software I use
I use OpenSCAD to design models—programmers will love it—and Simplify3D to slice and export the model for the printer. (Simplify3D exports G-Code; for a printer like mine, you’ll need GPX to convert it to an x3g file.)
UPDATE 2016-09-09: The version of Simplify3D I have now successfully exports x3g files on its own.
OpenSCAD is different from most 3D modeling software: It’s text-based. You describe your model in code, mainly using shape primitives and set operations (intersection, difference, and union), and then hit render to see what it looks like. When you’re done iterating, you do a final (longer-running) render, then export STL.
Simplify3D is a $140 slicing and printer control program. It’s both the best one out currently and ugly in a lot of places (especially the installer, which is a Windows-style “setup wizard”). It offers you a lot of control, which is both a blessing and a curse—but it means I can do certain things that I want that MakerWare wouldn’t let me, like crank the printer’s base print speed up to 125 mm/s (the default is 90).
So I write a model in OpenSCAD, export it to STL, bring that STL file into Simplify3D, export G-Code, and use gpx to convert the G-Code to x3g. I then put that x3g file onto the SD card to put into the printer.
Software I’ve tried and abandoned, or not tried at all
I’ve tried Cheetah3D, 123D Design, and Inventor Fusion. I found them all limiting in various ways; I frequently run into “I know what I want but either don’t have a tool that does that or the tool doesn’t want to let me do that” situations. OpenSCAD is bare-bones, but expressive.
I have not tried the successor to Inventor Fusion (which requires an internet connection, which makes no fucking sense for 3D modeling software), nor have I tried Blender.
I originally used MakerWare, and it was OK, but I find it hard to give up some of S3D’s more advanced features, like the speed control. I did have to export one part from MakerWare because Simplify3D seemed not to notice a long, very thin cylinder that was part of the model—but that’s the only problem I’ve had with S3D so far.
I’ll likely go back to MakerWare, at least initially, when I do my first dual-material (PLA+PVA) print. Simplify3D’s UI does not give me lots of confidence that it will handle that correctly without my needing to explain it some things.
I have tried Slic3r. Here’s a picture of me using it:

I haven’t tried the newer “MakerBot Desktop” (successor to MakerWare), nor ReplicatorG, nor any of the other, older slicers.
I really want someone to come out with the iWork of slicers. Or modelers, but I’m happy enough with OpenSCAD that I’m likely not to want to put in the time to learn another GUI modeler, unless it’s a graphical editor for OpenSCAD files. But a truly nice slicer, with Simplify3D’s capabilities but much more refined and easy-to-use UI, would be great.